


Beast of Reincarnation gives Emma and Koo separate skill trees. Start by choosing one attack, an escape option, and Koo support that suits the way you play. The routes below are early-game suggestions, not a requirement to unlock every listed skill in a fixed order.
For most players, the best early order is Helm Splitter, Iaido, and Roll for Emma, followed by Taunt, Healing Energy, Status Effect Amp, and one elemental mod for Koo. Choose either Shocking Vigor or Magmatic Mantle first. You do not need both immediately.
Best Skills to Unlock First: Quick Order
- Emma priority 1 — Helm Splitter: A direct offensive upgrade shown in the official combat overview. It gives early SP an immediate purpose instead of spreading points across several branches.
- Emma priority 2 — Iaido: A strong second sword-focused choice highlighted in IGN’s launch guide. It fits players who want Emma to do more of the work during openings.
- Emma priority 3 — Roll: The practical survival pick. Take it early if positioning and crowded fights are causing more trouble than damage output.
- Koo priority 1 — Taunt: Start with a control option before chasing several damage modifiers.
- Koo priority 2 — Mod: Healing Energy: The safer choice for a first run because it supports recovery while you are still learning parry timing.
- Koo priority 3 — Mod: Status Effect Amp: Move this higher if your favorite Bloom Arts and gear already lean heavily into status effects.
- Koo priority 4 — Mod: Shocking Vigor or Magmatic Mantle: Pick the one that supports your current setup. Unlocking both at once delays upgrades that help in every fight.
These priorities follow the skills highlighted in IGN’s launch-day video, but the order below adds a simple decision rule: survival first if you are still learning, direct damage first if your parries are reliable, and status amplification only when the rest of the build can use it.
How Skill Progression Works
Emma and Koo grow in different ways, even though they fight as one team. Emma earns SP during the adventure and spends it in her skill tree. The official combat overview shows those points opening new techniques and broader follow-up attacks. Helm Splitter is the named example shown after a skill-tree upgrade.
Koo’s most important combat abilities are Bloom Arts. New Bloom Arts awaken after Emma defeats major Nushi bosses and absorbs their power. That means some of Koo’s options are tied to story progress, while Emma’s early choices are more directly controlled by where you spend SP.
Both trees contain abilities that can be enhanced as well as unlocked. Focus on tools you use regularly before buying unrelated nodes. The September update added more SP-yielding Blighted Sprouts, so launch impressions about the total points available should not be treated as a fixed limit for the updated game.
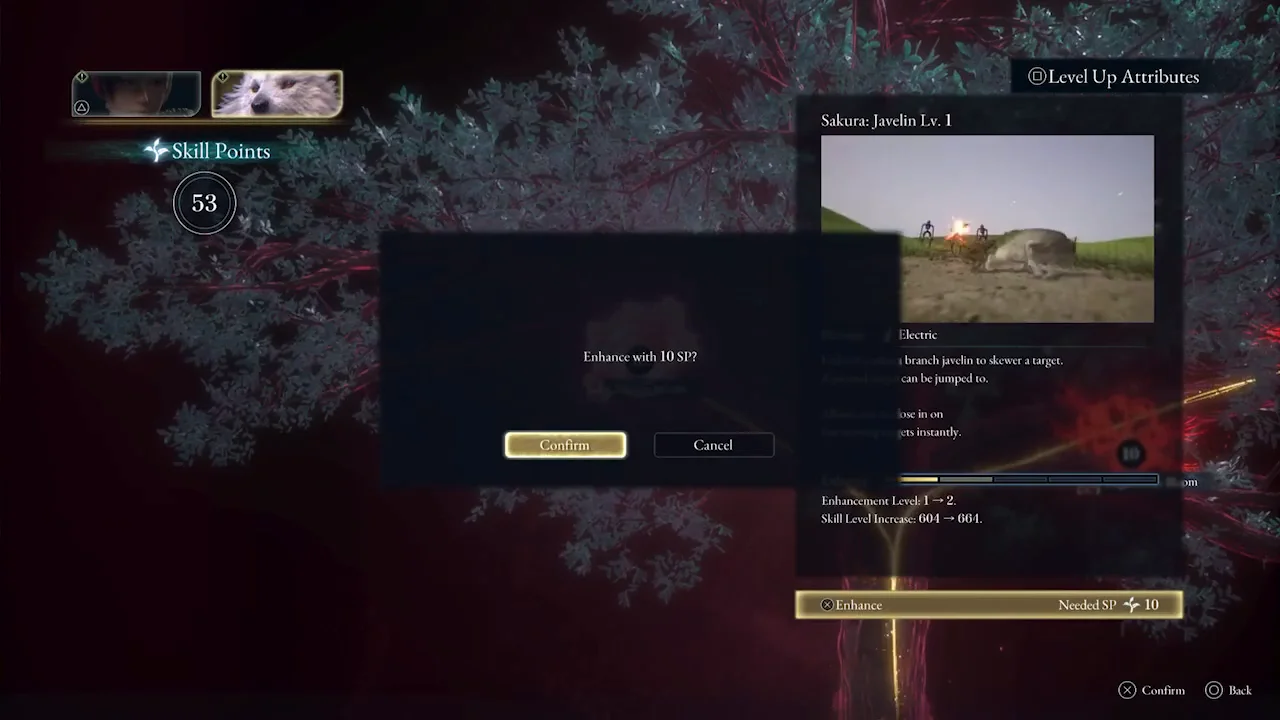
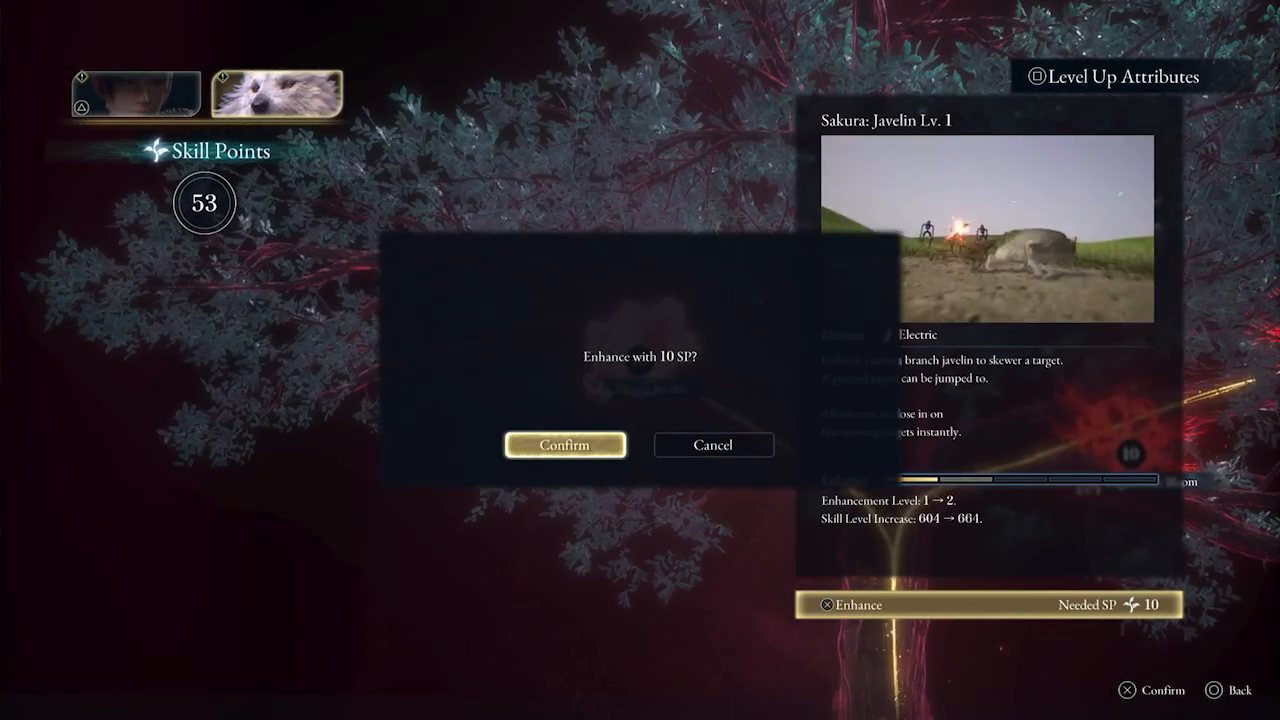
Open the skill-menu screenshot at full size.
Before confirming an enhancement, check the selected character portrait, skill name, current and next level, and SP cost. In this example Koo is selected, 53 SP are available, and Sakura: Javelin is being enhanced from level 1 to 2 for 10 SP. Those values belong to this screenshot, not every skill.
Resetting Skills After the September Update
Patch v1.0.11/v1.009.000, dated September 8, enables resetting skills tied to flower nodes. Update the game before relying on that option. The notes do not give a reset price or button sequence, so check the current confirmation screen rather than assuming the action is free.
The same patch adjusts Blade Arts, Finishers, Nushi Skills, and ranged weapons. Use the recommendations here as starting routes, then compare the updated in-game effects with your equipment. This guide does not claim that the launch ordering has been benchmarked again on the September build.
Best Emma Skills to Unlock First
1. Helm Splitter
Helm Splitter is the clearest first offensive goal. Game Freak’s official combat video uses it to demonstrate how Emma turns earned SP into a new finishing option. That makes it a safer recommendation than an upgrade whose value depends on a very specific weapon or late-game combination.
Choose Helm Splitter early if you can already create openings with parries and Koo’s Bloom Arts. It gives those openings a stronger payoff and keeps the build centered on a loop you use throughout the game: parry, build FP, call Koo, then send Emma in.
Do not expect one skill to replace the basics. Helm Splitter feels better when you are already watching the Down Gauge and using finishers at the right moment. If you are taking constant damage before an opening appears, Roll may help more first.
2. Iaido
Iaido is the next Emma skill highlighted by IGN for the early game. Treat it as the second part of a sword-focused route, not as a reason to ignore defense. It makes the most sense when you enjoy deliberate timing and want more options during the short windows created by a stagger, bind, or clean parry.
Players who are still testing different weapons can wait before investing heavily beyond the first useful unlock. Read the current in-game tooltip and compare it with your equipped katana, Spirit Stones, and most-used follow-ups. Launch patches can change exact values, but the role of the choice remains the same: improve Emma’s active sword pressure without buying unrelated branches.
3. Roll
Roll is the least flashy recommendation and often the one that saves the most failed attempts. Beast of Reincarnation rewards parrying, but not every attack needs to be challenged. A reliable repositioning option helps when several enemies crowd the camera, an area attack covers the ground, or you need space to open Koo’s menu.
Move Roll above Iaido if you are losing health while surrounded or missing unfamiliar boss timings. Keep it third if defense already feels comfortable and fights are taking too long. The best first build fixes the problem you actually have, not the one with the biggest damage number.
Best Koo Skills and Mods to Unlock First
1. Taunt
IGN places Taunt first among its early Koo recommendations. Its value is control: it gives the Koo side of the build a job beyond adding another damage effect. That is useful while learning how enemies move and when Emma can safely commit to a longer attack.
Use Taunt as the foundation of a safer setup, then decide whether the next slot should improve healing or status pressure. If solo fights already feel controlled, you can move to a damage-oriented mod sooner.
2. Mod: Healing Energy
Healing Energy is the best follow-up for a first run focused on consistency. Early progress is limited more often by mistakes than by a lack of theoretical damage. A recovery-focused mod gives the build room to survive while you learn a new Nushi pattern or work on parry timing.
It also fits the game’s wider survival loop. Food keeps natural healing available while the hunger gauge has energy, and a healing-oriented Koo setup adds another layer of protection. Players who rarely need that support can delay it, but it is the most forgiving default.
3. Mod: Status Effect Amp
Status Effect Amp becomes valuable when the rest of the loadout already creates status effects reliably. Koo can use Bloom Arts to exploit weaknesses, bind enemies, or pressure them with status conditions, so amplification works best as part of a plan rather than an isolated purchase.
Do not buy it simply because it sounds universal. Check which Bloom Arts, Charms, weapons, and Spirit Stones you are actually using. If few of them interact with status effects, Healing Energy or a direct elemental mod will give clearer value.
4. Mod: Shocking Vigor or Magmatic Mantle
IGN treats Shocking Vigor and Magmatic Mantle as an either-or early choice. Follow that logic. Pick the mod that matches your current elemental setup, then spend the next points improving the route instead of opening a second element immediately.
Shocking Vigor belongs in a shock-focused setup; Magmatic Mantle belongs in a fire-focused one. The exact bonuses shown by the current game build should decide the final choice. What matters early is commitment: one working elemental package is better than two unfinished ones.

Three Good Early Build Routes
Safe First-Run Build
- Emma: Roll, then Helm Splitter.
- Koo: Taunt, then Healing Energy.
- Next step: Add Iaido when defense feels stable.
This route gives you more room to make mistakes. It is the best option if the camera, groups, or boss timing are still overwhelming.
Parry and Sword Damage Build
- Emma: Helm Splitter, then Iaido.
- Koo: Taunt or the elemental mod that fits your strongest Bloom Arts.
- Next step: Take Roll before entering later areas with more crowded encounters.
Choose this route if parries are already producing FP consistently. It converts successful defense into stronger Emma attacks instead of spending the first points on extra safety.
Status and Koo Build
- Emma: Roll or Helm Splitter, depending on survival.
- Koo: Status Effect Amp, then Shocking Vigor or Magmatic Mantle.
- Next step: Add Taunt when you need more control over groups.
This route takes longer to come together because its value depends on compatible Bloom Arts and gear. It becomes stronger once you can reliably apply the effects being amplified.
Why Parrying Changes Your Skill Order
Emma’s parries fill the FP gauge that powers Koo’s Bloom Arts. If you rarely parry, Koo’s strongest tools enter the fight less often. In that situation, spending every early upgrade on Koo can leave you with a build that looks powerful on the menu but does not receive enough FP in practice.
When parrying is difficult, take Roll and a reliable Emma attack first. Practice against enemies with readable swings, and use Story difficulty if the timing window is stopping you from learning the rest of the system. Once FP arrives consistently, Koo’s control, healing, and status upgrades become much more valuable.
Opening the Bloom Art command menu slows the action. Use that slower selection window to check enemy position, health, and the Down Gauge before choosing a skill. Koo is not a separate cooldown bar; his abilities are the tactical half of Emma’s real-time combat.
For a full explanation of parries, hunger, cooking, rapport, and exploration, read our Beast of Reincarnation beginner guide.
What Not to Spend Points on First
- Every cheap node: Low prices do not make unrelated upgrades part of one useful build.
- Both elemental routes: Finish one working shock or fire setup before opening the other.
- Status amplification without status tools: The mod needs compatible Bloom Arts and gear to earn its place.
- Only damage: Roll, Taunt, or Healing Energy can prevent more lost attempts than a small damage increase.
- A late-game plan copied too early: Your available Bloom Arts change after Nushi victories, so reassess the build when Koo gains a new option.
Spend points on an upgrade that solves a current problem, or save toward a specific nearby unlock. Do not hoard everything because an older guide implies every choice is permanent: the September update expanded skill-reset support.
When to Change Your Priorities
Recheck the build after each major Nushi boss. New Bloom Arts can change which elemental or status mod makes sense, and a new combat problem may be more important than the next upgrade in your original plan.
Change direction when one of these things happens:
- A new Bloom Art becomes the center of your rotation.
- Your gear strongly rewards shock, fire, ranged attacks, or another specific action.
- You stop needing Healing Energy and want more pressure.
- Crowded battles become harder than single targets.
- Emma has damage but cannot stay in position long enough to use it.
The broader Beast of Reincarnation release hub covers platforms, Game Pass, story, and the combat system. You can also see how critics responded to the full game in our Beast of Reincarnation review roundup.
FAQ
What is the best first Emma skill?
Helm Splitter is the best general first offensive target. Choose Roll first instead if survival and positioning are the main reasons you are losing fights.
What are the best early Koo upgrades?
Taunt and Healing Energy form the safest starting pair. Status Effect Amp and either Shocking Vigor or Magmatic Mantle are better once your Bloom Arts and gear support a clear status or elemental plan.
Can you change your skill choices?
Patch v1.0.11/v1.009.000 enables resetting skills tied to flower nodes. Check your installed version and the in-game reset screen before changing your build; the patch notes do not specify the cost or exact menu steps.
How does Koo unlock new Bloom Arts?
Defeating major Nushi bosses awakens new Bloom Arts for Koo. Emma learns new techniques by spending SP in her skill tree.
Should I choose Shocking Vigor or Magmatic Mantle?
Choose the mod that matches the elemental effects already used by your Bloom Arts and equipment. Do not spend early points on both unless the rest of the build can support both routes.
Final Recommendation
Start with Helm Splitter, add Iaido when you want more sword pressure, and take Roll as soon as survival becomes the bigger problem. For Koo, begin with Taunt and Healing Energy, then move into Status Effect Amp and one elemental mod after your Bloom Arts and gear point toward a clear build.
That order gives Emma a dependable core and lets Koo grow around the way you actually play. It also leaves room to adjust after each Nushi unlock instead of spending the first hours trying to build every branch at once.