Pixel Twelve
Super Mario Odyssey Beginner Guide: Cappy, Your First Power Moon and Assist Mode

How To

Super Mario Odyssey Beginner Guide: Cappy, Your First Power Moon and Assist Mode

A visual Super Mario Odyssey first-hour guide with the standard controls, Cappy captures, the first Cascade Kingdom Power Moon, Assist Mode and the difference between moons and coins.

By Emma ReedGame: Super Mario OdysseyVerified Sep 25, 2026
Guide Type
How To
Last Verified
Sep 25, 2026

Guide details

Overview

A visual Super Mario Odyssey first-hour guide with the standard controls, Cappy captures, the first Cascade Kingdom Power Moon, Assist Mode and the difference between moons and coins.

What are you trying to do?

Your goal is to collect Power Moons. They are crescent-shaped rewards hidden around each kingdom. They give energy to the Odyssey, the hat-shaped airship that carries Mario and Cappy to the next place. You can follow the story and pick up moons along the way; you do not have to empty every kingdom before moving on.

Bowser has taken Princess Peach, so Mario follows him through several kingdoms. The first area, Cap Kingdom, is a short introduction to moving and throwing Cappy. The first Power Moon you are expected to find is in the next area, Cascade Kingdom. If you are still in Cap Kingdom and cannot see a Moon, you have not missed the first one.
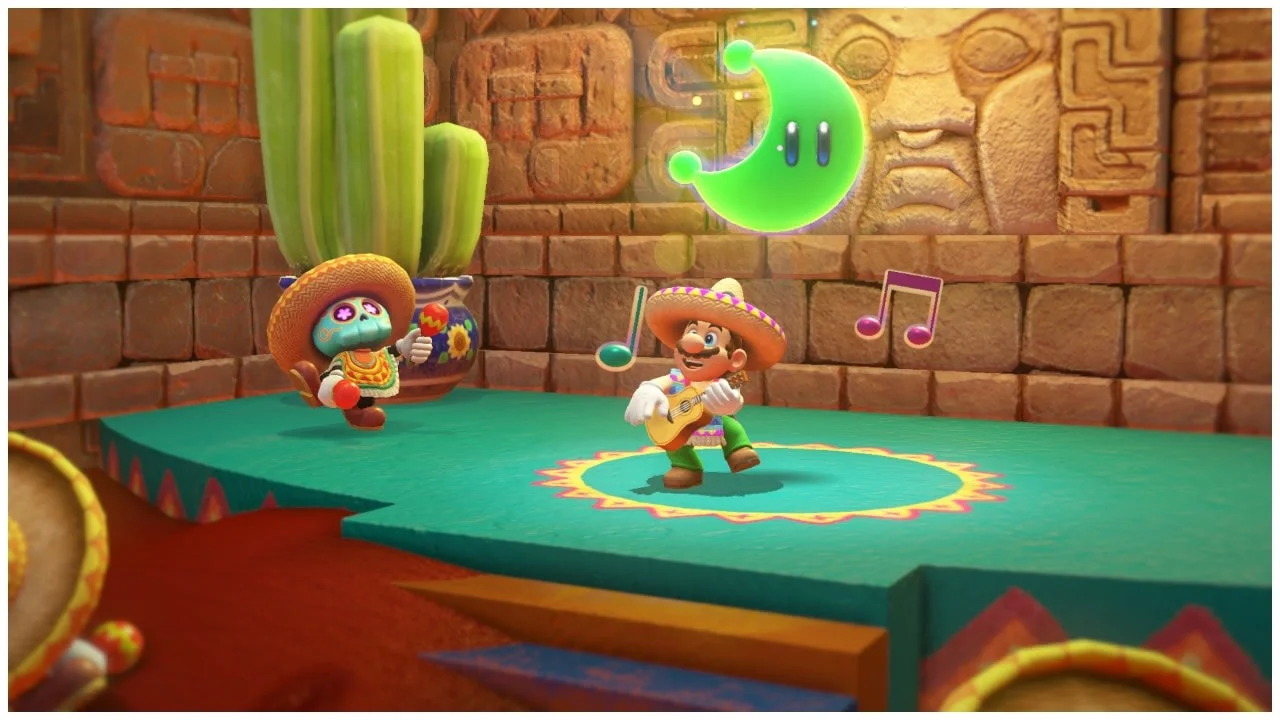
Mario stands on a desert platform with a glowing crescent-shaped Power Moon floating in the air.
The crescent floating above the platform is a Power Moon. It is much larger than an ordinary coin.

1. Get comfortable with four controls

These controls describe the standard one-player layout using a pair of Joy-Con or a Pro Controller. A single sideways Joy-Con is for the two-player setup and has a different button layout. On screen, first find Mario in the middle of the scene and move him a few steps on safe ground before heading toward an edge.

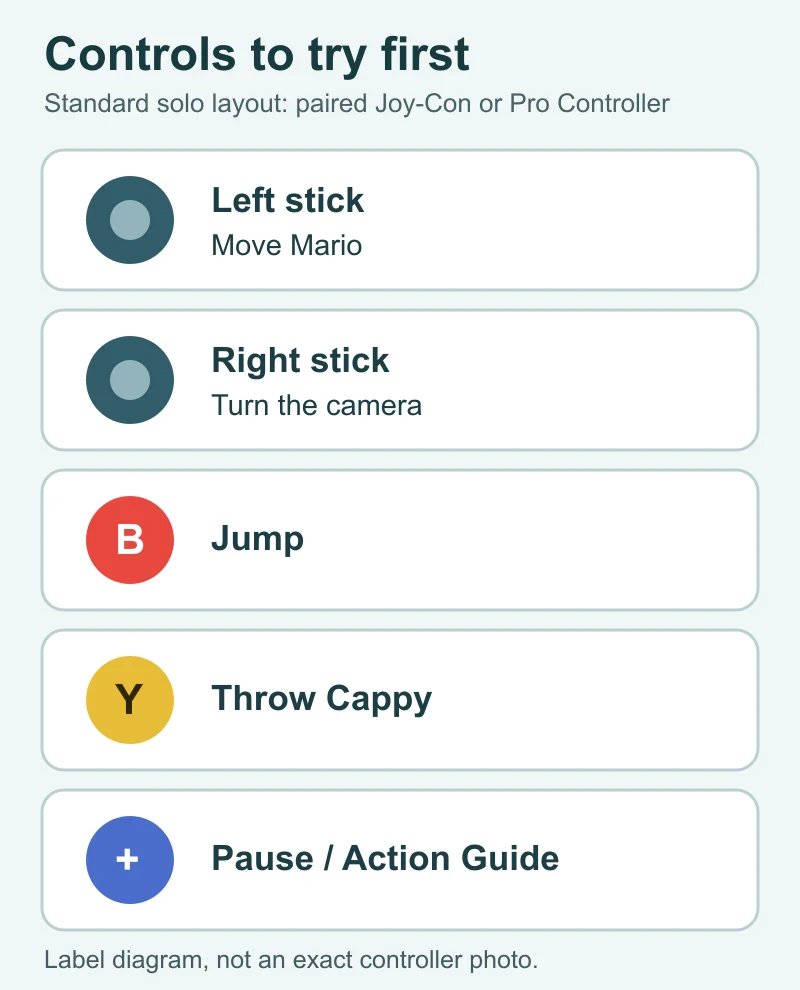
  1. Move the left stick to walk. Move the right stick to turn the camera until you can see the path ahead. If Mario walks toward the screen instead of the route you wanted, stop and turn the camera before trying again. That is often easier than fighting a confusing view.
  2. Press B to jump. Try it on level ground and watch Mario leave the floor and land. Press Y to throw Cappy, Mario’s cap with eyes. He flies out and comes back. Do not worry about fancy jumping tricks yet: move, jump and throw are enough for the opening areas.
Original Pixel Twelve button label diagram showing left stick for moving, right stick for camera, B for jumping, Y for throwing Cappy and Plus for the pause menu.
These are the five controls to test on safe ground. This is a label diagram, not a photo of an exact Nintendo controller.
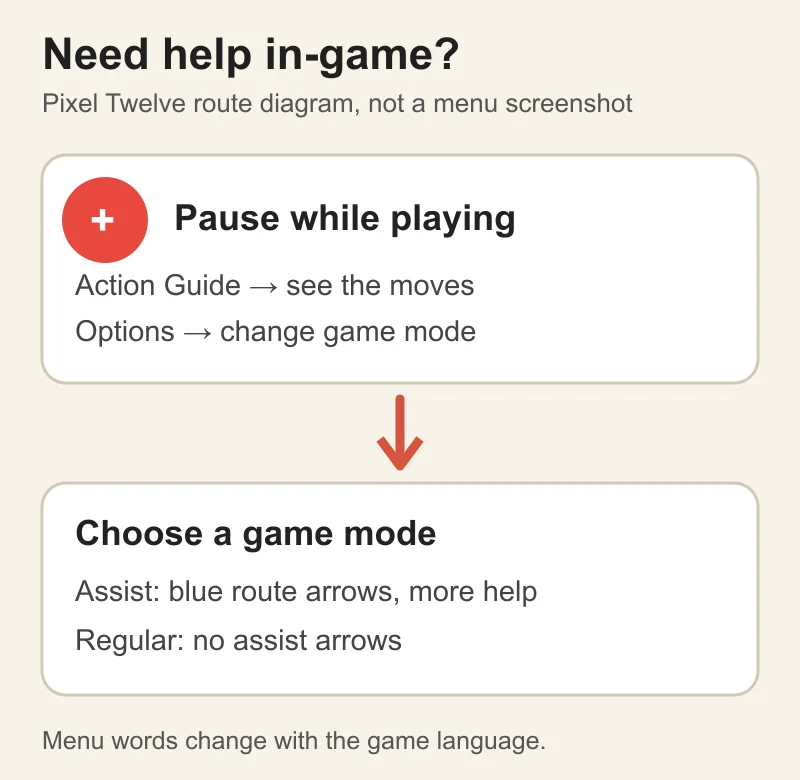
  1. Press + to pause. Look for Action Guide in the pause menu if you want the game to show its moves. Look for Options if you want to change a setting. The diagram below shows the route and labels; it is not a fake screenshot of the menu.
Original Pixel Twelve route diagram showing the Plus pause button, Action Guide, Options and Assist Mode labels.
Pause with +. Action Guide explains moves; Options is where you can change the game mode. Labels may be translated if your game language is not English.

If a button seems wrong: open the in-game Action Guide and check the controller picture for your setup. Do this before trying a long button sequence from a video. A two-player controller layout is different from solo play.

2. Turn on Assist Mode if the 3D space feels confusing

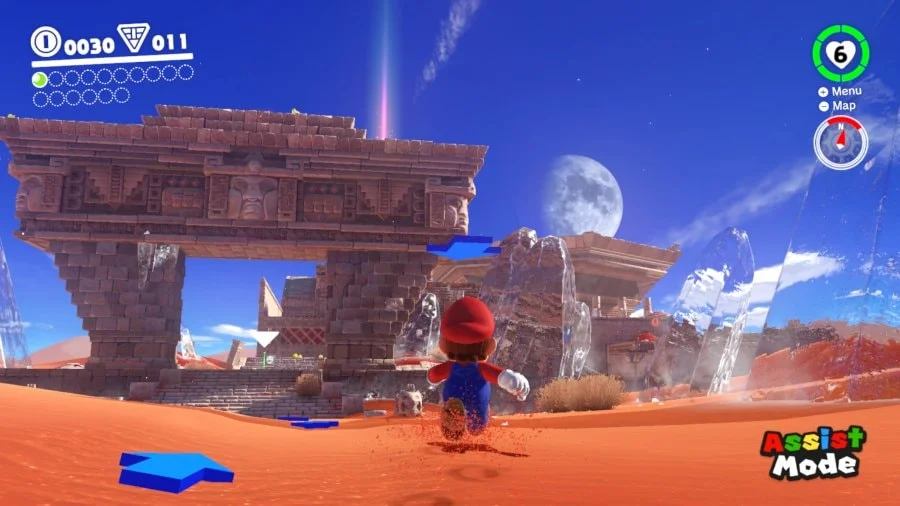
Official gameplay screenshot with a blue arrow on the ground pointing toward the next destination and an Assist Mode label at lower right.
In Assist Mode, look for the blue route arrow on the ground and the Assist Mode mark at the lower-right corner.
  1. At the start of a new game, choose Assist Mode if you want extra help. If you already started, press + while playing, enter Options, then choose the game-mode setting and select Assist Mode. The exact wording may change with the game language, but the choice is between Regular and Assist.
  2. Follow the blue arrows toward the next story goal. They are a route hint, not a requirement to ignore everything else. You can still stop to collect coins, speak to characters and look around. When you have the moons needed to leave a kingdom, those guidance arrows may no longer point through that completed objective.

Nintendo says Assist Mode gives Mario more health, lets him recover health by standing still and returns him near the path after a fall at the cost of some health. You can switch back later, so using it while you learn does not mean starting the adventure again. If the arrow disappears, pause to check the mode before assuming you broke the game.

3. Learn what a “capture” looks like

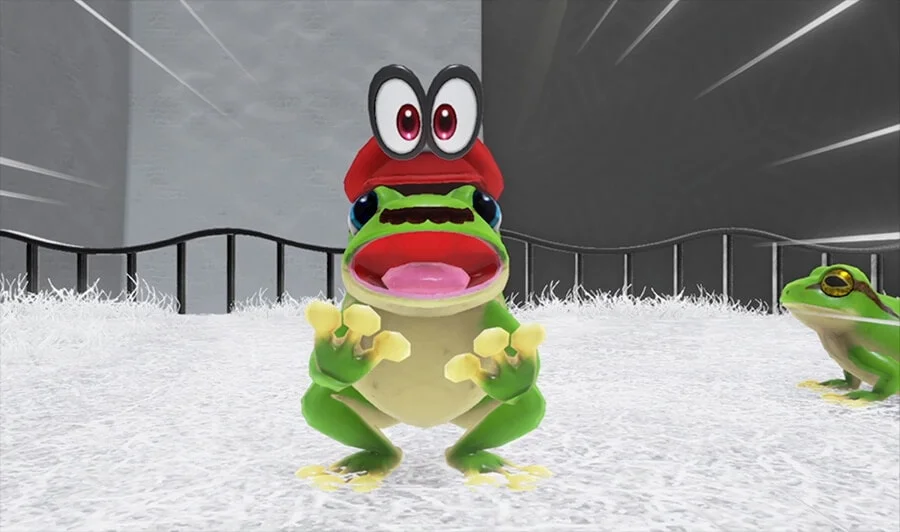
A frog in a snowy area wears Mario’s red cap, and Cappy’s eyes appear on top of it.
Cappy’s eyes on the creature are the clearest sign that your throw turned into a capture.
  1. Look for a creature or object that Cappy can land on. In Cap Kingdom, the first safe example is a frog near the route through Top-Hat Tower. Face it, press Y to throw Cappy and watch the result. If the view switches to the creature and Mario’s cap appears on it, you now control the capture.
  2. Try moving and jumping while inside the frog. A frog jumps higher than Mario, so use it where a wall or ledge looks too tall for Mario’s normal jump. Follow the platform shapes ahead rather than leaping into empty space. When you are done, use ZL or ZR to leave the capture; the game’s Action Guide also shows the action for your controller.

Not everything can be captured. If Cappy simply hits something and returns, it may be an object to knock aside, a creature that needs another approach, or something that cannot be captured. Look for the cap-and-eyes result instead of repeatedly throwing at every decoration.

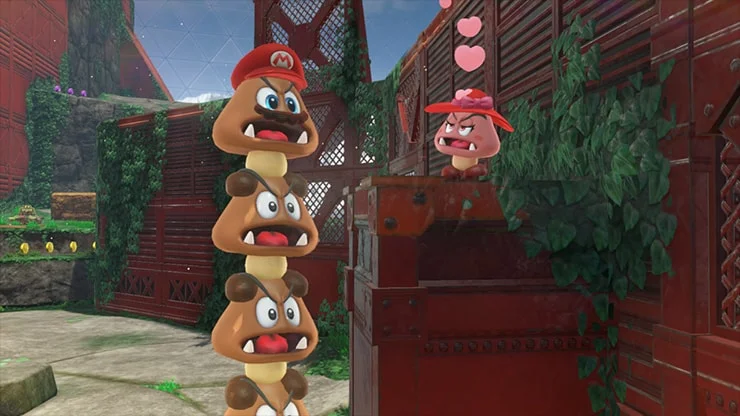
A stack of Goombas in a stone area wear Mario’s red cap with Cappy’s eyes.
The same cap-and-eyes clue appears on other captures, including these Goombas.

4. Find your first Power Moon in Cascade Kingdom

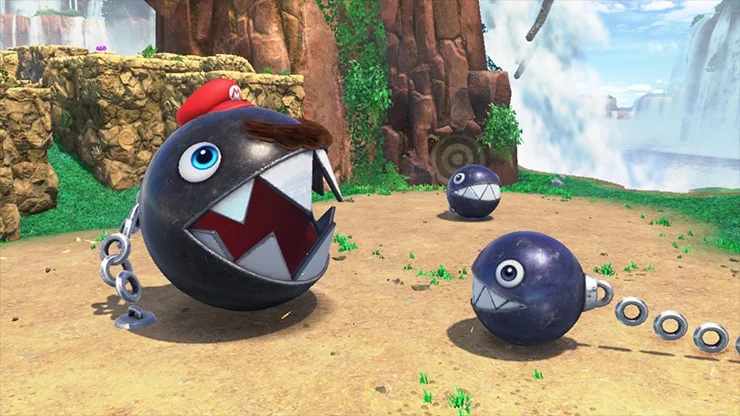
After Cap Kingdom, the story takes you to Cascade Kingdom, a green area with cliffs, waterfalls and dinosaur bones. Start from the Waterfall Basin side and follow the main ground path toward the first Chain Chomp. You are looking for a large black ball with white teeth attached to a chain, not a small ordinary Goomba. Near it is a pale rock that glows and looks different from the plain cliff around it.

An official gameplay screenshot shows a black Chain Chomp with large white teeth attached to a chain in Cascade Kingdom.
Look for the black toothed ball and its chain. This is the creature to capture near the first glowing rock.
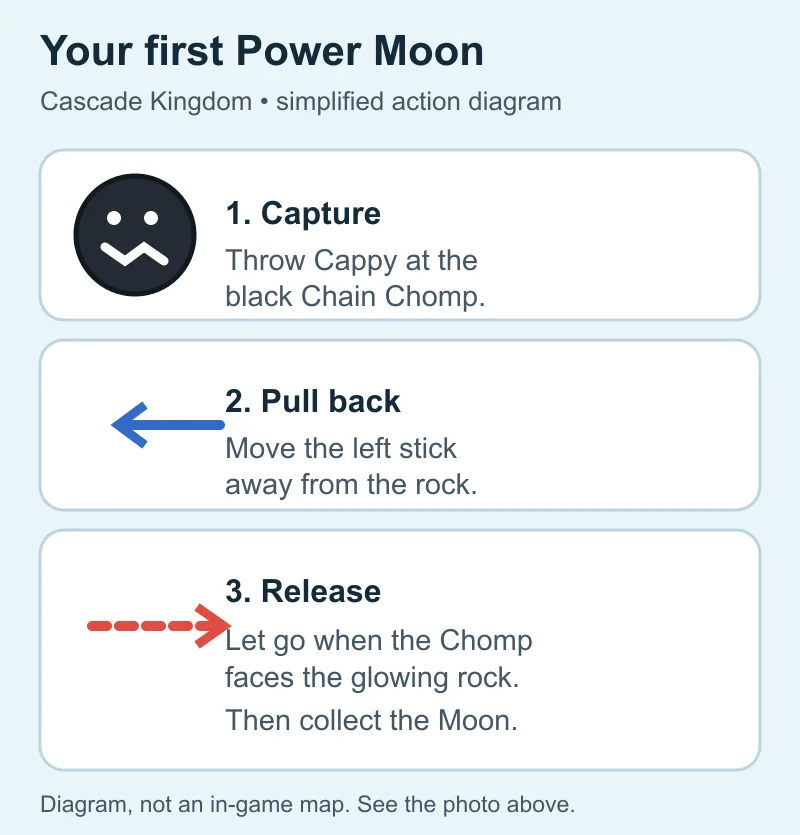
  1. Stand where you can see both the Chain Chomp and the glowing rock. Throw Cappy at the Chain Chomp with Y. When Mario is controlling the black ball, do not run straight into the rock: the creature works like a slingshot.
Original Pixel Twelve action diagram showing a Chain Chomp pulled away from a glowing rock and then released toward it to reveal a Power Moon.
This simplified diagram shows the direction of the action. It is not a map or a screenshot of the exact positions in Cascade Kingdom.
  1. Push the left stick away from the rock to pull the Chain Chomp backward until the chain is taut. Watch the direction marks that appear in the game. When it is aimed back toward the glowing rock, let go of the stick. The Chain Chomp springs forward and smashes the rock, revealing the Power Moon.
  2. Move Mario into the floating crescent to collect it. If the Chain Chomp misses, capture it again, turn your view until the rock and chain are both clear, then pull back in a slightly different direction. Missing once is normal. The fix is the angle, not throwing Cappy harder.

Still in Cap Kingdom? Finish its short route and reach Cascade first. The first Moon described here is not hidden inside the opening Cap Kingdom tutorial.

5. Tell Power Moons, gold coins and purple coins apart

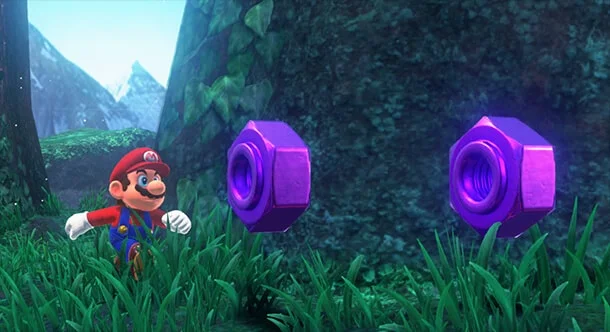
A Power Moon is a large crescent that helps the Odyssey travel. A gold coin is smaller and is ordinary money you can pick up throughout the adventure. Purple regional coins are different: each kingdom has its own purple coin shape, and they are spent on items from that kingdom. None of these are the same as the little health hearts you sometimes find.

Mario stands beside a set of purple ring-shaped regional coins growing from a grassy wall.
The purple rings in this kingdom are regional coins. Their shape changes in other kingdoms, but they stay purple.
  1. When you see a large crescent, try to reach or reveal it; it counts toward travel. When you see a line of small gold coins, collect them if the route is safe, but do not mistake them for the required Power Moon count. Purple coins are worth collecting when you spot them, but you can return later for ones that are awkward to reach.
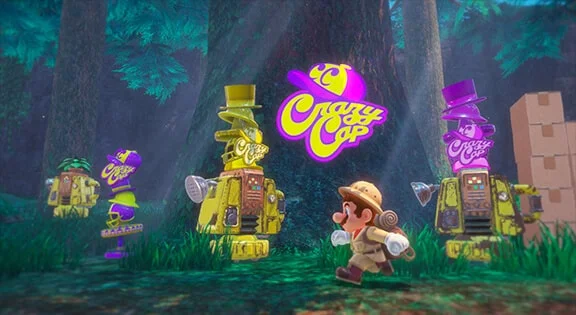
Mario stands outside a glowing Crazy Cap shop sign in a wooded kingdom.
A Crazy Cap shop is where you can spend coins on outfits and other items; it is not where every story Moon is found.

Crazy Cap shops sell outfits, souvenirs and sometimes helpful items. They are fun stops, but the best first lesson is simple: if the Odyssey is asking for more moons, hunt the big crescent rewards rather than trying to buy your way through every obstacle. Nintendo also notes that regional coins can only be used in the kingdom where you found them.

6. Use a creature’s ability instead of forcing Mario through

The frog and Chain Chomp teach the pattern: notice an obstacle, look for a nearby creature, throw Cappy, then try that creature’s own move. Do not assume every capture works like Mario. The game will show prompts for the new ability when you first take control.

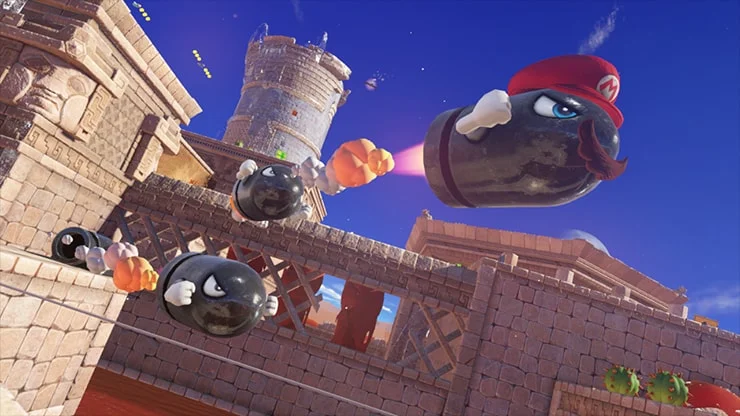
A Bullet Bill flying through a stone area wears Mario’s cap and Cappy’s eyes.
A captured Bullet Bill can fly across a gap. The cap and eyes show you are controlling it.
  1. When a gap is too wide, scan the area for a flying enemy such as a Bullet Bill. Capture it with Cappy and steer it across while you still have control. Do not start a long flight until you can see a safe landing area on the other side.
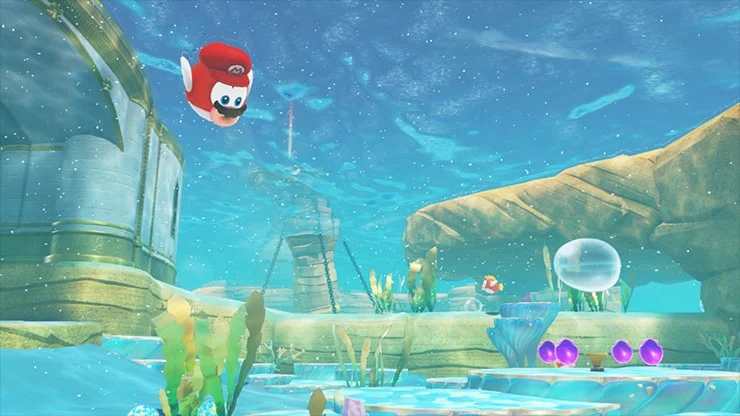
A red Cheep Cheep wearing Mario’s cap swims underwater in a clear blue area.
A captured Cheep Cheep helps Mario move underwater; the useful ability changes with the creature.
  1. Underwater, a Cheep Cheep is a better choice than repeatedly sending Mario down without a plan. Capture one and use its swimming movement to inspect a submerged path. If the game gives you a creature-specific button prompt, follow that on-screen prompt over a button list written for another capture.

You do not need to know every capture before the next kingdom. Practise one creature at a time, then leave it and check whether Mario can reach the next platform. The Power Moon you just earned in Cascade already taught the most important idea: Cappy changes what you can do with the things around you.

Quick fixes before you put the controller down

  • I cannot find the first Moon: do not search Cap Kingdom on the first visit. Reach Cascade Kingdom, find the first tethered Chain Chomp near Waterfall Basin and smash the glowing rock.
  • Cappy hits a creature but nothing changes: look for the cap-and-eyes sign. Try a known capturable frog or Chain Chomp, and check the Action Guide if your controller uses different buttons.
  • The Chain Chomp will not hit the rock: capture it, pull the left stick away from the rock until the chain stretches, then release. Use the in-game trajectory marks to fix the angle.
  • I keep falling or getting lost: switch to Assist Mode in + → Options → game mode. The blue arrows point toward the next story objective and falls are less punishing.
  • My moons did not increase: check whether you collected small gold coins or purple regional coins instead of a large crescent-shaped Power Moon.
  • I forgot a move: pause with + and choose Action Guide. Its controller picture is more reliable than a control list for a different play setup.

Once you can move, throw Cappy, recognise a capture and collect that first Moon, you know enough to keep going. Come back for optional coins and tricks when you feel ready; the game does not expect you to master every jump before leaving the first kingdom.

Get Pixel Twelve's biggest stories first.

Add as a preferred source on Google