Pixel Twelve
Mario + Rabbids Kingdom Battle Beginner Guide: First Battles, Cover, Dash and Team Jump

How To

Mario + Rabbids Kingdom Battle Beginner Guide: First Battles, Cover, Dash and Team Jump

A visual, first-time guide to the original 2017 Mario + Rabbids Kingdom Battle, with ten official gameplay images showing the battle goal, movement boundary, cover, shot preview, dash, team jump, weapon screen and clear result.

By Sophie MitchellGame: Mario + Rabbids Kingdom BattleVerified Sep 26, 2026
Guide Type
How To
Last Verified
Sep 26, 2026

Guide details

Overview

A visual, first-time guide to the original 2017 Mario + Rabbids Kingdom Battle, with ten official gameplay images showing the battle goal, movement boundary, cover, shot preview, dash, team jump, weapon screen and clear result.

Start here: this is the 2017 game, not Sparks of Hope

Mario + Rabbids Kingdom Battle is a Nintendo Switch adventure that changes between walking around the world and fighting on a small grid. It is not the later game Sparks of Hope, which has a different battle system. You do not need to know strategy-game jargon to begin. In your first few fights, aim to do three things: read the goal, leave each hero beside cover and check a shot before firing.

The pictures below are from Nintendo’s official game page and Ubisoft’s own 2017 beginner video. They show several battles, including later worlds, so your first map will not look exactly the same. Look for the repeated screen parts—the objective, heroes, health, movement edge and action icons—rather than copying one exact route.
1. Know when you are exploring and when a battle has started

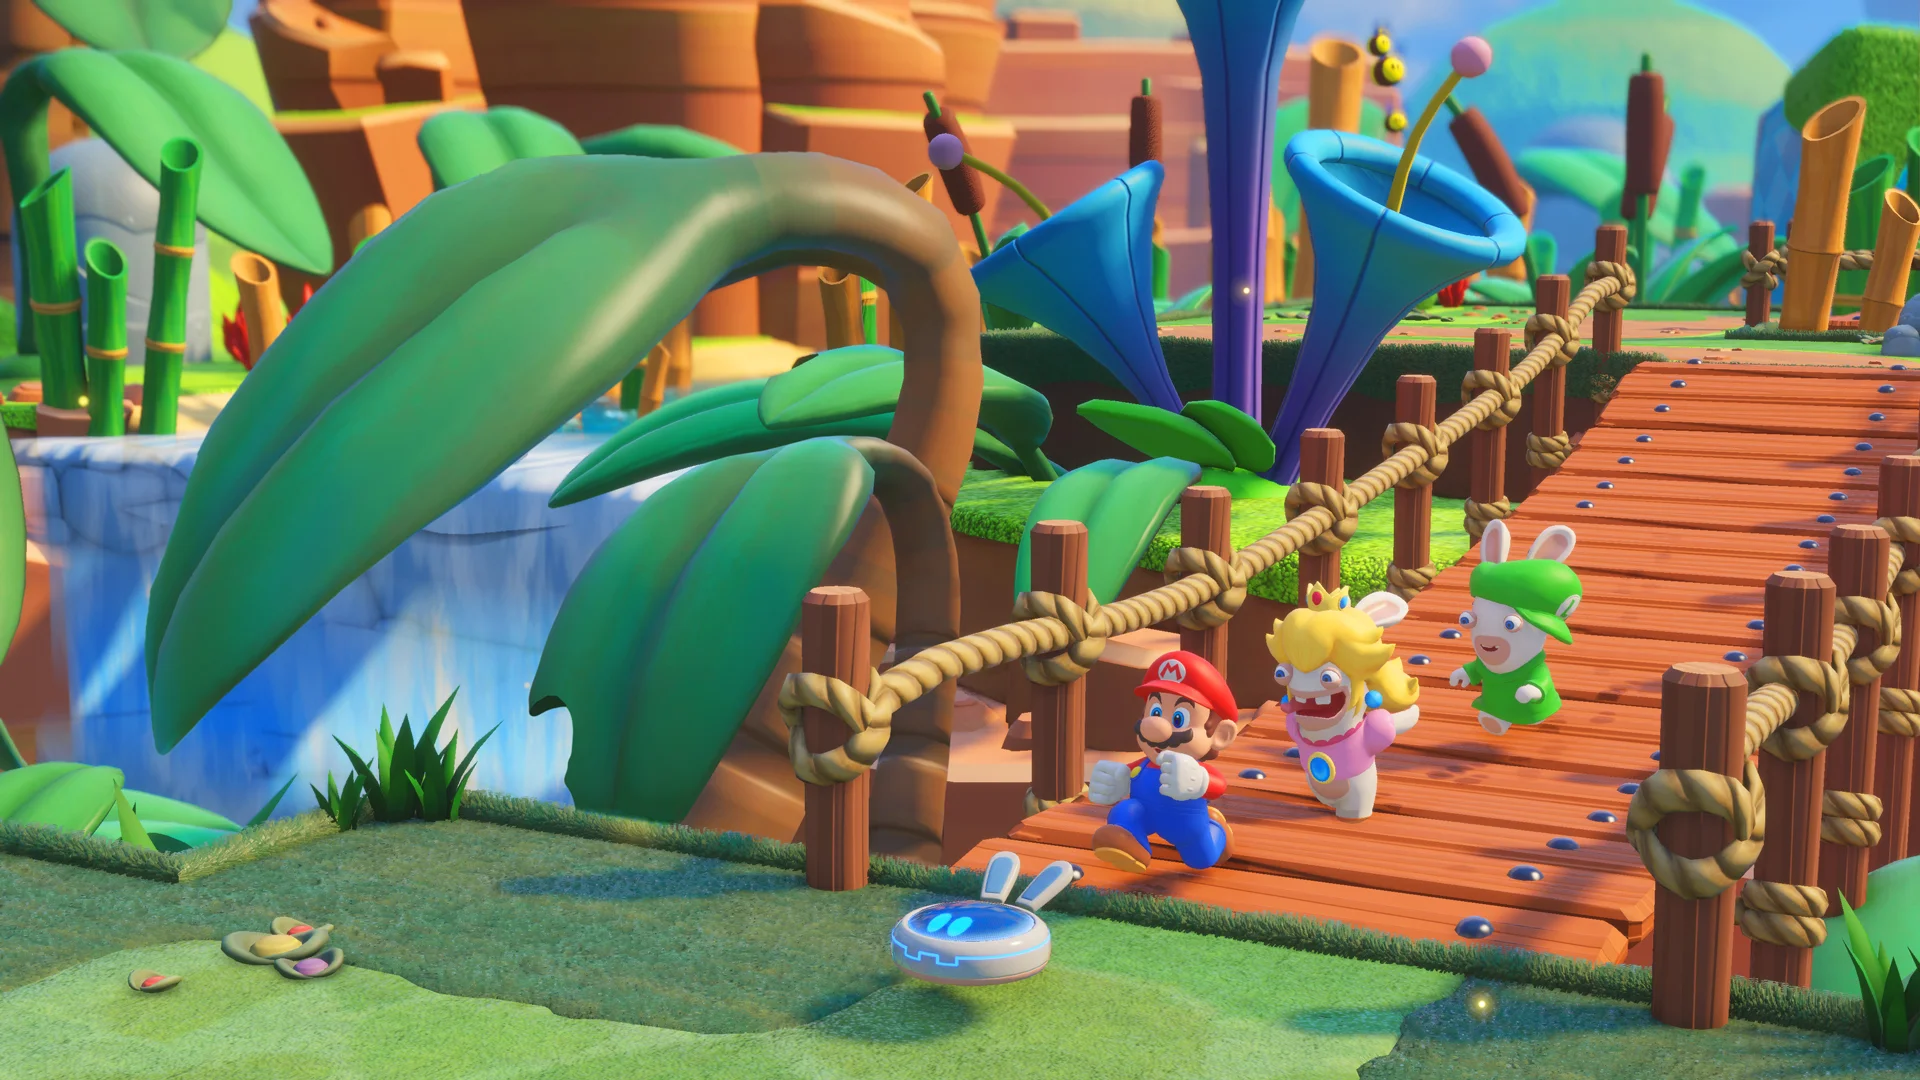
Mario and Rabbids walk along a bright outdoor path between turn-based fights.
Outside battle, there is no grid or turn counter. Follow the walkable path, then stop to look for coins, chests and side routes before the next fight.
  1. On the path, you can move the group through the world. In this screenshot, Mario and the Rabbids stand on a bridge in a colorful open area. This is exploration, so you are not choosing attacks yet. Follow the obvious walkway; when it forks, take a moment to look for a coin trail or chest.
  2. A battle looks different. The camera lifts above a small field, colored movement lines and a row of action icons appear, and a goal such as Defeat All shows near the top. That is your cue to stop thinking like a platform game and start planning one hero’s turn at a time.

2. Read the battle screen before moving anyone

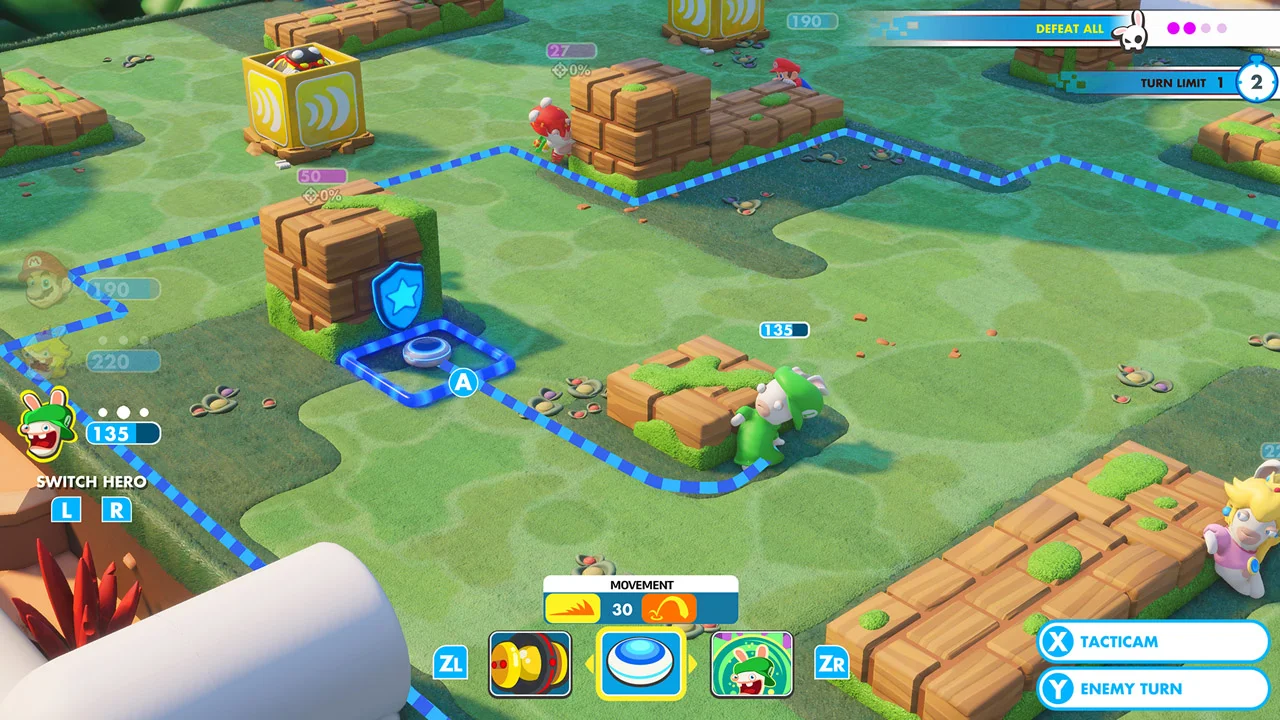
Battle screenshot showing Defeat All at upper right, hero HP at left, blue movement boundary and Tacticam and Enemy Turn prompts at lower right.
Start at the **upper-right goal**, then look left for your active hero’s portrait and HP. The blue outline marks reachable ground; the bottom row offers actions and an A confirm prompt.
  1. Find the long bar at the upper right. In this example it says Defeat All: remove the enemies to win. Other battles can have another goal, so read this line every time. The round marker is nearby. Do not assume every fight ends when the last enemy falls.
  2. Look at the left edge for the heroes’ portraits and blue HP numbers. The bright portrait is the selected hero. The lower-left Switch Hero prompt shows L and R in this Switch capture; use those buttons when you want to plan with a different teammate.
  3. Look along the bottom for the selected action and the small labels at lower right. In this screenshot, X Tacticam opens a better view of the field and Y Enemy Turn gives control to the enemies. Do not press the latter until you have checked the moves and shots you still want to make.

The blue striped outline across the ground is not a wall you must break. It shows the current movement reach. A glowing square with an A prompt beside a low brick block is one possible destination you can confirm.

3. Pick cover, not just the nearest square

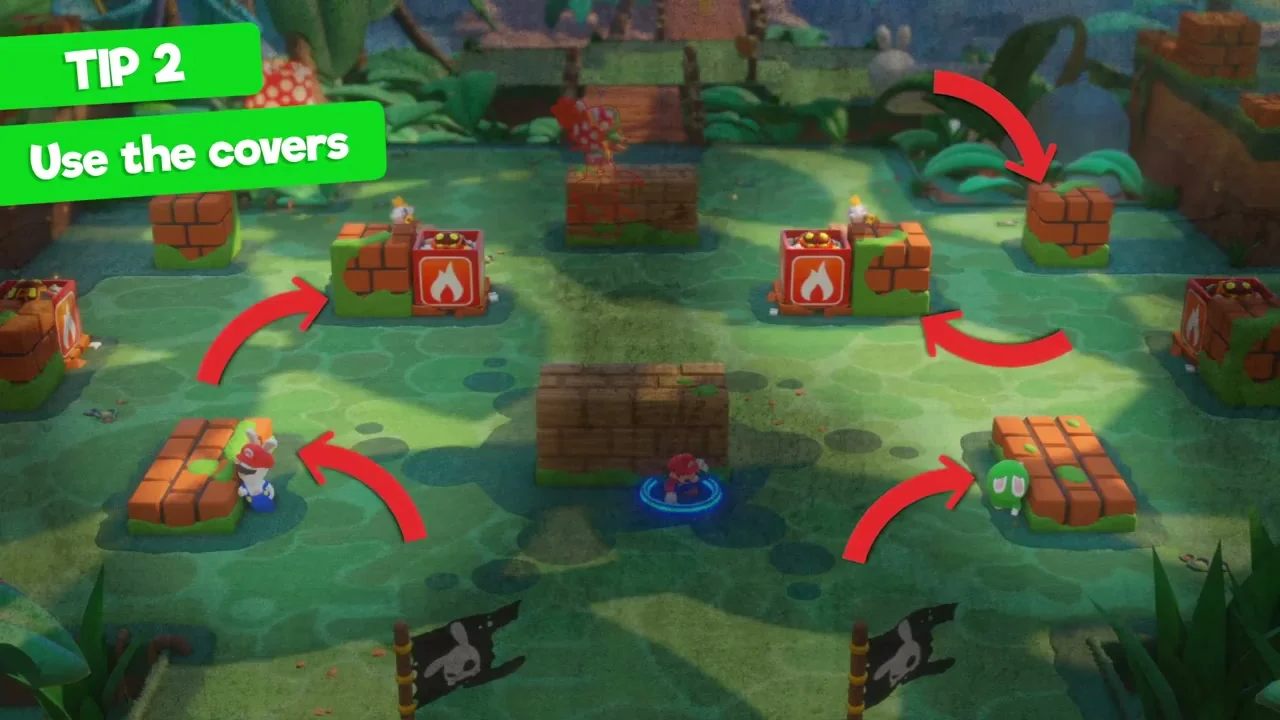
Ubisoft tutorial battlefield with red arrows pointing from heroes toward low brick cover blocks.
The brick stacks are **cover**. Put a hero beside one so the block sits between that hero and the enemy rather than stopping in open grass.
  1. Before confirming a move, scan for the short brick walls and square blocks. Ubisoft’s picture uses red arrows to point from the heroes toward them. The grass between those blocks is open ground. Move the cursor to a tile right next to a block, on the side away from an enemy, and preview the final position.
  2. In the battle-screen screenshot above, a blue shield/star appears beside one highlighted cover tile. That visual tells you the square can protect the hero. Press the on-screen A confirm when the hero is in the place you meant to choose.
  3. Cover is not permanent safety. An enemy can change angle, and some blocks can be damaged. At the start of the next turn, check the new enemy positions before leaving a hero behind the same wall again.

4. Check the target preview before firing

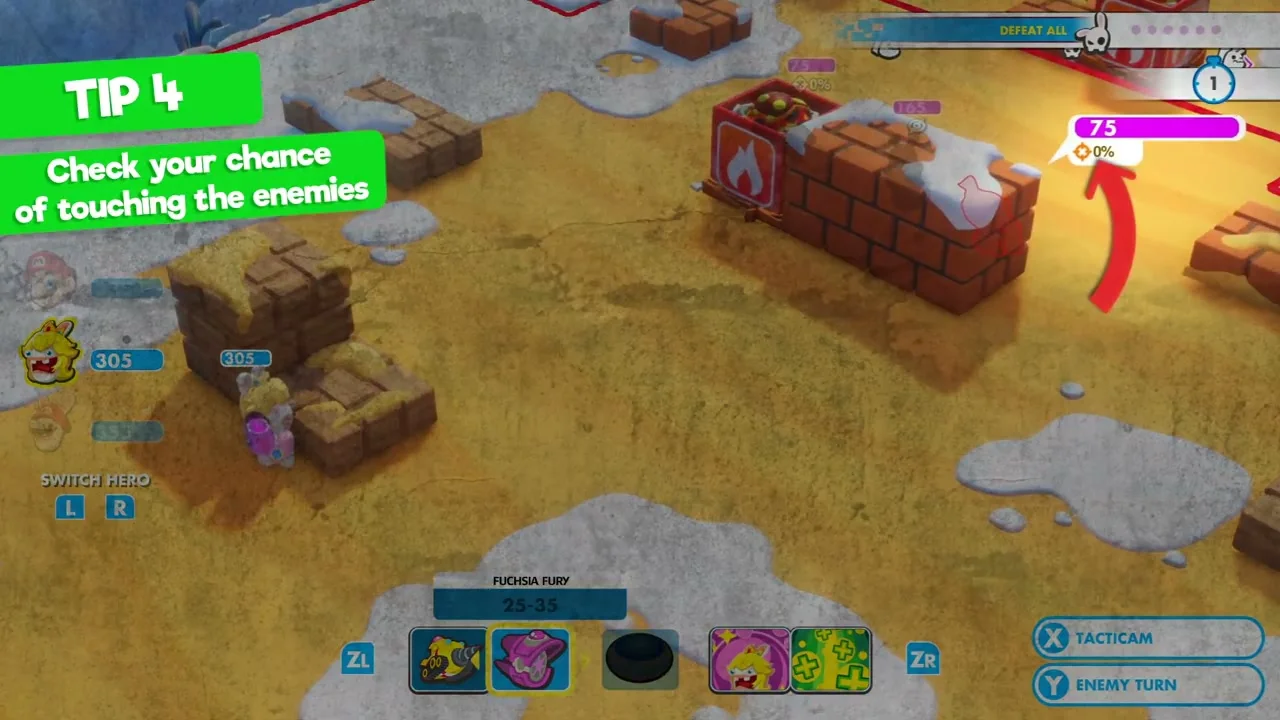
Battle UI shows an enemy protected by a brick wall, a highlighted weapon icon and a target readout with 0 percent.
The **0%** next to this protected target is the warning: that shot is blocked. Move to a clearer angle or select a different enemy before spending the attack.
  1. Choose the weapon icon in the bottom action bar, then move the target selection over an enemy. In the picture, the target’s pink health bar is at the upper right, the chosen weapon icon is highlighted at the bottom, and the preview reads 0% because the wall blocks the line.
  2. Do not press confirm just because the weapon is ready. If the preview is 0%, try a different target or move to a tile with a clearer view. Other positions may show a better percentage. The main lesson is to read the number while you are still planning, not after your hero has fired.
  3. Watch the target’s health bar as well. A hero with little health is one you may be able to remove this turn. If you cannot get a clean shot, getting behind cover is usually better than taking a poor one in the open.

5. Use a dash when the route passes through an enemy

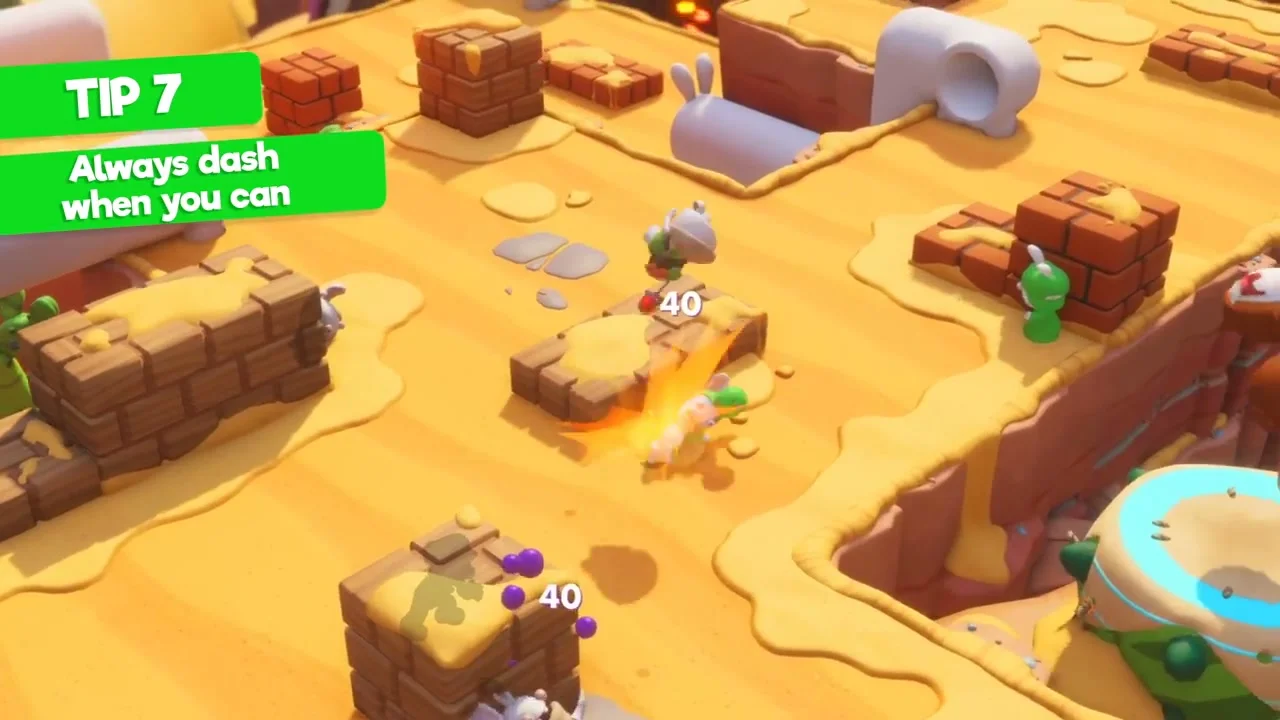
Ubisoft tutorial shows a hero dashing through an enemy on a sandy turn-based battlefield.
A **dash** happens during movement: pass through an enemy that is inside the hero’s reachable area, then finish on a safer square.
  1. With a hero selected, look for an enemy that lies inside the colored movement boundary, not far across the map. Move the route cursor through that enemy. The game shows a dash opportunity as you pass them; follow the on-screen prompt to confirm it.
  2. Do not stop thinking at the hit. After the dash, choose a final landing tile beside cover if one is available. The screenshot shows the contact, but your actual decision is where the hero finishes. A dash for a little damage is a bad trade if the hero ends alone in an open lane.
  3. If the dash target is outside your move range, do not keep pushing the cursor. Pick a nearer enemy or skip the dash this turn. Different heroes and upgrades change what is reachable, so use the visible boundary rather than memorizing a distance.

6. Team jump to reach cover your feet cannot reach

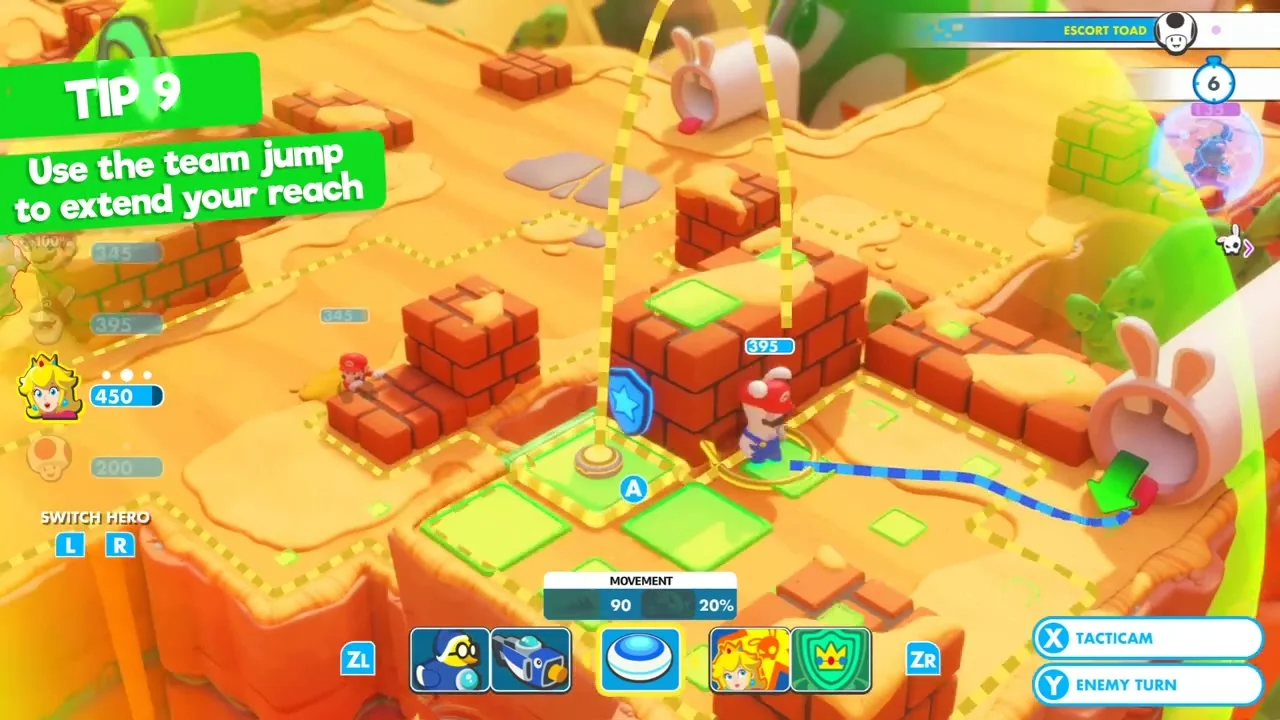
Battle interface shows a yellow team-jump arc above a teammate, green possible landing squares and a blue route toward a pipe.
The **yellow arc** shows the team jump and the **green squares** are possible landing places. The separate blue route on the right leads toward a pipe.
  1. Select a hero and look for another friendly hero within movement range. Move the cursor onto that teammate. When the game offers the team-jump action, confirm it, then move the landing marker to one of the highlighted squares. The screenshot shows a yellow jump arc and green choices beyond a brick block.
  2. Look at the destination before you accept it. Team jumping is a way to extend reach, not a reason to land in the middle of enemy fire. If one highlighted tile sits beside cover or closer to the objective, choose that over an exposed tile.
  3. You do not need a team jump in every turn. If the ordinary movement area already has a safe square and a clear shot, use it. Practise the jump on a simple battle first so the path, teammate and landing-square colors feel familiar.

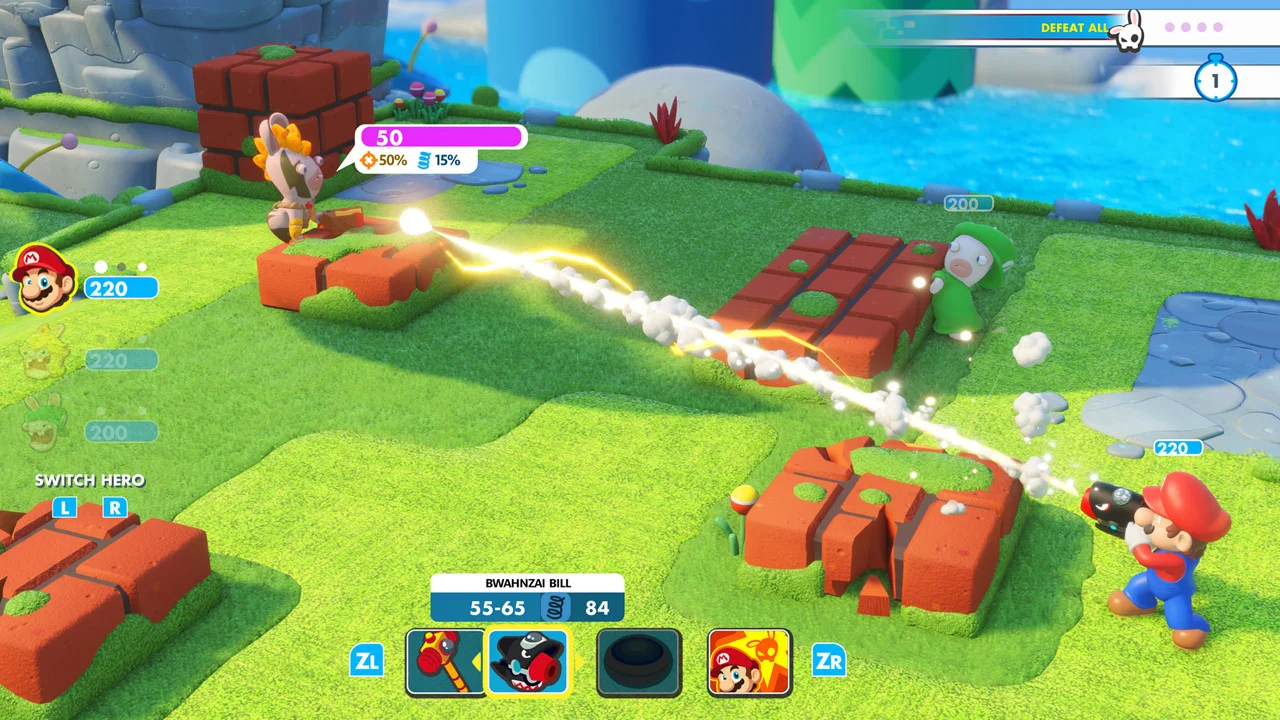
7. Fire only after you know what the bottom icons do

Mario fires a blaster across a field, with his portrait and HP at left and the weapon and technique icons along the bottom.
The **bottom icons** are actions for the selected hero. The highlighted blaster is the shot; other icons can be a second weapon or a character technique when available.
  1. Look for the active hero’s portrait on the left. In this picture Mario is selected and has 220 HP. The highlighted blaster icon in the bottom middle is the shot being used. Choose that icon, move between eligible targets and check the preview before confirming.
  2. A different icon may represent another weapon or a special ability, depending on the hero and what you have unlocked. Highlight it and read the short label or preview instead of guessing from its shape. Some techniques are unavailable for a while after use.
  3. After one hero acts, use L or R if the screen offers Switch Hero, then repeat the same small check: where can this hero stand, which enemy can they see, and is an ability available? End the turn only after you have considered the whole team.

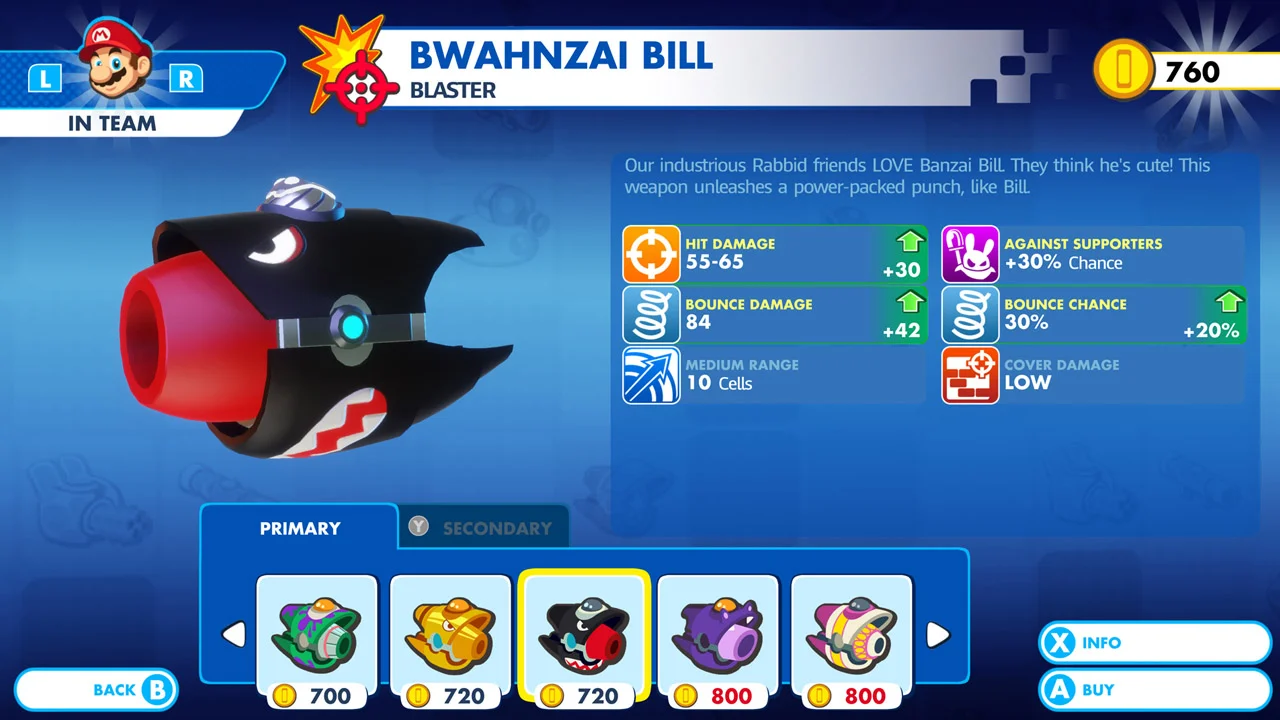
8. Compare a weapon in Battle HQ before spending coins

Mario weapon screen shows Bwahanzai Bill, a 720-coin price, 760 coins available, hit damage, range and A Buy prompt.
This is the **weapon-selection screen**, not a battle. Check your coins at upper right, the selected price below its icon, then compare hit damage and range before pressing **A Buy**.
  1. When Battle HQ is available outside a fight, use its on-screen prompt (the Switch X button in the original overworld controls) and open the weapon selection. The screenshot has Mario’s portrait at upper left, the selected blaster in the middle and a row of choices along the bottom.
  2. Read the upper-right coin total and the price below the selected weapon. This example has 760 coins and a 720-coin choice. In the right-hand panel, Hit Damage 55–65, Medium Range 10 Cells and other effects tell you what would change. A more expensive weapon is not automatically best for every situation.
  3. When you find a clear improvement you can afford, use the on-screen A Buy prompt. If you do not see Battle HQ yet, continue the opening story; the menu becomes available as the game introduces equipment. You do not need to buy a weapon before your first battle.

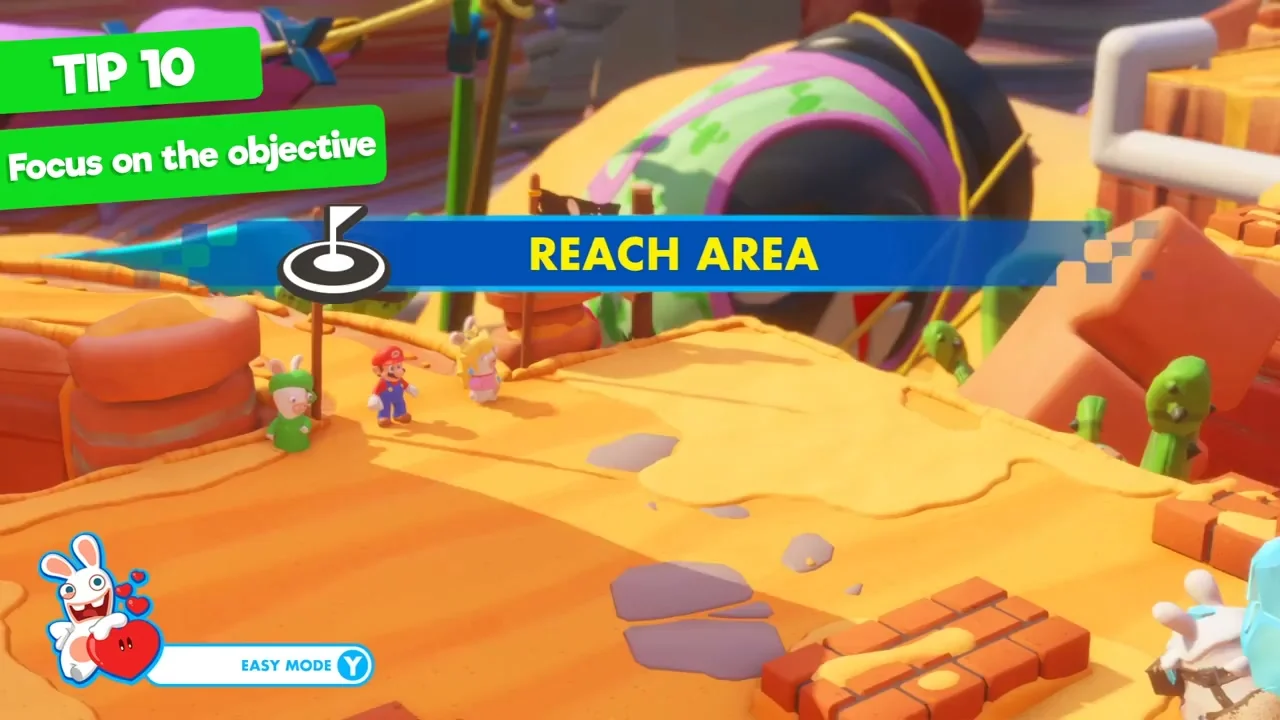
9. Match the plan to the goal on this particular map

Ubisoft tutorial shows Reach Area in a blue banner above heroes on a desert map.
**Reach Area** is not the same goal as **Defeat All**. Look for the marked destination and move toward it while staying alive; you may not need to eliminate every enemy.
  1. Before your first move on each map, read the banner. Defeat All means remove the enemies. Reach Area means bring the required hero or group to the marked destination. An escort mission can have another named target to protect. This picture is a later example, not the first battle.
  2. If the goal is reaching a place, check the route and use cover, a pipe or a team jump to cross the field. If the goal is defeating enemies, use the target preview to avoid blocked shots. This single habit prevents a common mistake: spending every turn fighting enemies when the game actually wants you to move.
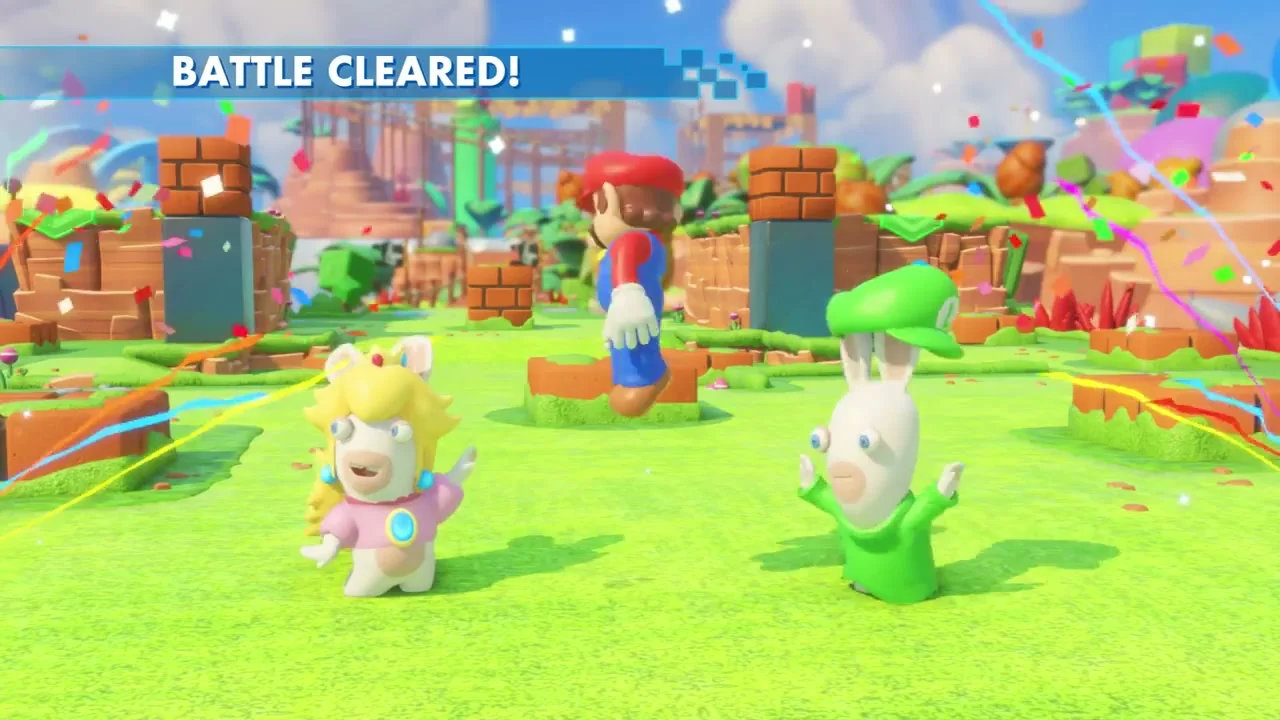
Ubisoft tutorial result shows Battle Cleared and the Mario and Rabbids team celebrating.
When the goal is complete, the screen says **Battle Cleared**. Check the result, then return to exploration or the next path; a slower clear still moves you forward.

The result may rate how efficiently you played. A perfect result is not required for a first playthrough. Finish the battle, learn one thing that caused damage, and use it on the next map.

A simple plan for your next three turns

  • Turn one: read the goal at upper right. Switch through the heroes with L/R, inspect HP on the left and use Tacticam if you cannot see where enemies are. Put a hero beside a brick block, then check the target percentage before shooting.
  • Turn two: look for one safe dash or team jump inside the movement boundary. If it does not lead to a safe final square, skip it. Use the bottom action bar for a clear shot or available technique, then check every hero before ending the turn.
  • Turn three: look again at the objective. If it says Reach Area or Escort, move the team toward the destination instead of chasing an enemy at the edge. If it says Defeat All, choose targets your heroes can actually see. After the fight, compare one weapon in Battle HQ if the menu is open.

If your first battles keep going wrong

  • A shot does no damage: the target preview may have shown 0% because cover blocked it. Select a different target or change position first.
  • A hero gets hit every enemy turn: check whether their final tile is beside a brick wall and whether the wall is between that hero and the enemy. Being near cover is not enough if the threat has a side angle.
  • You cannot reach a far tile: the blue movement boundary is the real limit. Try a team jump from a nearby ally or move to a safe intermediate square this turn.
  • You cannot find the weapon menu: Battle HQ is an outside-battle menu introduced as the story progresses. Do not search the in-battle action bar for a store; follow the exploration path and watch for the Battle HQ prompt.
  • The map will not end after several enemies fall: read the upper-right objective again. You may need to reach an area or protect someone instead of defeating every enemy.

Get Pixel Twelve's biggest stories first.

Add as a preferred source on Google