
Pixel Twelve
Final Fantasy VII Remake Beginner Guide: ATB, Materia and Stagger

How To

Final Fantasy VII Remake Beginner Guide: ATB, Materia and Stagger

A visual first-hours guide to Final Fantasy VII Remake with nine official game screenshots explaining the battle HUD, ATB, party switching, Tactical Mode, Assess, Stagger, Materia, weapon upgrades and Classic Mode.

By Emma ReedGame: Final Fantasy VII RemakeVerified Sep 24, 2026
Guide Type
How To
Last Verified
Sep 24, 2026

Guide details

Overview

A visual first-hours guide to Final Fantasy VII Remake with nine official game screenshots explaining the battle HUD, ATB, party switching, Tactical Mode, Assess, Stagger, Materia, weapon upgrades and Classic Mode.

Start here: what you control

Final Fantasy VII Remake is the first part of a retelling of the 1997 game. You play Cloud and, later, other people in his group as they move through Midgar. This guide uses the 2020 PlayStation 4 version and its button names. On PC or with custom controls, look for the same named actions in your own on-screen prompts. You do not need to know the 1997 game to follow these steps.

A fight has two halves: you move and make ordinary attacks in real time, then spend a bar called ATB on stronger commands. If you only press Attack, battles can feel slow. If you only open menus, you may have no ATB to spend. Learn the bottom-right display first; the rest of the combat system makes much more sense after that.
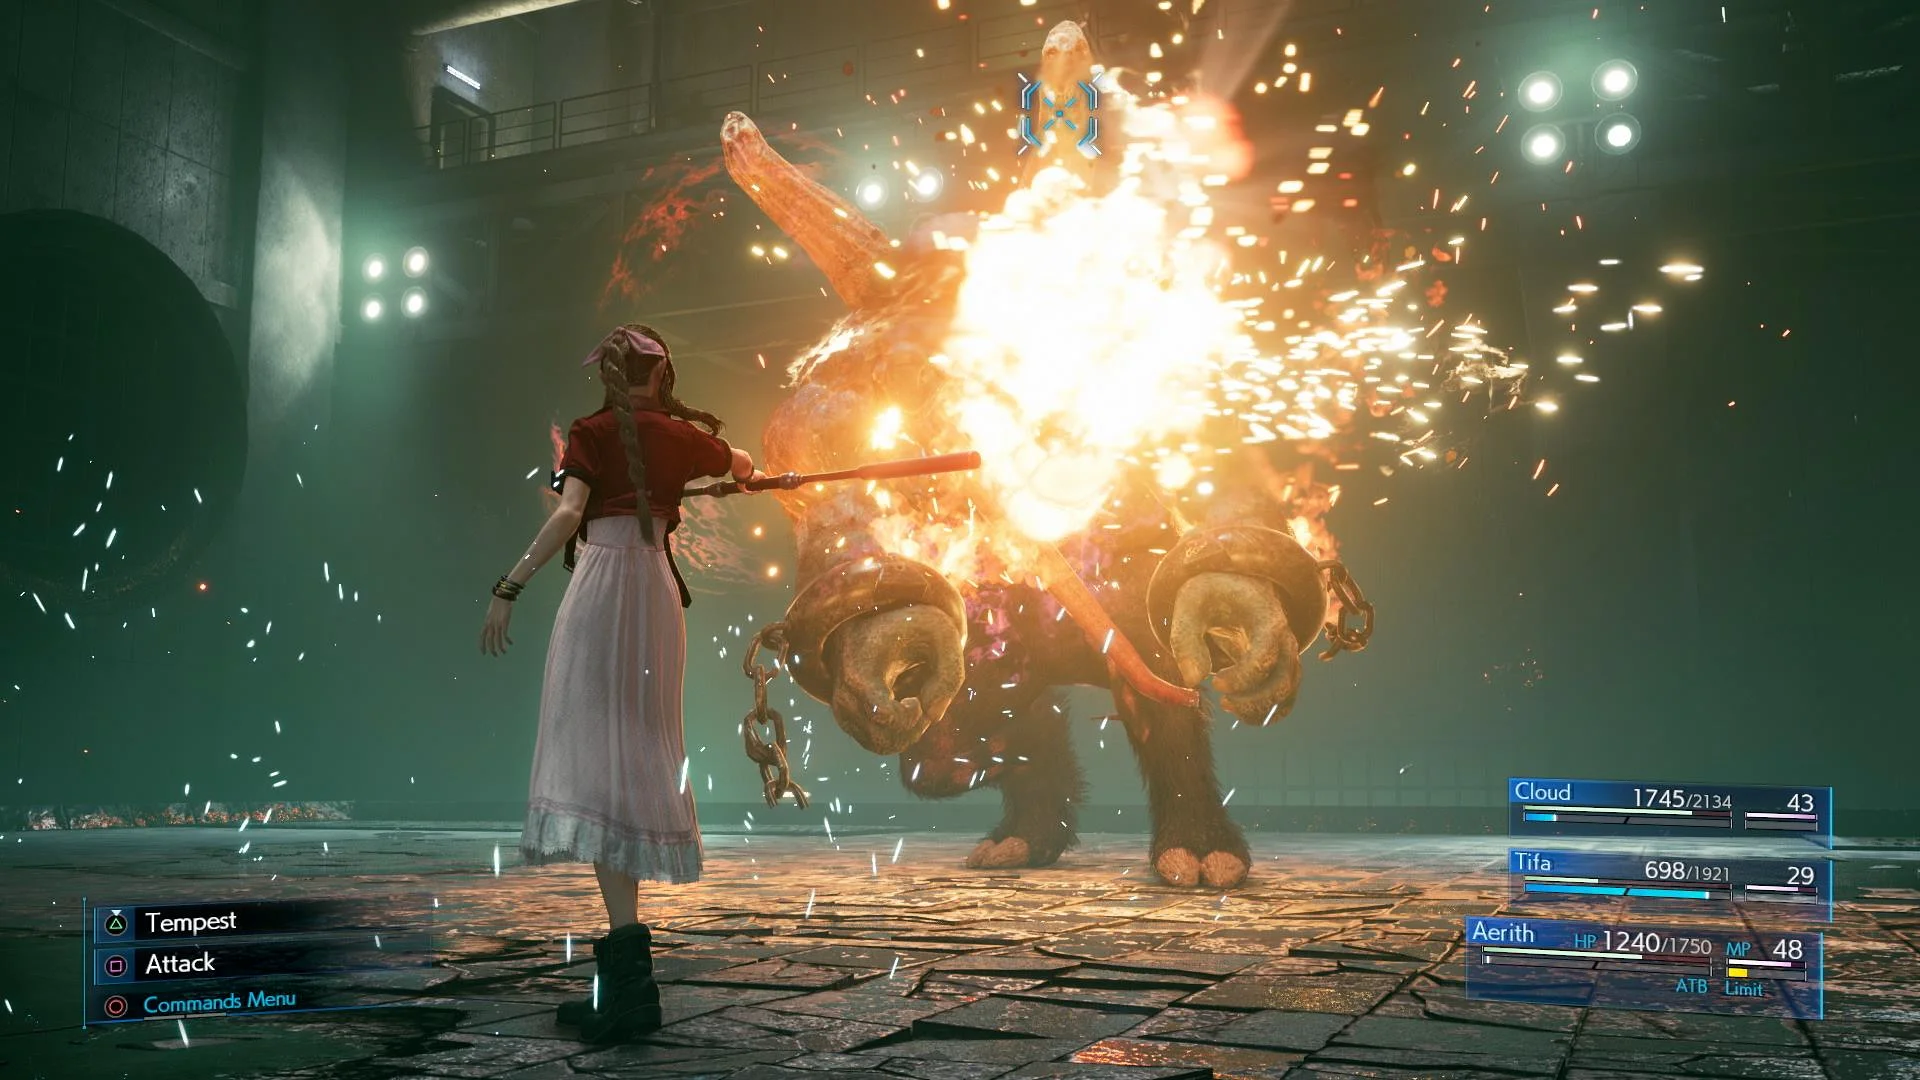
1. Read the three numbers and bars at the bottom right

Official battle screenshot with Cloud, Tifa and Aerith rows at the bottom right; each row shows HP, MP and a blue ATB bar.
Look at the party rows in the bottom-right corner. HP is health, MP powers spells, and the blue bar underneath is ATB. Aerith is being controlled in this example; your first mission has fewer party members.
  1. Enter any early fight and look at the lower-right corner, not at the light effects in the centre. Find the current character's name, then the HP number on that same row. HP means health; a low number means the next hit may defeat them.
  2. Find MP at the right of the health display. Magic uses MP. Directly below the health number is a blue ATB meter. It fills as time passes, and your own ordinary attacks fill it faster. One filled segment lets you spend one ATB charge on a command.
  3. Once a second character joins, their name and bars appear in the same corner. Press left or right on the PlayStation directional pad to take direct control of another party member. You can also issue commands to allies from the command menu. Their ATB is separate, so check the row of the person who will act.

The screenshot includes three late-game party rows so you can see the layout clearly. Do not worry if your opening fight shows only Cloud. The letters HP, MP and ATB do the same jobs throughout the game.

2. Make safe basic attacks and know when to guard

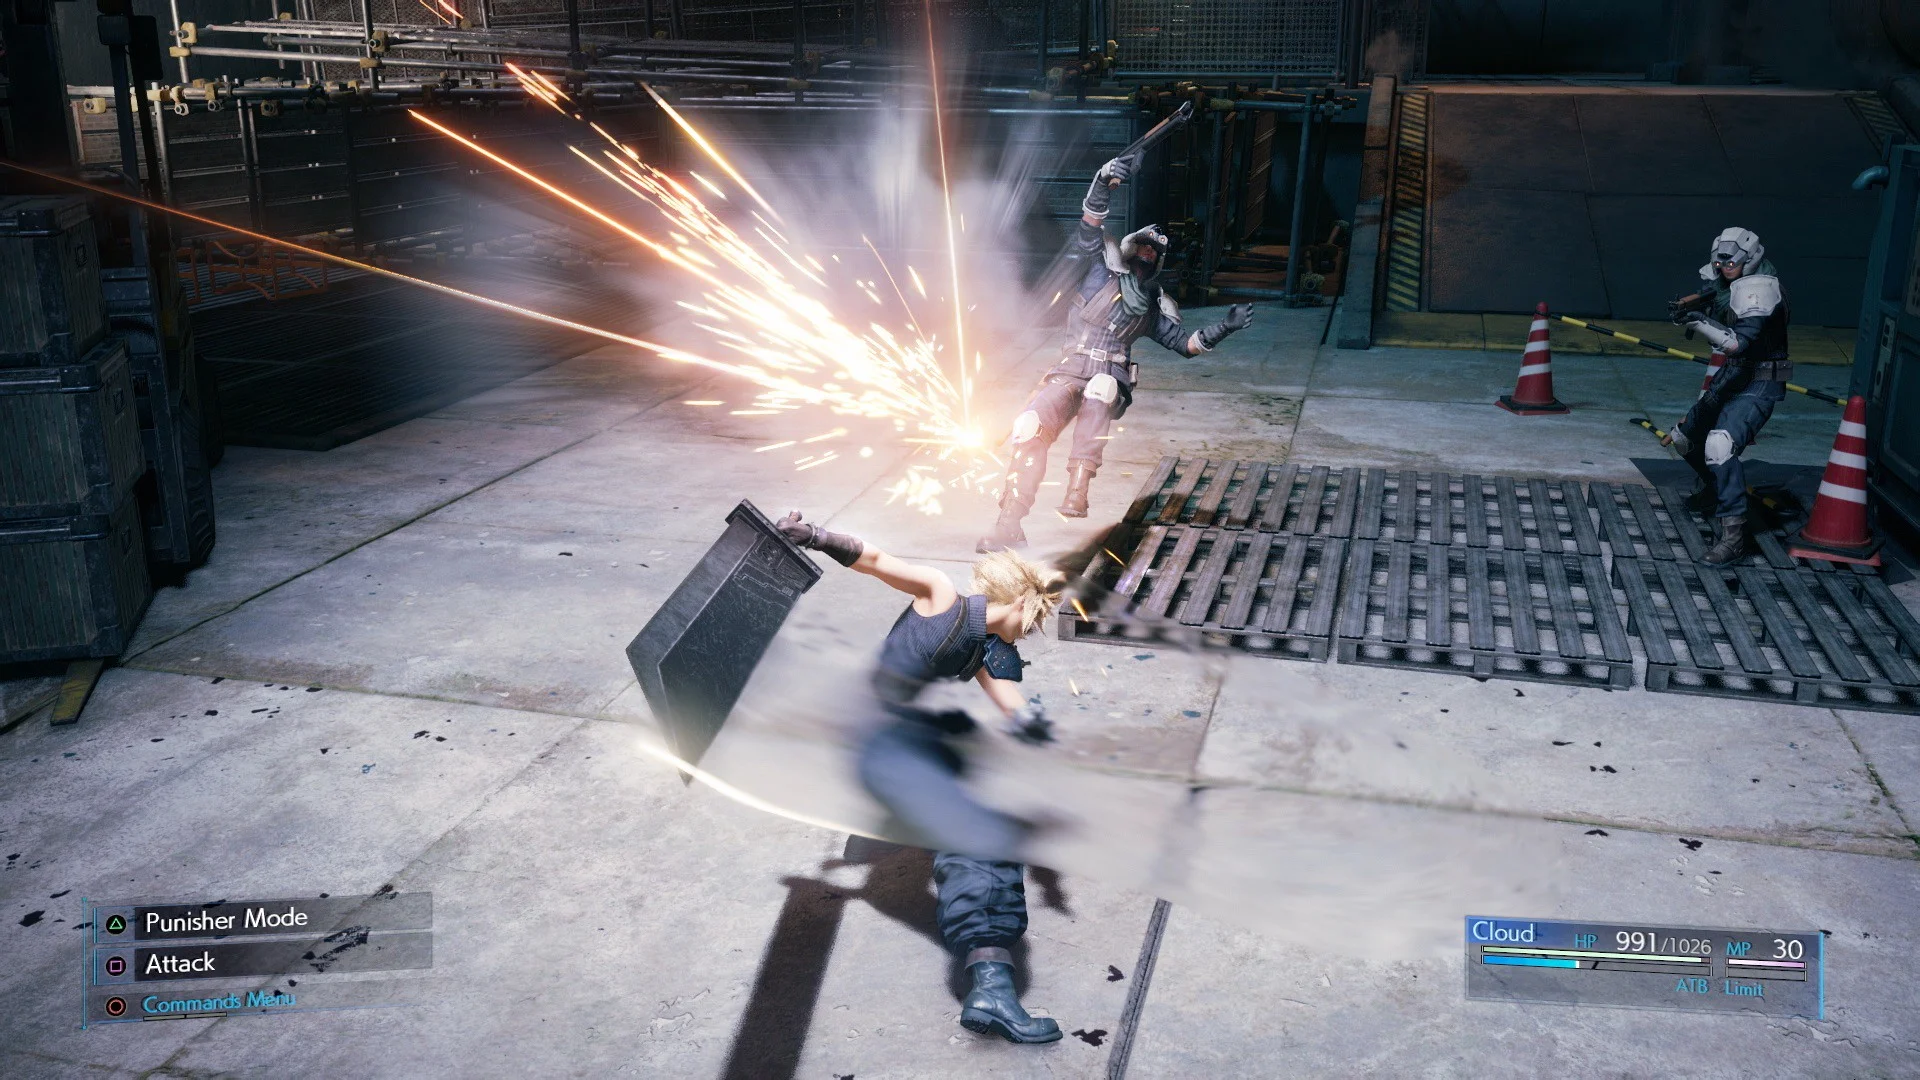
Cloud attacks a Shinra soldier; the lower-left HUD says Triangle: Punisher Mode and Square: Attack, with HP and ATB visible at lower right.
The lower-left Attack label is the PlayStation Square button. Triangle would change Cloud to Punisher Mode. The lower-right blue meter shows the ATB you are building.
  1. While you control Cloud, press Square for an ordinary sword attack. Watch the blue ATB bar under Cloud's HP rise. The attack animation is not the same thing as a selected Ability: the stronger Ability needs an ATB charge and the command menu.
  2. If a nearby enemy is preparing a hit, hold R1 to guard. You still may take reduced damage, but guarding is usually easier to time than a perfect roll. Press Circle to dodge when you can see a safe direction to move. Do not keep attacking through a warning just to finish a combo.
  3. The lower-left Triangle label shows Cloud's other fighting style. In the picture it says Punisher Mode, meaning Triangle will switch into it. Punisher hits harder and can counter some guarded melee attacks, but Cloud moves more slowly. If the enemy keeps moving away or shoots from a distance, switch back to Operator Mode or try Barret instead.

These labels change with the person you control. Tifa, Barret and Aerith have their own Triangle actions, so read the lower-left words rather than assuming every character has Cloud's two modes.

3. Open Tactical Mode and spend a filled ATB charge

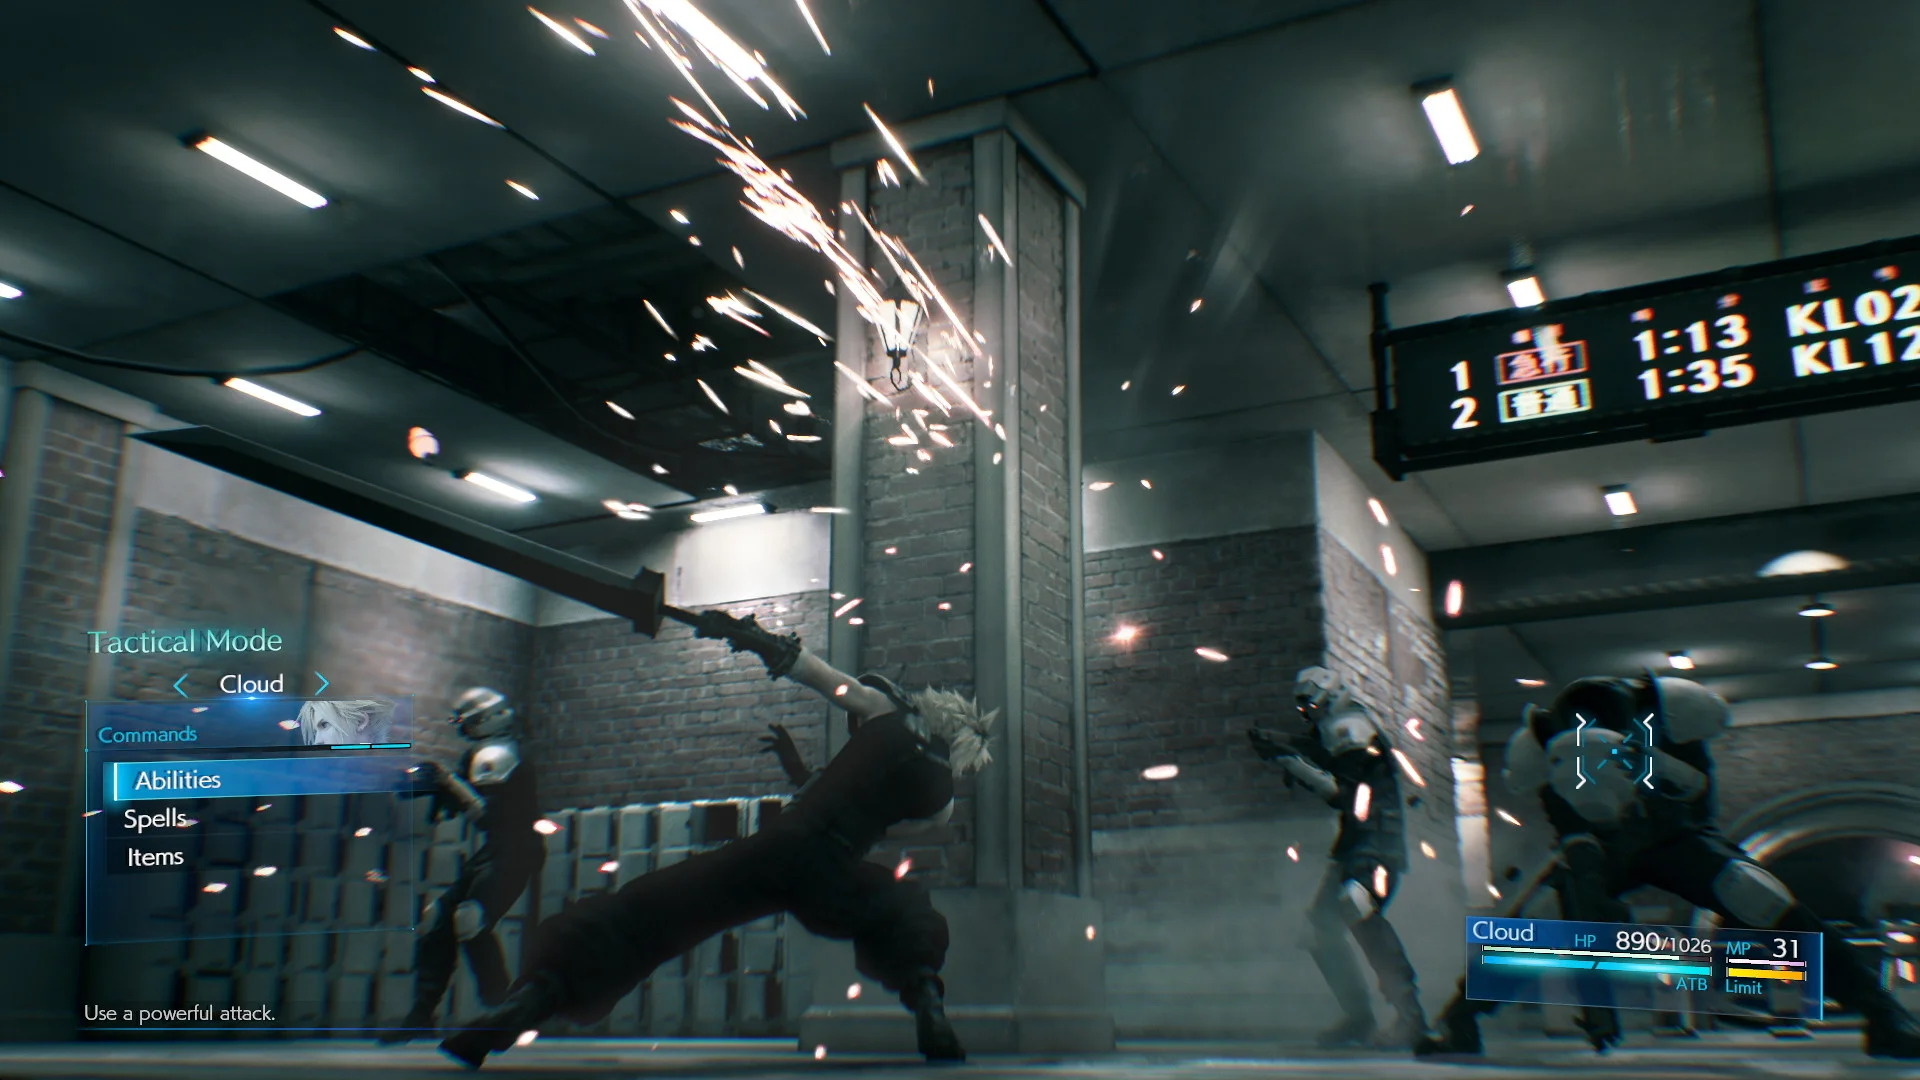
Tactical Mode screenshot with the Commands box on the left listing Abilities, Spells and Items; Cloud’s HP and blue ATB bar are at lower right.
Press X when the Command Menu is available. This screen slows the fight and puts Abilities, Spells and Items on the left; check the blue ATB bar at lower right before choosing.
  1. When Cloud has at least one filled blue ATB segment, press X on the default PlayStation layout. Look for the Tactical Mode heading at the upper left and the Commands box below it. Time slows so you can read the options.
  2. Choose Abilities for a character's special moves, Spells for equipped magic, or Items for a potion and other supplies. Then choose a target if the game asks for one. A grey or unavailable option usually means you lack ATB, MP, the necessary Materia or an item.
  3. After the command plays, repeat this loop: ordinary attacks to build ATB, X to choose a useful command, then return to moving and guarding. Save a charge for a heal if a character is close to being knocked out.

A spell can cost both ATB and MP. A potion costs an item and ATB during a fight. If the menu seems empty even though the blue meter is full, check which character's row you are commanding and whether that person has the needed Materia.

4. Change characters when Cloud cannot reach the target

In the first reactor mission, Barret joins Cloud. He has a gun-arm, so he can hit enemies above the floor or across a gap while Cloud's sword may miss. Check the party names at the bottom right as in the first screenshot: once Barret's row appears, he is available to control.

  1. Press left or right on the PlayStation directional pad during combat until Barret's name is the active row. Point him toward the distant enemy and use his ordinary attack to build his own ATB. Switch back to Cloud for an enemy standing within sword range.
  2. For a quick order without switching, open Tactical Mode and use the ally-selection controls shown near the Commands box. The point is to spend the correct person's ATB: a filled Cloud bar does not become a filled Barret bar.

If a story moment temporarily limits the party, only the available names appear. The game never expects you to command a teammate who is not in this fight.

5. Check HP after a fight, then heal before the next one

Before walking into the next fight, look again at each party member's HP number. If it is low, open the main menu while you are out of combat and use an item or available healing magic on that person. Square Enix confirms that healing outside battle does not need an ATB charge; healing during combat does.

  1. From the pause menu, open Items and select a Potion if you have one, then select the injured party member. If you use healing magic instead, choose a character who has Healing Materia equipped and enough MP for the spell.
  2. During combat, press X for Tactical Mode, choose Items or Spells, and target the injured ally. Make sure that character's ATB bar is full enough first. If their health is already very low, guard or move away while ATB builds instead of continuing to trade hits.

A low HP number is more urgent than a nearly full attack gauge. Avoid treating every potion as something to save forever, but do not waste one on someone whose health is almost full.

6. Use Assess to stop guessing about weaknesses

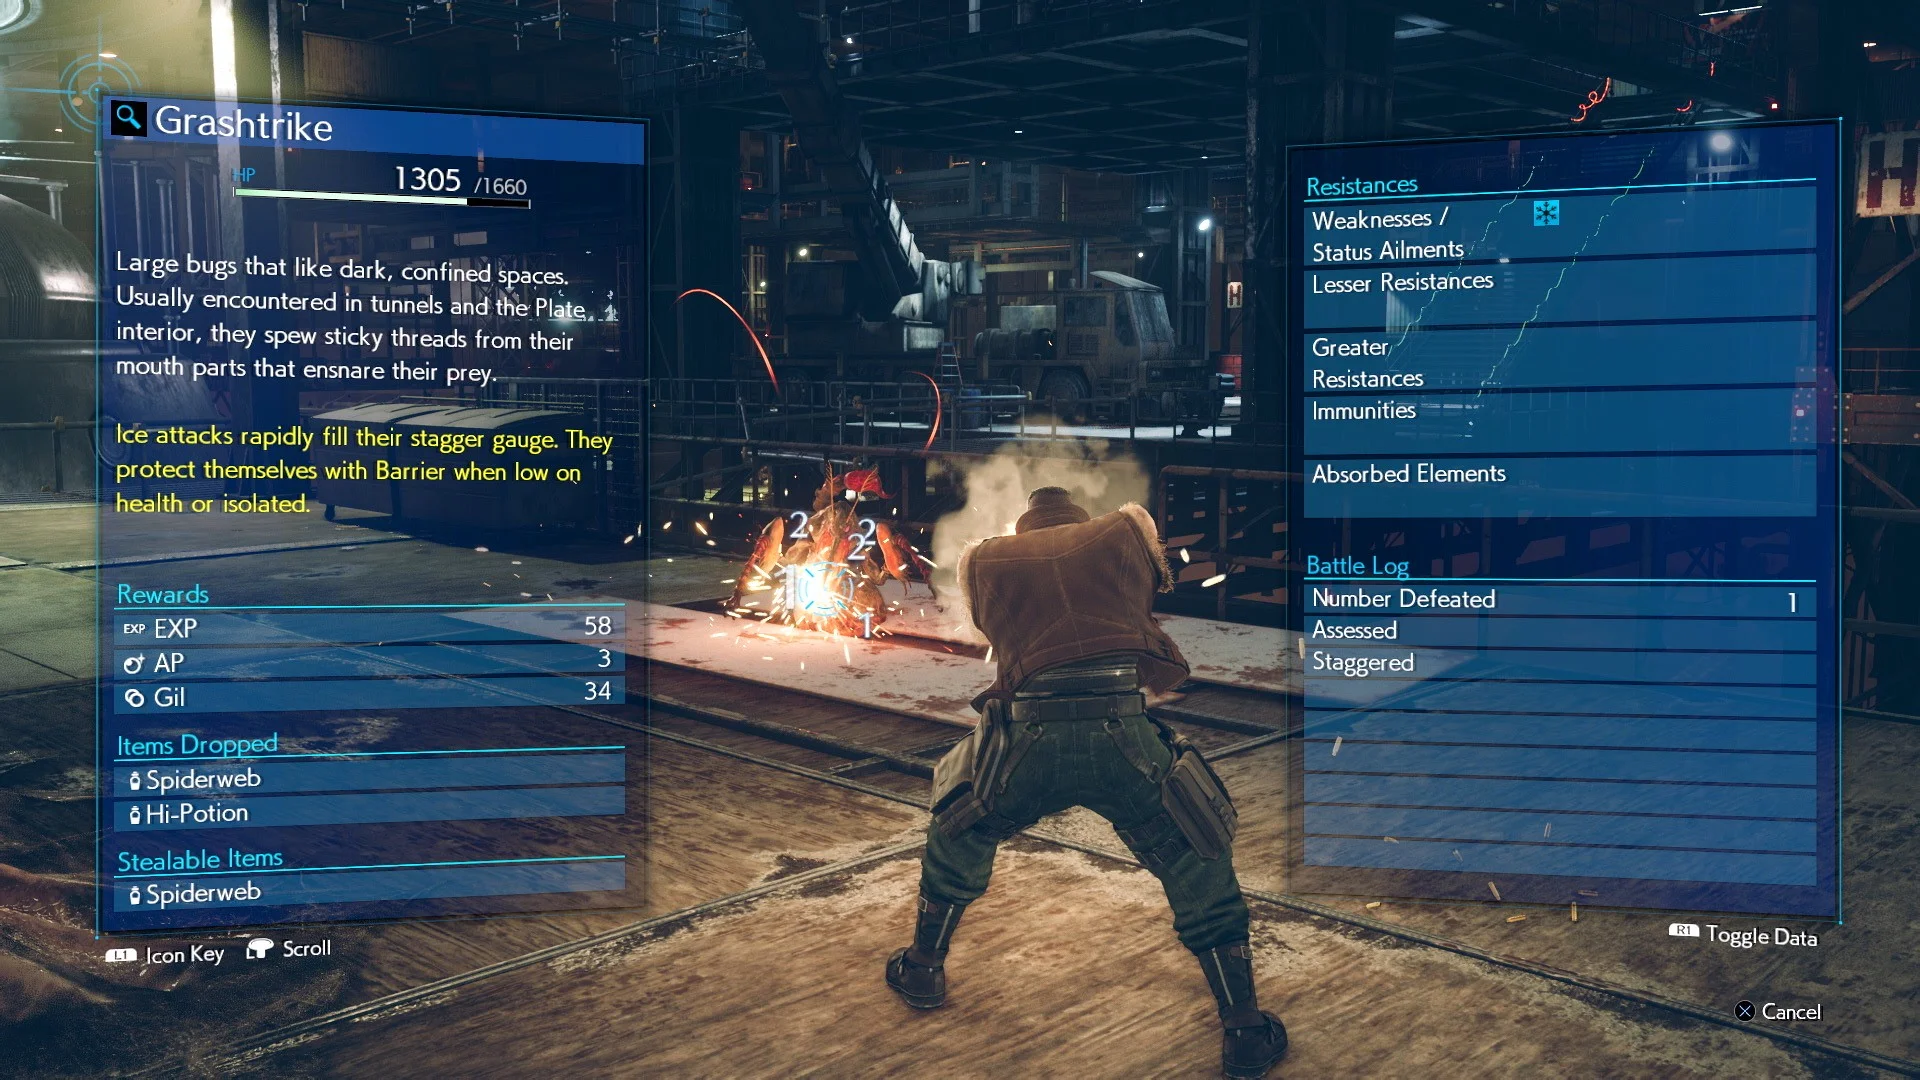
Official Assess information screen for a Grashtrike: yellow guidance on the left says ice attacks fill its stagger gauge, and the right panel lists weaknesses.
The yellow sentence on the left is the practical clue: this Grashtrike is easier to stagger with ice. The Weaknesses row on the right shows an ice symbol. Read the text rather than guessing from the enemy’s appearance.
  1. Later, when you obtain the Materia named Assess, open the main menu's Materia & Equipment screen and put that orb into an empty slot on a party member's weapon or armor. Having it in your inventory alone does not give that member the Assess command.
  2. In battle, build that member's ATB, open Tactical Mode and choose the Assess ability. Select the enemy you want to inspect. The large information panel gives its name, health, weaknesses and any special tip about its Pressure or Stagger conditions.
  3. On the screenshot, look at the yellow note under Grashtrike's description on the left. It says ice attacks rapidly fill its stagger gauge. Then look at the Weaknesses line on the right. If your party has an ice spell equipped and enough MP, this is the sort of target to use it on.

Early Shinra machines often dislike lightning, but this is a rule of thumb, not a promise for every foe. When Assess says something else, follow the actual enemy information. Chadley, a young research character you meet in the Sector 7 slums, gives Battle Report tasks that make Assess useful.

7. Turn Pressured into Staggered

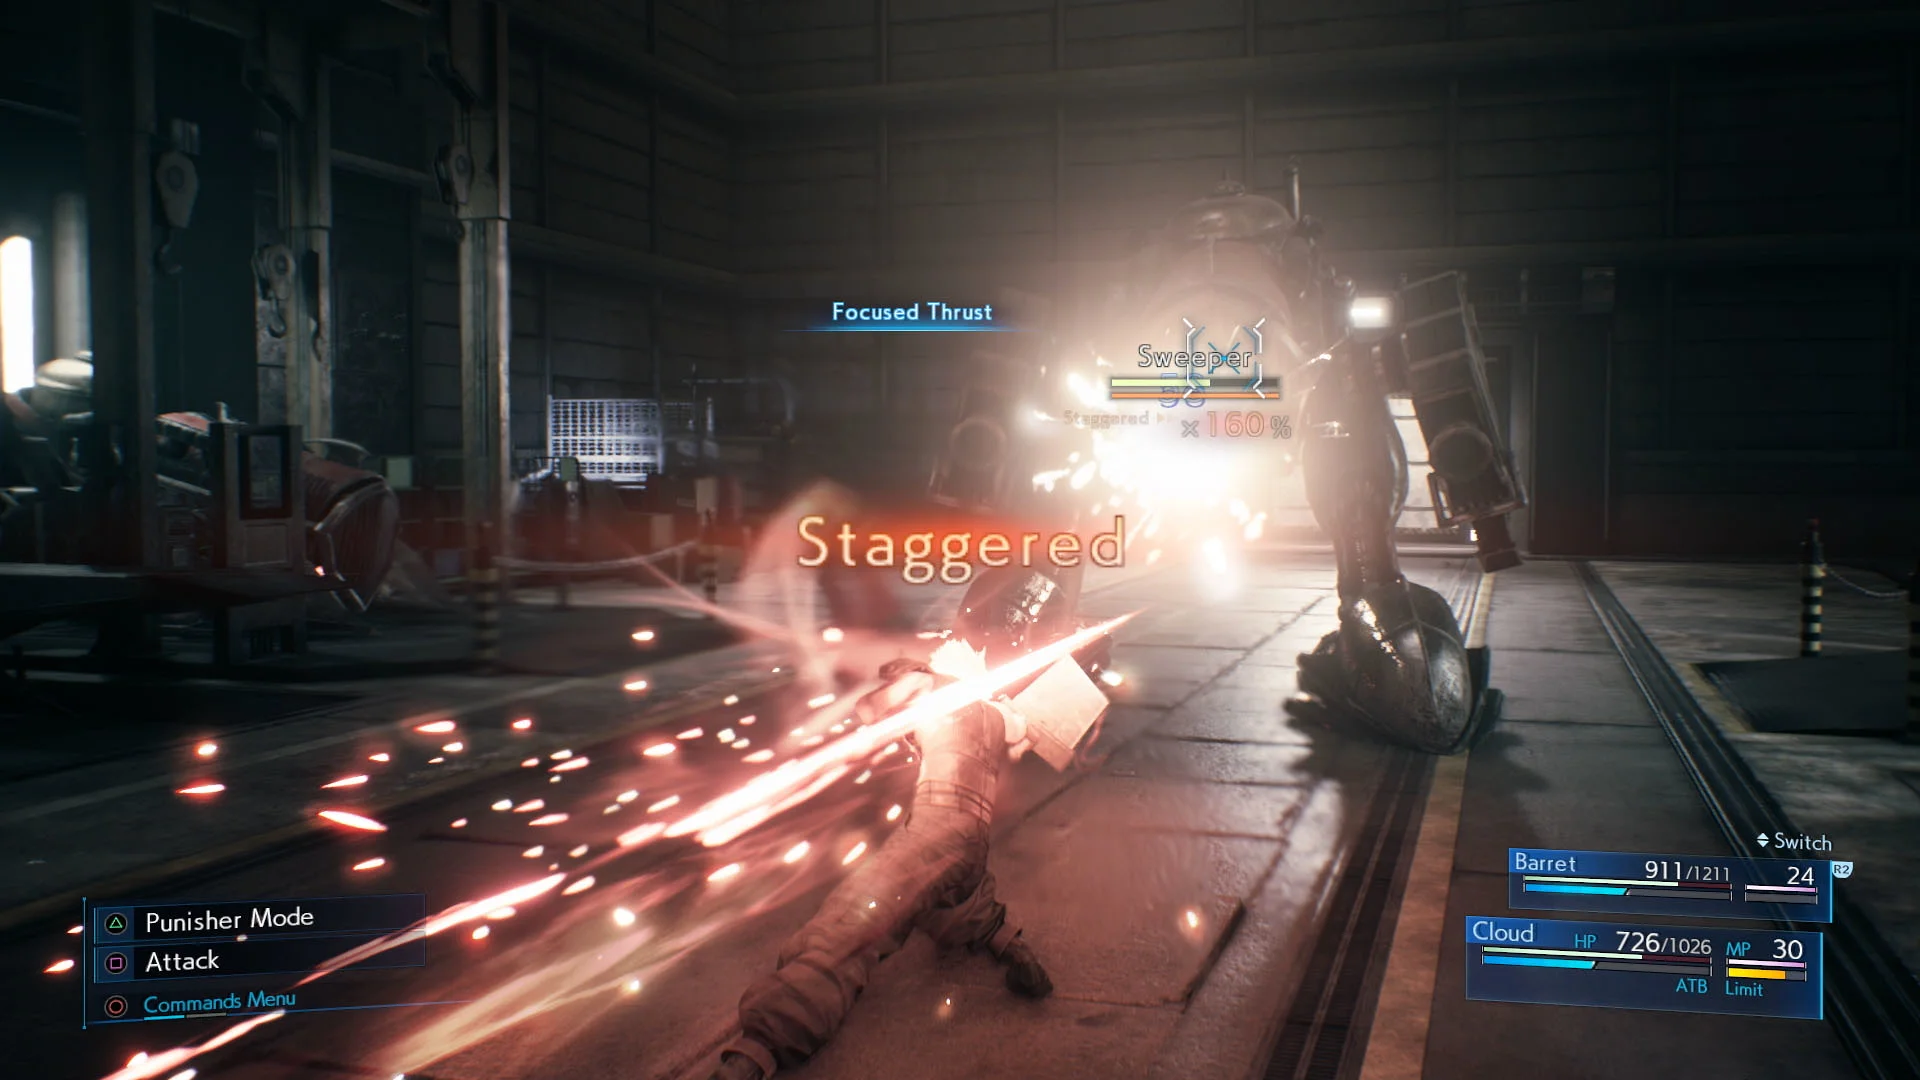
Cloud attacks a Sweeper robot with Focused Thrust; Staggered appears across the centre and an orange gauge with a 160 percent damage multiplier sits below the enemy name.
This is the payoff: the robot says Staggered in the centre, and the meter beneath Sweeper shows a 160% damage multiplier. The ability name Focused Thrust is visible above Cloud.
  1. Look at an enemy's name and health near the top of the battle screen. Under health is another bar that measures Stagger. Some enemies enter a Pressured state first; the word Pressured appears near their health bar when you have disrupted them.
  2. When you see Pressured, spend a filled ATB charge on an ability that builds Stagger. Cloud's Focused Thrust and Barret's Focused Shot are early examples. This is more effective than repeatedly choosing a random attack with no regard for the enemy's state.
  3. When the lower bar fills, the screen shows Staggered, as it does in this screenshot. The enemy is briefly unable to fight back and takes more damage. Now spend ready ATB charges on your strongest safe abilities or an effective spell before the opening ends.

The 160% shown here is a particular moment, not a fixed multiplier for every fight. Some bosses need you to follow a special Assess hint before they become Pressured, so return to the previous step if their Stagger bar hardly moves.

8. Put Materia into an actual equipment slot

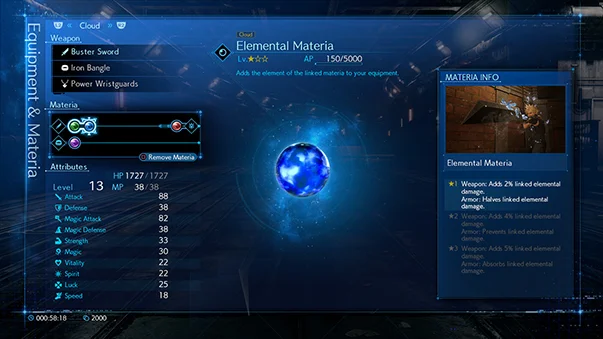
Square Enix Materia & Equipment screenshot: Cloud’s Buster Sword and Iron Bangle are listed at upper left, linked colored Materia slots are below, and Elemental Materia information is on the right.
This is the Materia & Equipment screen, not the weapon-upgrade sphere. Choose a weapon or armor slot on the left, then an orb from your inventory; the right panel explains the highlighted Materia.
  1. Open the main menu while out of battle and choose Materia & Equipment. Find the character's weapon and armor names at the upper left. Under them are small colored circles: those are slots, not decoration. Select an empty circle and choose the Materia you want to equip.
  2. Read the panel on the right before confirming. Green Magic Materia can give a spell such as Cure, Fire or Thunder; other colors and names grant different effects. In the official screenshot, Elemental Materia is selected. It works with a linked partner slot, so the little line joining two circles matters for that specific Materia.
  3. Return to the battle menu and check Spells or Abilities. If the move is missing, confirm the orb is on the character you are currently commanding, not just on someone else or sitting in the inventory. If a spell appears but cannot be cast, check both MP and ATB.

The Square Enix source image is smaller than the other screenshots. Zoom in if you need to read the tiny menu text; the key areas are the weapon/armor list on the left, the linked circles below it and the explanation on the right.

9. Learn a weapon ability before switching swords

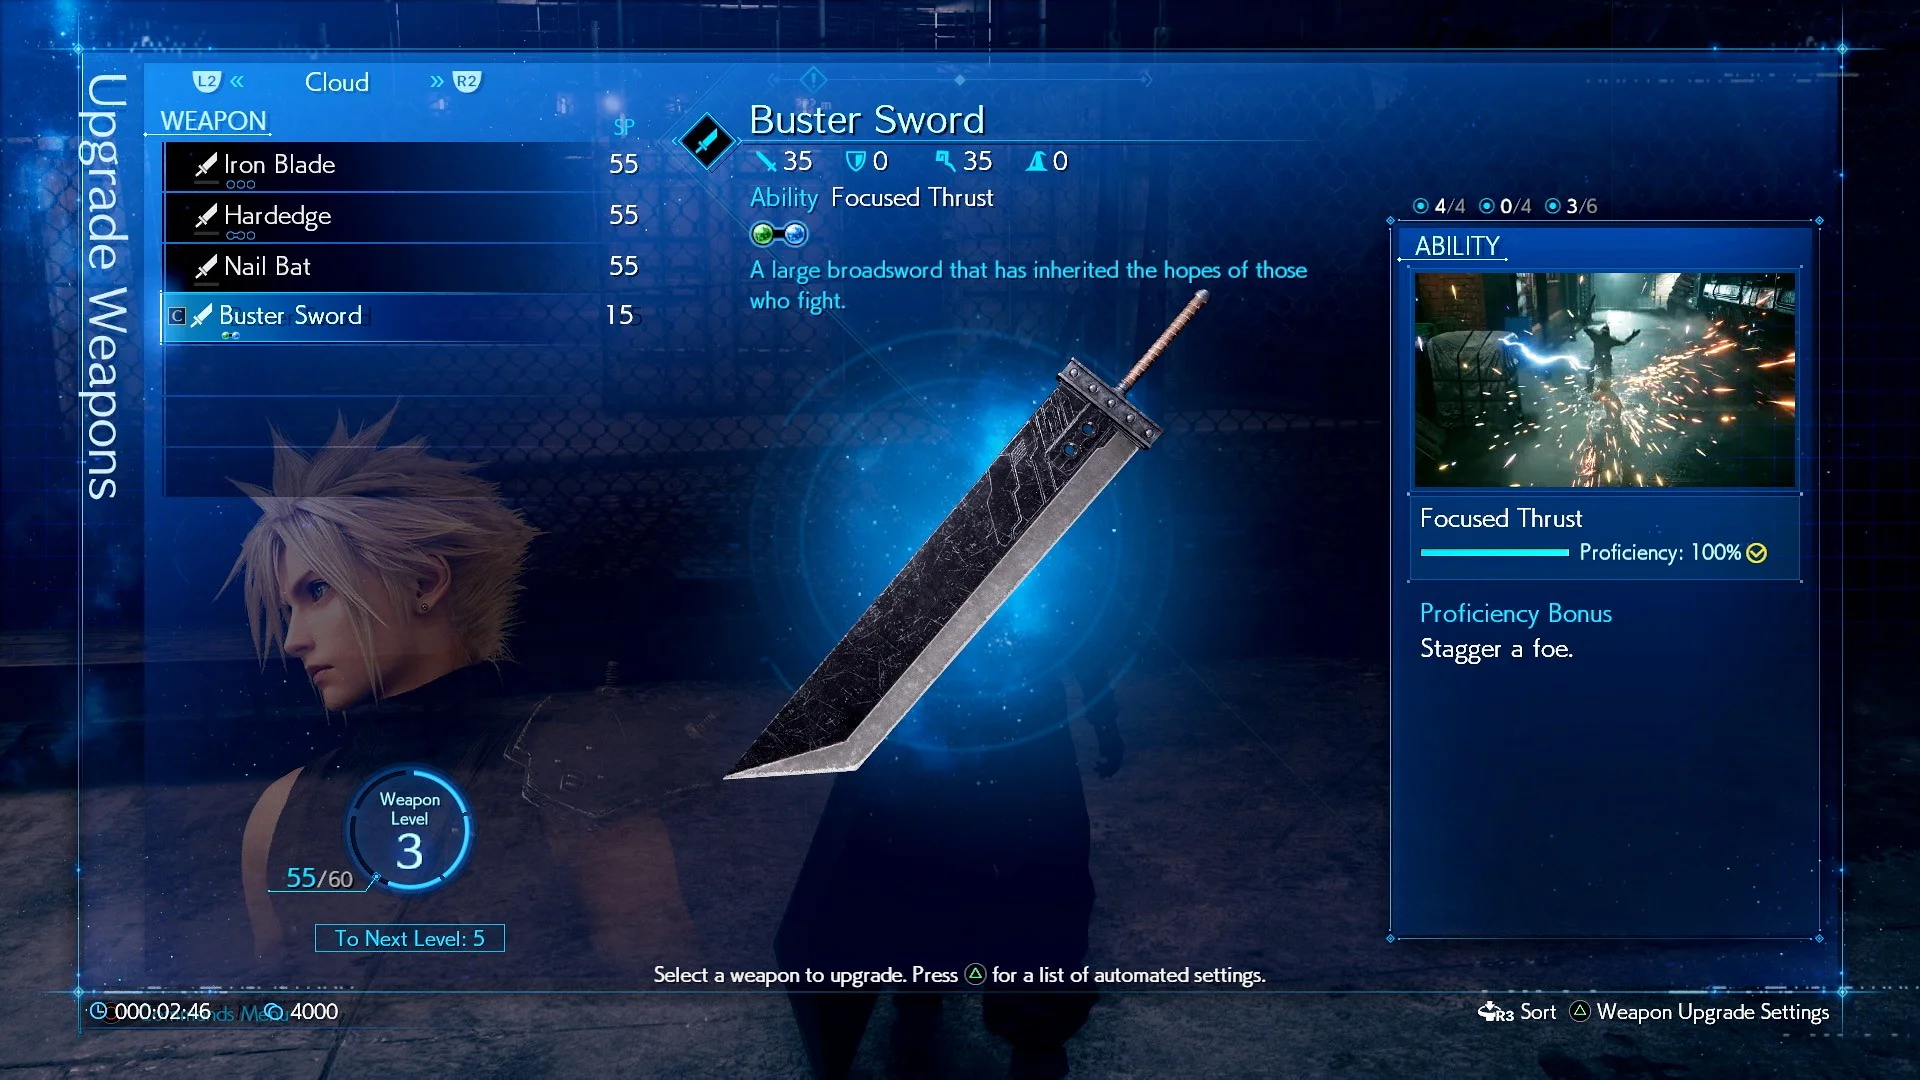
Cloud’s Upgrade Weapons list has Buster Sword selected on the left, Focused Thrust and a proficiency bar on the right, and the sword pictured in the middle.
Buster Sword is selected on the left. On the right, Focused Thrust is the ability and the Proficiency bar shows how much has been learned. This example shows 100%; your own bar may be lower.
  1. When you obtain a new weapon, open the main menu and inspect it in the weapon/equipment screens. In this screenshot, the weapon list is on the left; select a weapon to see its unique ability and Proficiency bar on the right.
  2. Equip the weapon and use its named ability in real fights. Its proficiency increases as you use it, and at 100% the character learns the ability for use with other weapons too. The screenshot's 100% is an example, not what a new player's save begins with.

If an ability disappears after you change weapons, check its proficiency. You may have switched before mastering it. This is why trying a new sword for a while can be more useful than changing back after one encounter.

10. Spend weapon SP on a clear upgrade

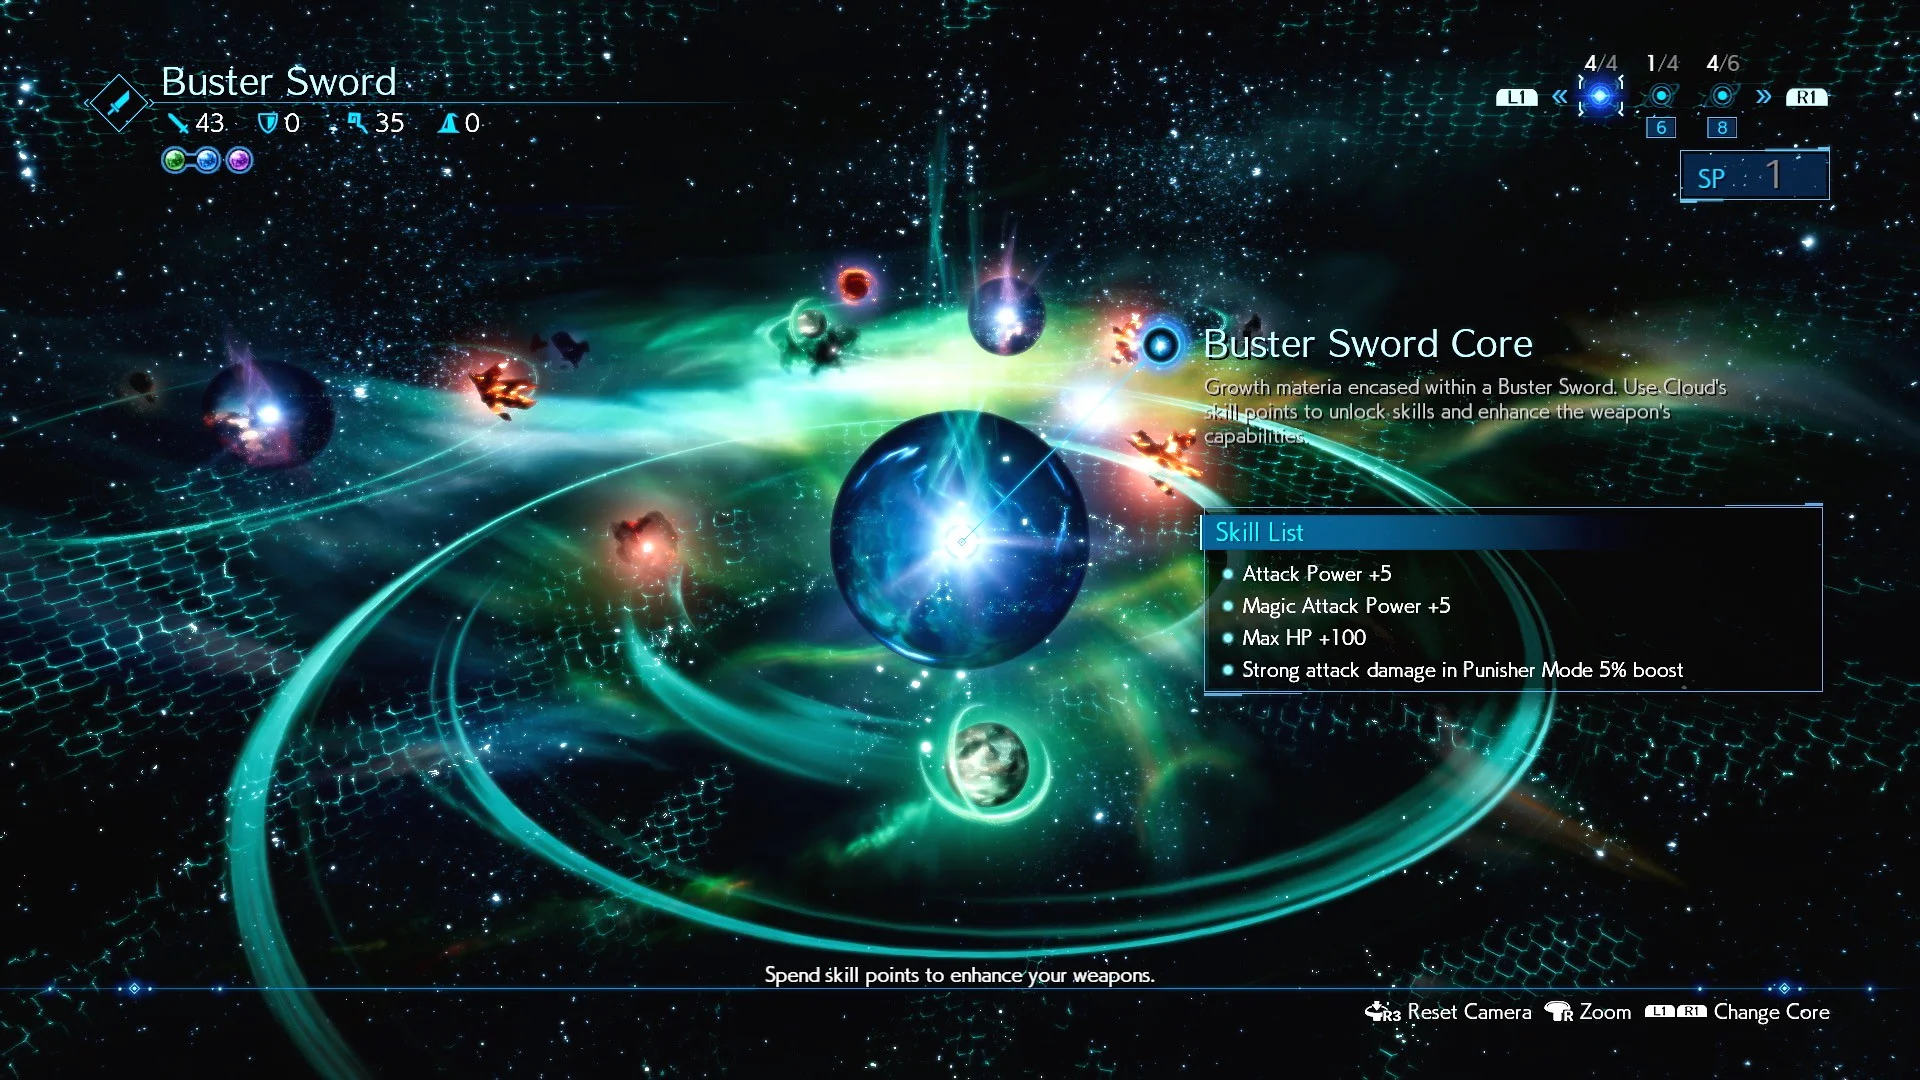
The Buster Sword Core screen shows glowing upgrade nodes around a central sphere, a Skill List on the right and an SP count at the top right.
The core name is beside the selected orb, the Skill List is on the right, and SP is counted at the top right. This is a separate menu from placing Materia into equipment slots.
  1. Open Upgrade Weapons from the main menu, choose Cloud, then choose the weapon you want to improve. The Buster Sword Core screen is a cluster of glowing nodes, not the colored Materia slots from the previous picture.
  2. Look at the SP number at the top right and read a node's Skill List on the right. Choose something you can afford and that helps your current problem: for example, more health if you are being knocked out, or another Materia slot if you need a second useful orb.

Weapon SP belongs to that weapon's upgrade system. It is not ATB and it is not the MP used to cast spells. If the selected node says you need more SP, keep playing and return later rather than looking for a potion or a shop item.

11. Try Classic Mode if the real-time controls are too much

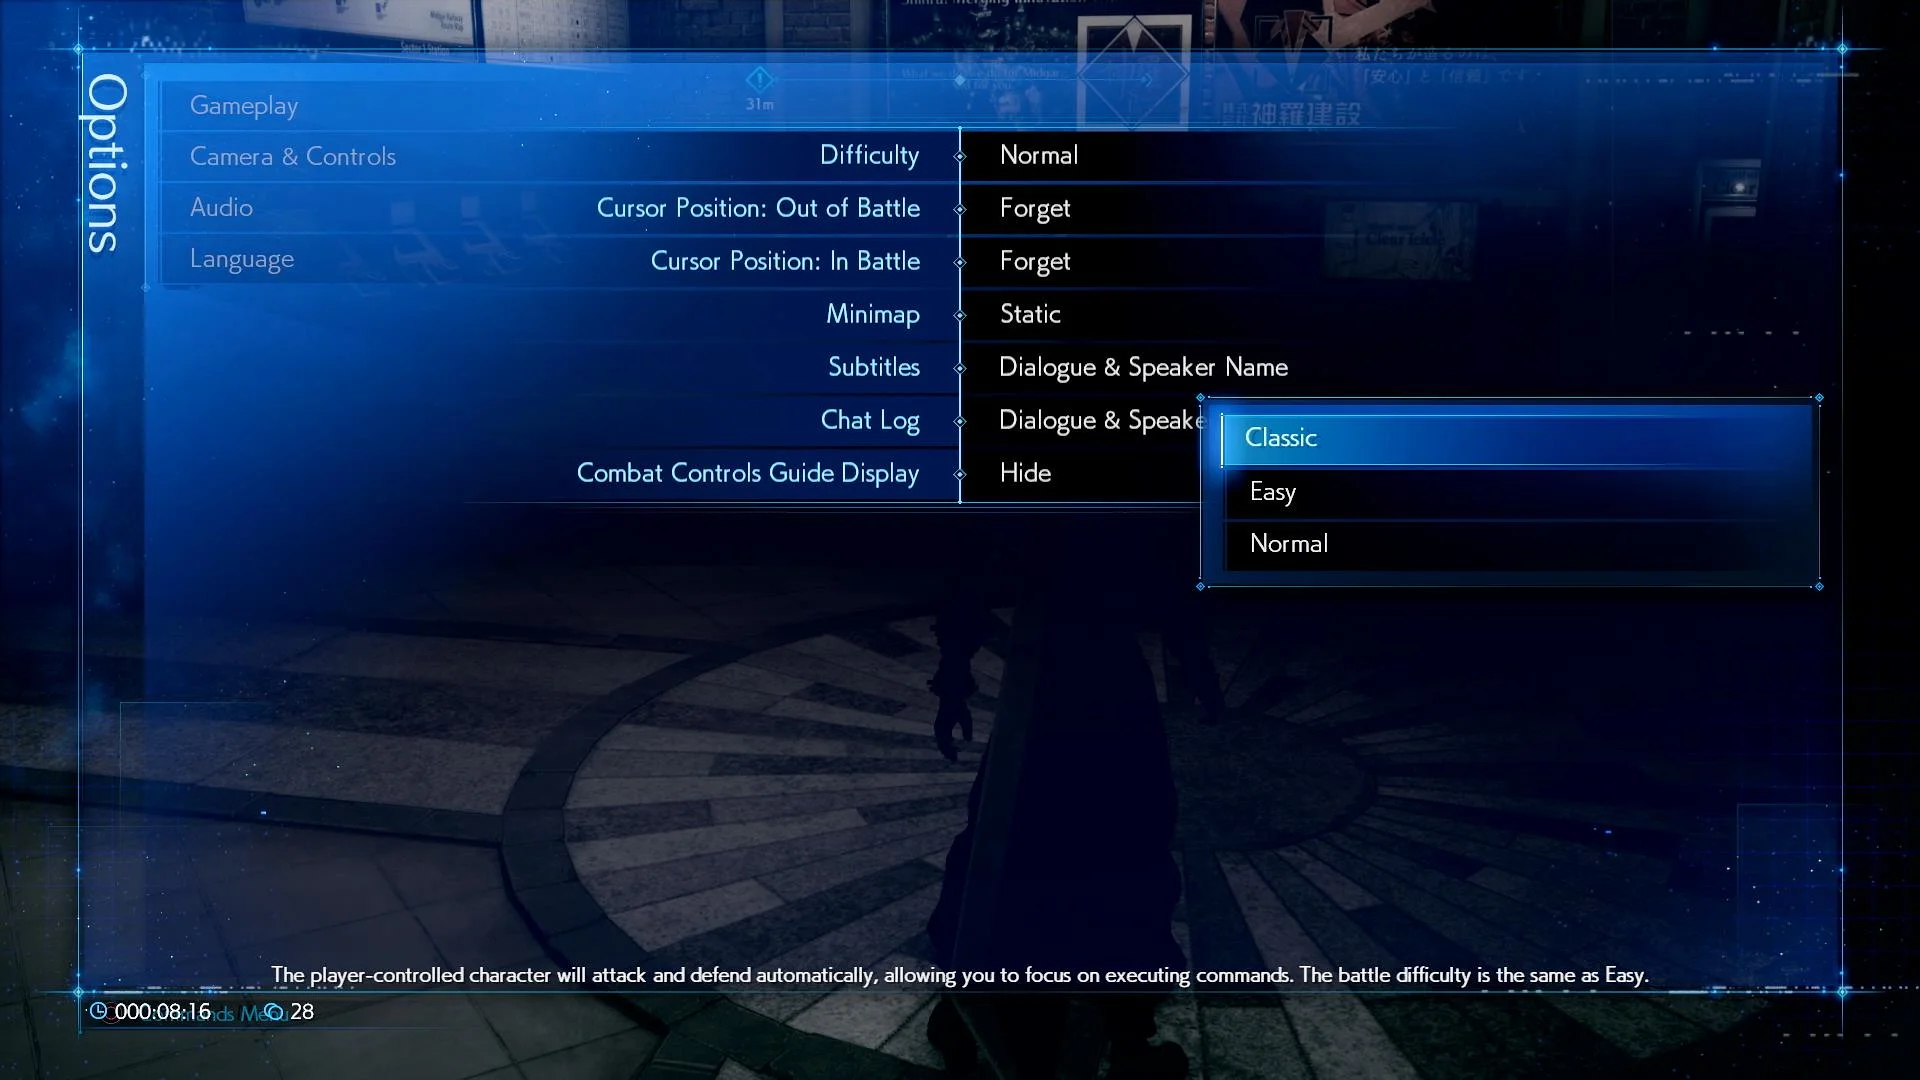
Options Gameplay screen with Difficulty expanded and Classic highlighted on the right; the help line at the bottom says the player-controlled character attacks and defends automatically.
Pause, open System and Options, then find Difficulty under Gameplay. Choose Classic from the list on the right. The bottom help text explains the automatic attacks and defense.
  1. Pause outside a dangerous action moment, open System, then Options. In the Gameplay panel, highlight Difficulty. The screenshot shows Classic above Easy and Normal on the right.
  2. Choose Classic if you would rather focus on selecting commands. Basic movement, attacking and guarding happen automatically, while you still choose abilities, magic and items as ATB fills. You can still take direct control when you want to.

Classic is not a secret way to keep Normal's challenge with easier controls. The pictured original PS4 settings say its battle difficulty is the same as Easy. Choose the mode that makes the game fun for you; there is no need to fight the controls just to continue the story.

A simple loop for your next few battles

  • Before the fight, check HP and equip useful Materia. If someone is hurt, heal now so you do not need to spend your first ATB charge surviving.
  • During the fight, read the bottom-right HP, MP and blue ATB bars. Make basic attacks with Square, but hold R1 to guard when an enemy winds up.
  • At one filled ATB segment, press X and choose a useful command from the left menu. If Cloud cannot reach an enemy, switch to Barret with the directional pad.
  • When you have Assess, equip it and read the enemy's actual weakness. When Pressured appears, use a Stagger-building ability; spend your strongest safe commands once Staggered appears.
  • After the fight, check health again and look at the weapon and Materia menus when you gain new gear. One small upgrade at a time is enough.

If a command is missing, check this first

  • The Abilities menu is grey: look at the acting character's blue ATB bar, not a teammate's. Attack to fill one segment.
  • A spell is missing: open Materia & Equipment and check that the right character has that Materia in a slot. Then check MP and ATB.
  • Assess is missing: you must obtain and equip the Materia named Assess before its battle command appears. Chadley's later Battle Reports are not the same thing as an already-equipped orb.
  • You keep dying while waiting for ATB: guard with R1, heal between fights, or consider Classic difficulty. Square Enix recommends blocking as a more reliable first defence than constant dodging.
  • A weapon ability vanished after changing weapons: open Upgrade Weapons, find the ability's Proficiency bar and use that weapon until the ability is learned.

Get Pixel Twelve's biggest stories first.

Add as a preferred source on Google