
Pixel Twelve
Disco Elysium Beginner Guide: Skills, Checks and the Thought Cabinet

How To

Disco Elysium Beginner Guide: Skills, Checks and the Thought Cabinet

A spoiler-light visual guide to Disco Elysium that shows the world screen, Character Sheet, Health and Morale, clothing, dialogue, checks and Thought Cabinet in seven developer screenshots.

By Sophie MitchellGame: Disco ElysiumVerified Sep 24, 2026
Guide Type
How To
Last Verified
Sep 24, 2026

Guide details

Overview

A spoiler-light visual guide to Disco Elysium that shows the world screen, Character Sheet, Health and Morale, clothing, dialogue, checks and Thought Cabinet in seven developer screenshots.

Before you click anything: what kind of game is this?

Disco Elysium is a detective role-playing game. You walk through a neighbourhood called Martinaise, talk to people and investigate a death. There is no usual cycle of sword fights and loot. Your character's skills mostly affect what he notices, says and attempts during conversations. Your partner Kim Kitsuragi helps you investigate, but you choose your detective's words and actions.

This guide is for the Windows PC version shown in the official screenshots. The later Final Cut and console versions may arrange or label a control differently. Use the named screen and icon in each picture rather than relying on a keyboard shortcut you may have changed. The game includes adult themes, violence and substance abuse, so its tone is much darker than the simple steps here.
1. Find people and clues on the world screen

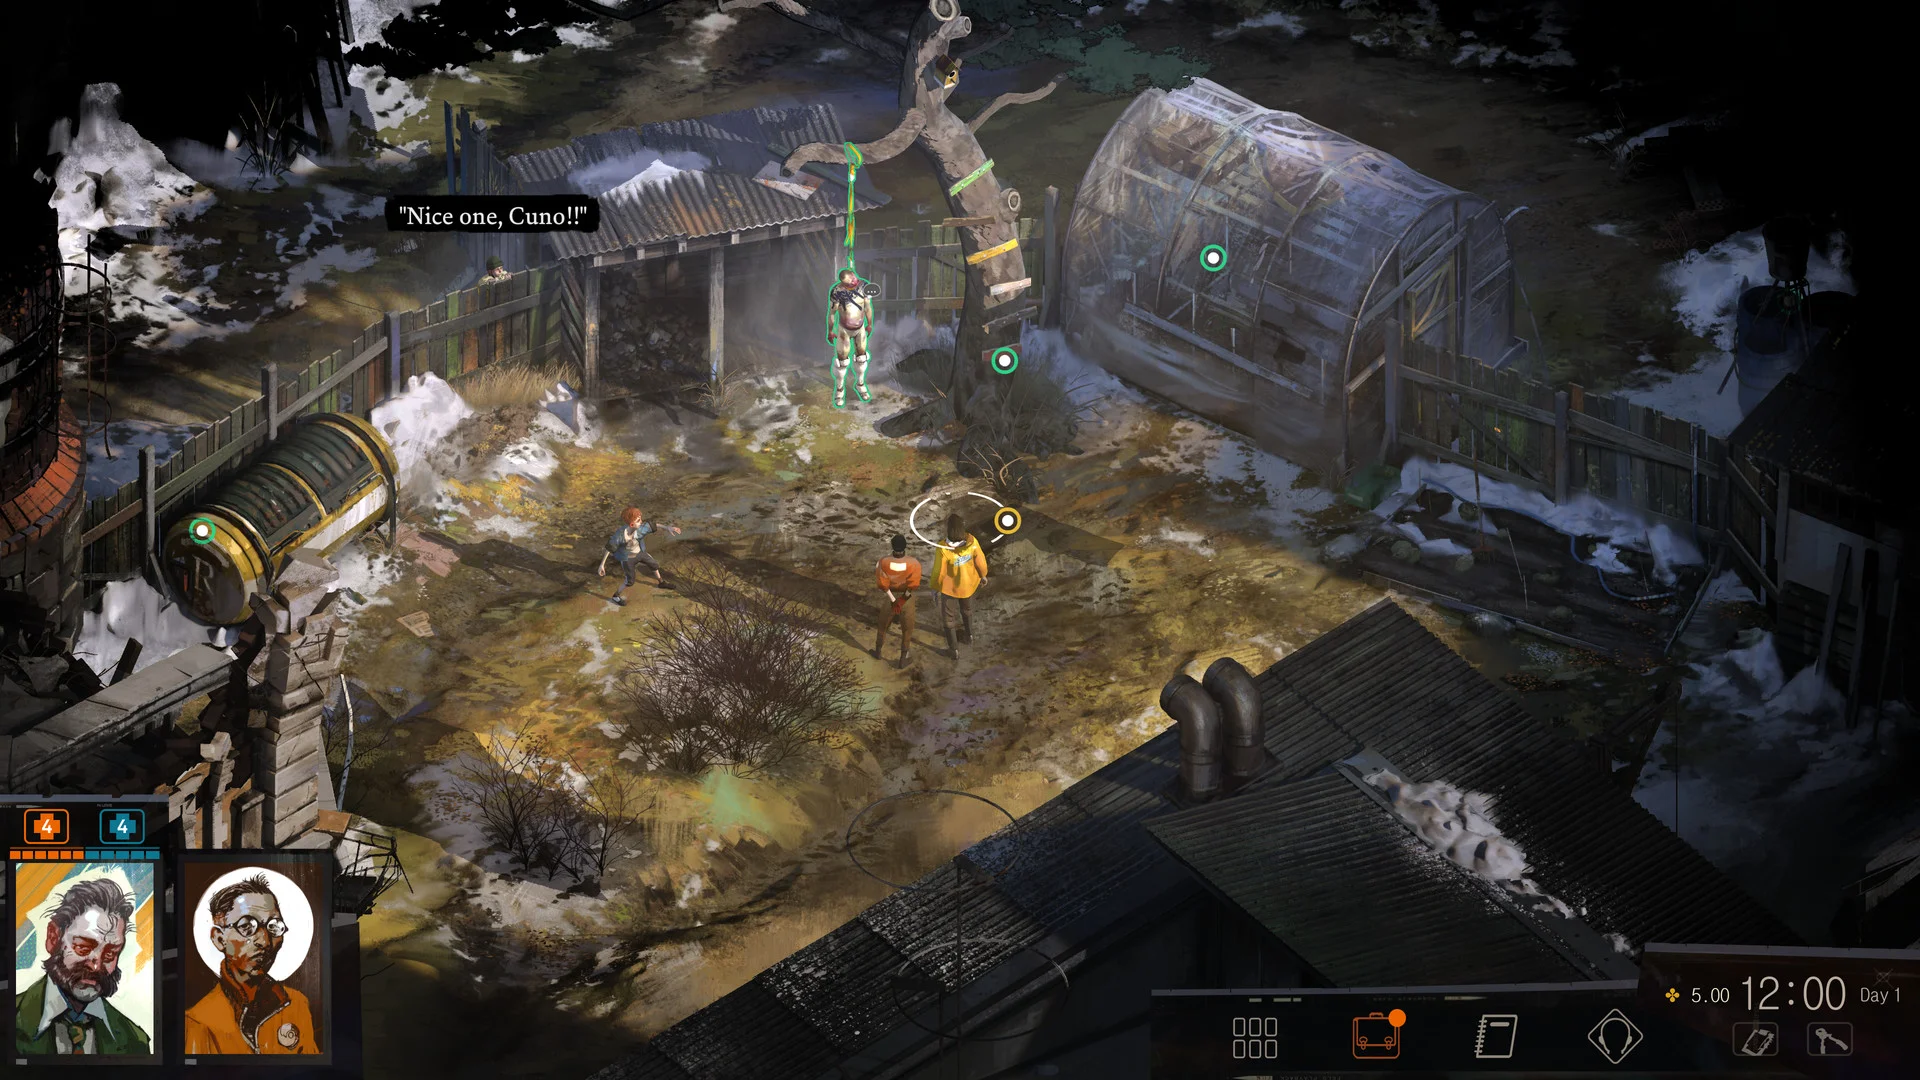
Official Disco Elysium world screenshot: the detective and Kim stand below an outlined person, while circular interaction markers appear on objects and the Health and Morale bars sit at lower left.
Start in the world view. Look for a bright outline or small circle on a person or object, then select it. Your detective is the man in the green jacket beside Kim in orange.
  1. Find your detective on the screen and select a patch of ground to walk there. In the picture, he and Kim are near the lower middle. This view uses an angled, overhead camera; you do not have to steer a character with combat controls.
  2. Move the pointer over a nearby person or object. When it gains a bright outline or an interaction marker, select it to inspect or begin a conversation. In the example, the hanging figure is outlined and circles mark other things you can investigate. Do not assume every painted detail is selectable.
  3. Before leaving an area, scan the space for those markers and speak to people who look relevant to your current question. The game can give you new clues through a normal conversation, not only through a high-stakes skill check.

This screenshot is from a later scene. Your first playable room has fewer people and clues, but the same basic idea applies: find an outlined point, select it, read what happens and then decide what to ask or inspect next.

2. Read the Character Sheet without memorising 24 names

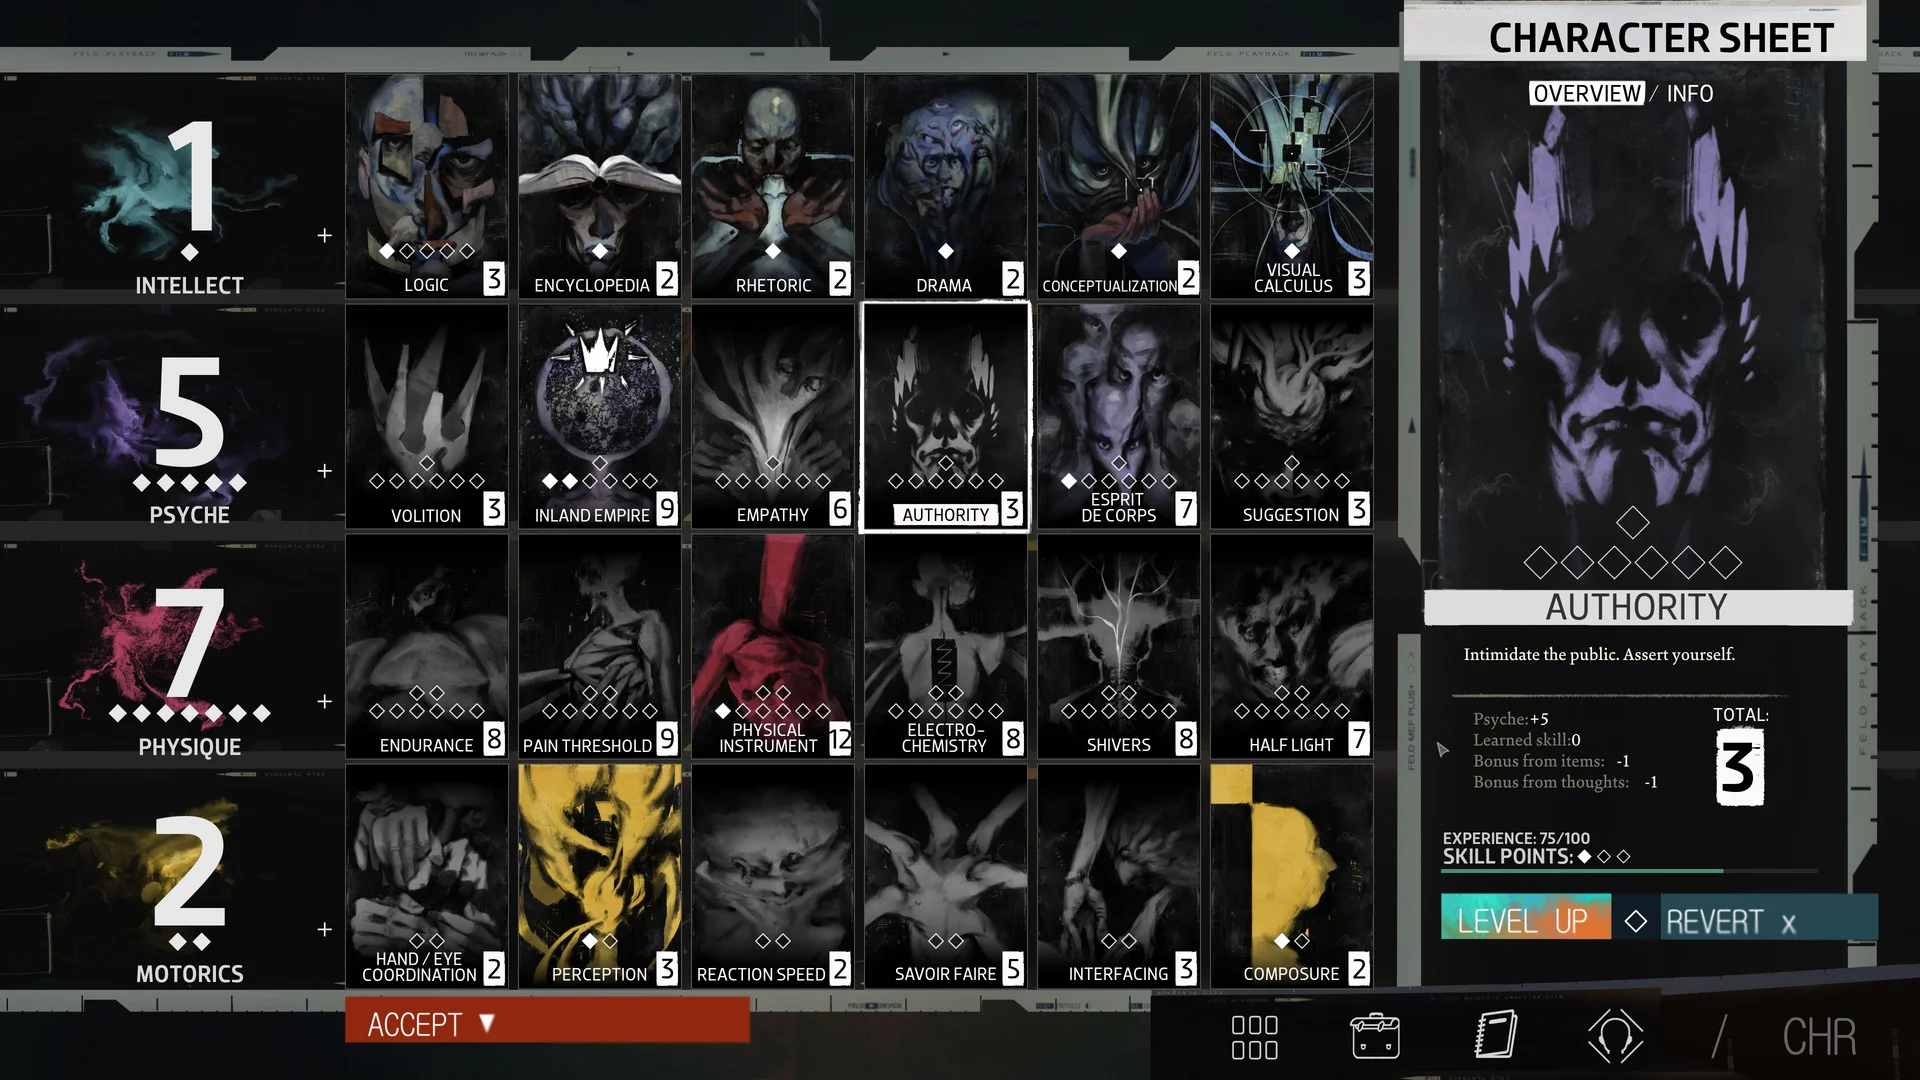
Official Character Sheet: Intellect, Psyche, Physique and Motorics are listed down the left, six skill portraits follow each row, and Authority is selected on the right.
Use the small grid icon along the bottom to open the Character Sheet. Four attribute names run down the left; the selected skill and its total appear in the right panel.
  1. Look along the bottom edge for the little grid made of small squares and open it. Confirm the screen says Character Sheet. You are in the right place if you see four large rows on the left and painted skill portraits across the middle.
  2. Read the four row names first: Intellect, Psyche, Physique and Motorics. Each row has six skills. Select a portrait to see what that one does in the panel on the right. The picture has Authority selected; its displayed total is an example from this character build, not the score every new player has.
  3. When you earn a Skill Point, this screen is where you can raise a skill. Read the description and think about the obstacle you actually face. If you keep failing a check that names a particular skill, upgrading that skill may help; you do not need to spread points across all 24 immediately.

Your skills also speak up on their own. A high skill can give you an observation during dialogue without you choosing a separate menu command. More lines from a skill are not guaranteed to be reliable advice; they are part of your detective's way of seeing the world.

3. Watch both Health and Morale

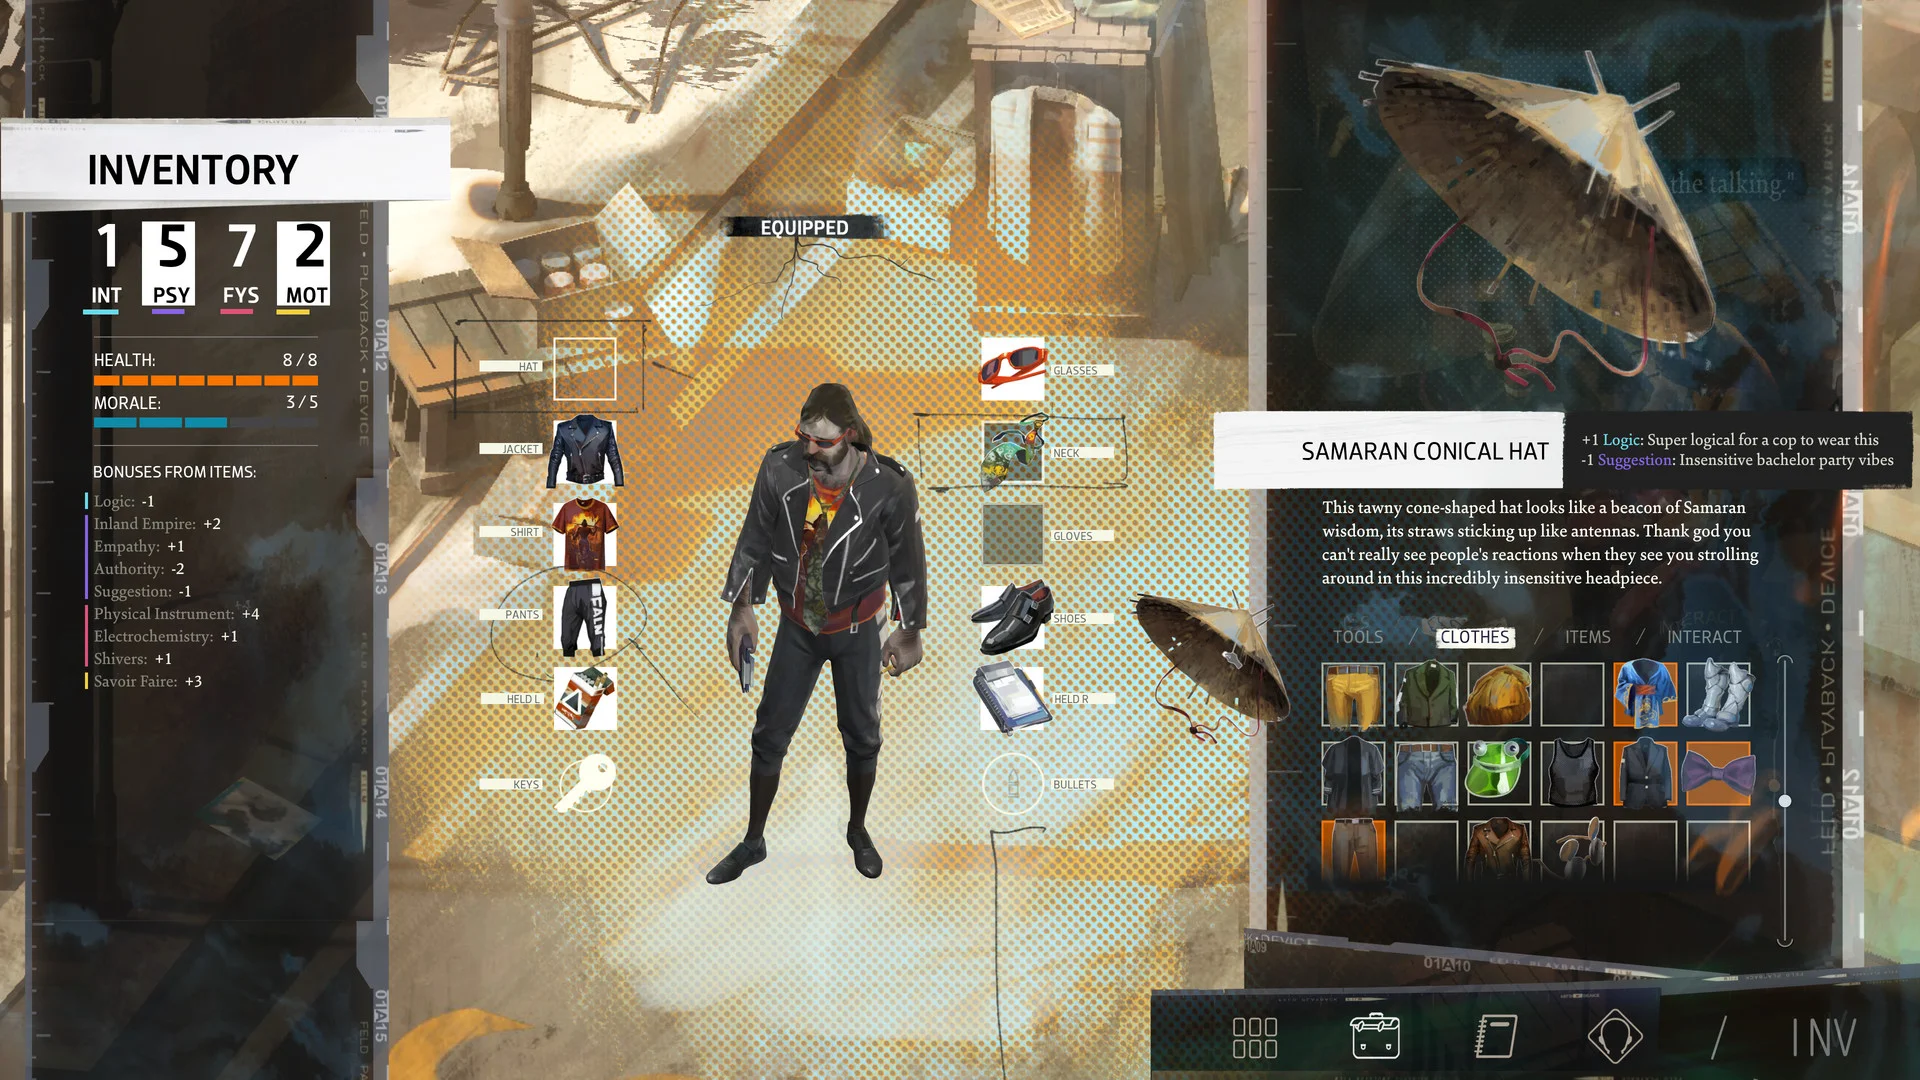
Inventory screenshot with orange Health and blue Morale bars on the left, clothing slots around the detective in the centre, and item details on the right.
On the Inventory screen, the orange Health bar and blue Morale bar are on the left. Both matter. Clothing slots are around the detective in the middle; the selected item explains its effects on the right.
  1. Look at the left edge of the Inventory picture. Beneath the four abbreviated attributes are two labelled bars: Health in orange and Morale in blue. Health is physical survival. Morale is your detective's ability to keep going mentally. Losing all of either can end the game.
  2. When a conversation or action reduces one bar, pause before trying another risky check. Search your inventory for a recovery item that matches the bar you lost. Inspect its description before using it so you do not confuse Health and Morale supplies.
  3. Do not copy the 8/8 Health and 3/5 Morale values in this screenshot as targets. They belong to one developed character. Your maximum bars depend on your own build and can change.

Endurance contributes to Health and Volition to Morale, according to the developers. A skill point or an item can change your chances of surviving a difficult moment, but the easiest first habit is simply to check both bars before a risky conversation.

4. Use clothing as equipment, not decoration

  1. Select the suitcase icon along the bottom edge to open Inventory. The screenshot above shows the detective in the middle with named clothing slots such as Jacket, Shirt, Pants and Shoes around him. On the right, switch to the Clothes tab if you are looking at tools or other items.
  2. Select an item in the clothes grid. Read the small bonuses and penalties before equipping it. The pictured hat gives a Logic bonus but a Suggestion penalty. That is why an item that helps one conversation may make another harder.
  3. If a check tells you which skill it uses, compare that name with your current clothing bonuses on the left of the Inventory screen. Put on something helpful if you own it, then return to the conversation. You do not need to wear the same outfit for every encounter.

The picture's outfit, skills and inventory come from an advanced example. New characters will have fewer choices. Do not spend your first hour hunting for a specific hat shown in promotional screenshots; learn where the Clothes tab is and read what your own items actually do.

5. Tell normal dialogue from a skill check

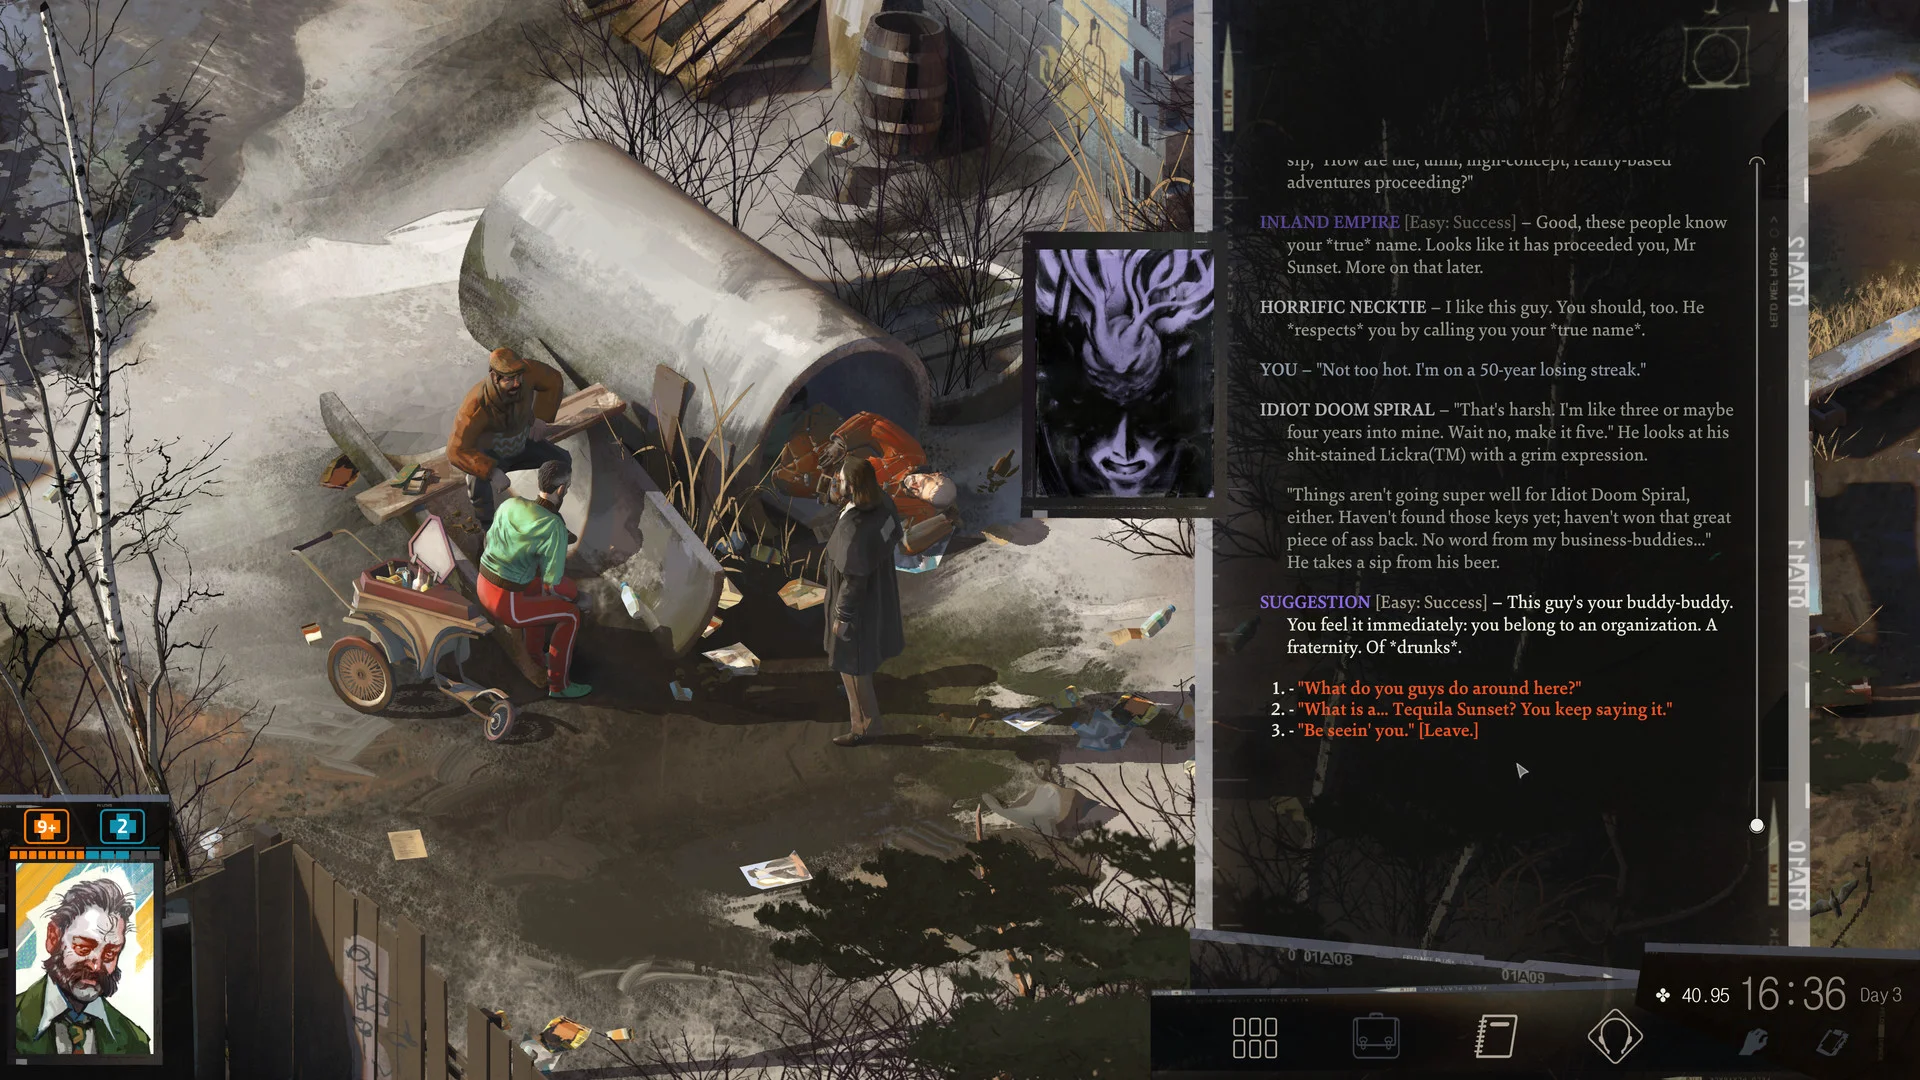
Official dialogue screenshot: the detective speaks with people beside a concrete pipe; the conversation panel on the right shows skill comments and numbered dialogue choices.
The conversation is on the right. Coloured skill names such as Inland Empire and Suggestion appear inside the text; the numbered orange lines at the bottom are replies you can choose.
  1. Select a person to talk. The right side becomes a long conversation panel. Read the speaker name and the text, then look beneath it for numbered replies. Select the line you want your detective to say, or use a [Leave] option when one appears and you want to return later.
  2. When a coloured skill name appears inside the conversation, it is usually one of your detective's thoughts or observations. In the screenshot, Inland Empire and Suggestion comment before the reply list. Read those lines as clues or opinions, not guaranteed instructions.
  3. A normal reply simply moves the talk along. A check is different: its option names a skill and a difficulty or chance. Look at the next screenshot before choosing one, especially if the conversation feels important.

Some dialogue explores heavy subjects. You can step away from a conversation and investigate somewhere else when the game gives you that option; one awkward reply does not mean you have failed the whole case.

6. Identify the skill and odds before a check

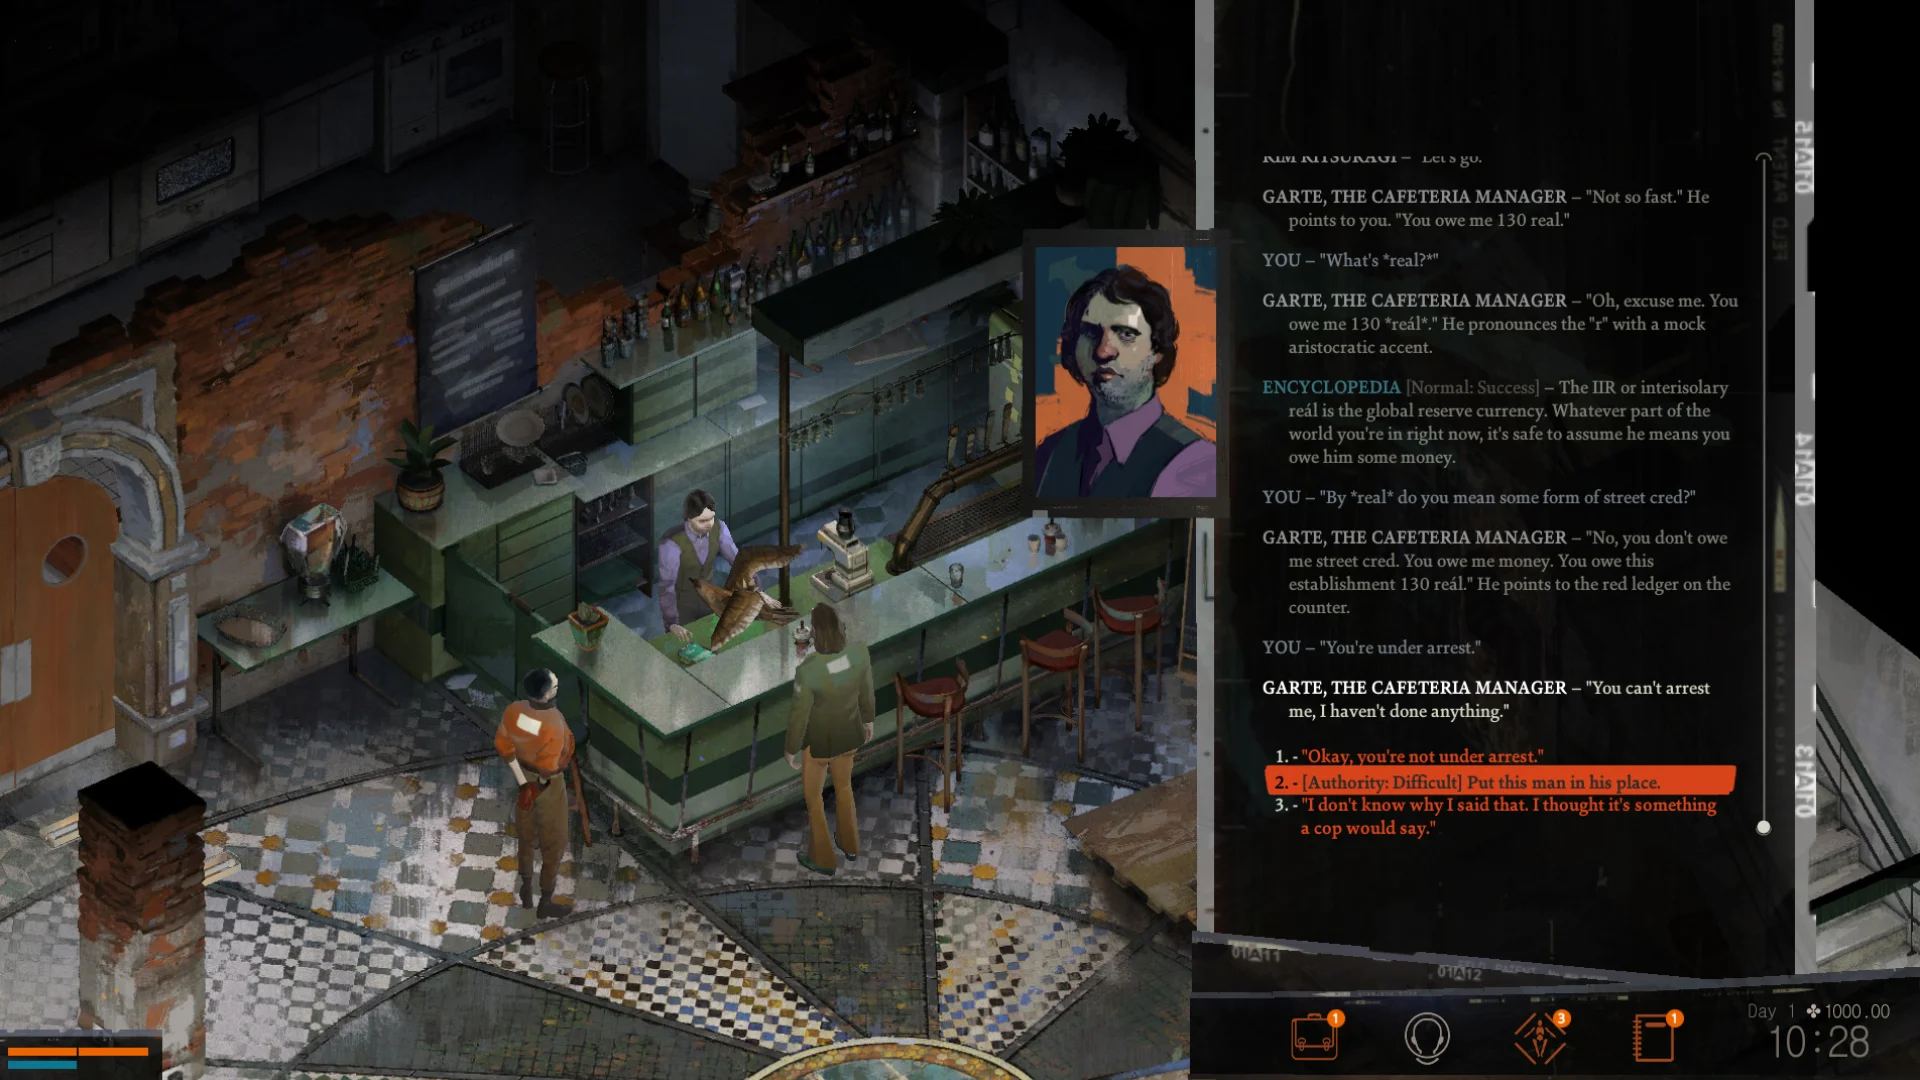
Dialogue with Garte: an orange highlighted option at the bottom right reads Authority: Difficult, while the dialogue above shows an Encyclopedia observation.
The second reply at lower right is a check: it says Authority: Difficult. The skill is Authority. Read that label before selecting it; the separate Encyclopedia line above is a passive observation.
  1. In the dialogue screenshot, find the second orange choice at the bottom of the right panel. Its bracketed text says Authority: Difficult. Authority is the skill being tested; Difficult warns that the roll will be hard for this detective. Do not confuse it with the blue Encyclopedia observation higher up.
  2. Before selecting a check, inspect any chance or modifiers the game shows for that option. A clothing item, information from another conversation or a higher skill can change your odds. If the game shows a low chance, decide whether the attempt is worth the risk now or whether you would rather learn more first.
  3. A check is not a test of your real-life reflexes. The game rolls dice and combines the result with your character's skill and other modifiers. You can make a good decision and still fail. Read what actually happens after the roll instead of assuming the story has stopped.

The exact wording and panel layout may differ across editions. The useful habit stays the same: spot the skill name, read the difficulty or chance, then choose knowingly.

7. Understand the result, then decide whether to return

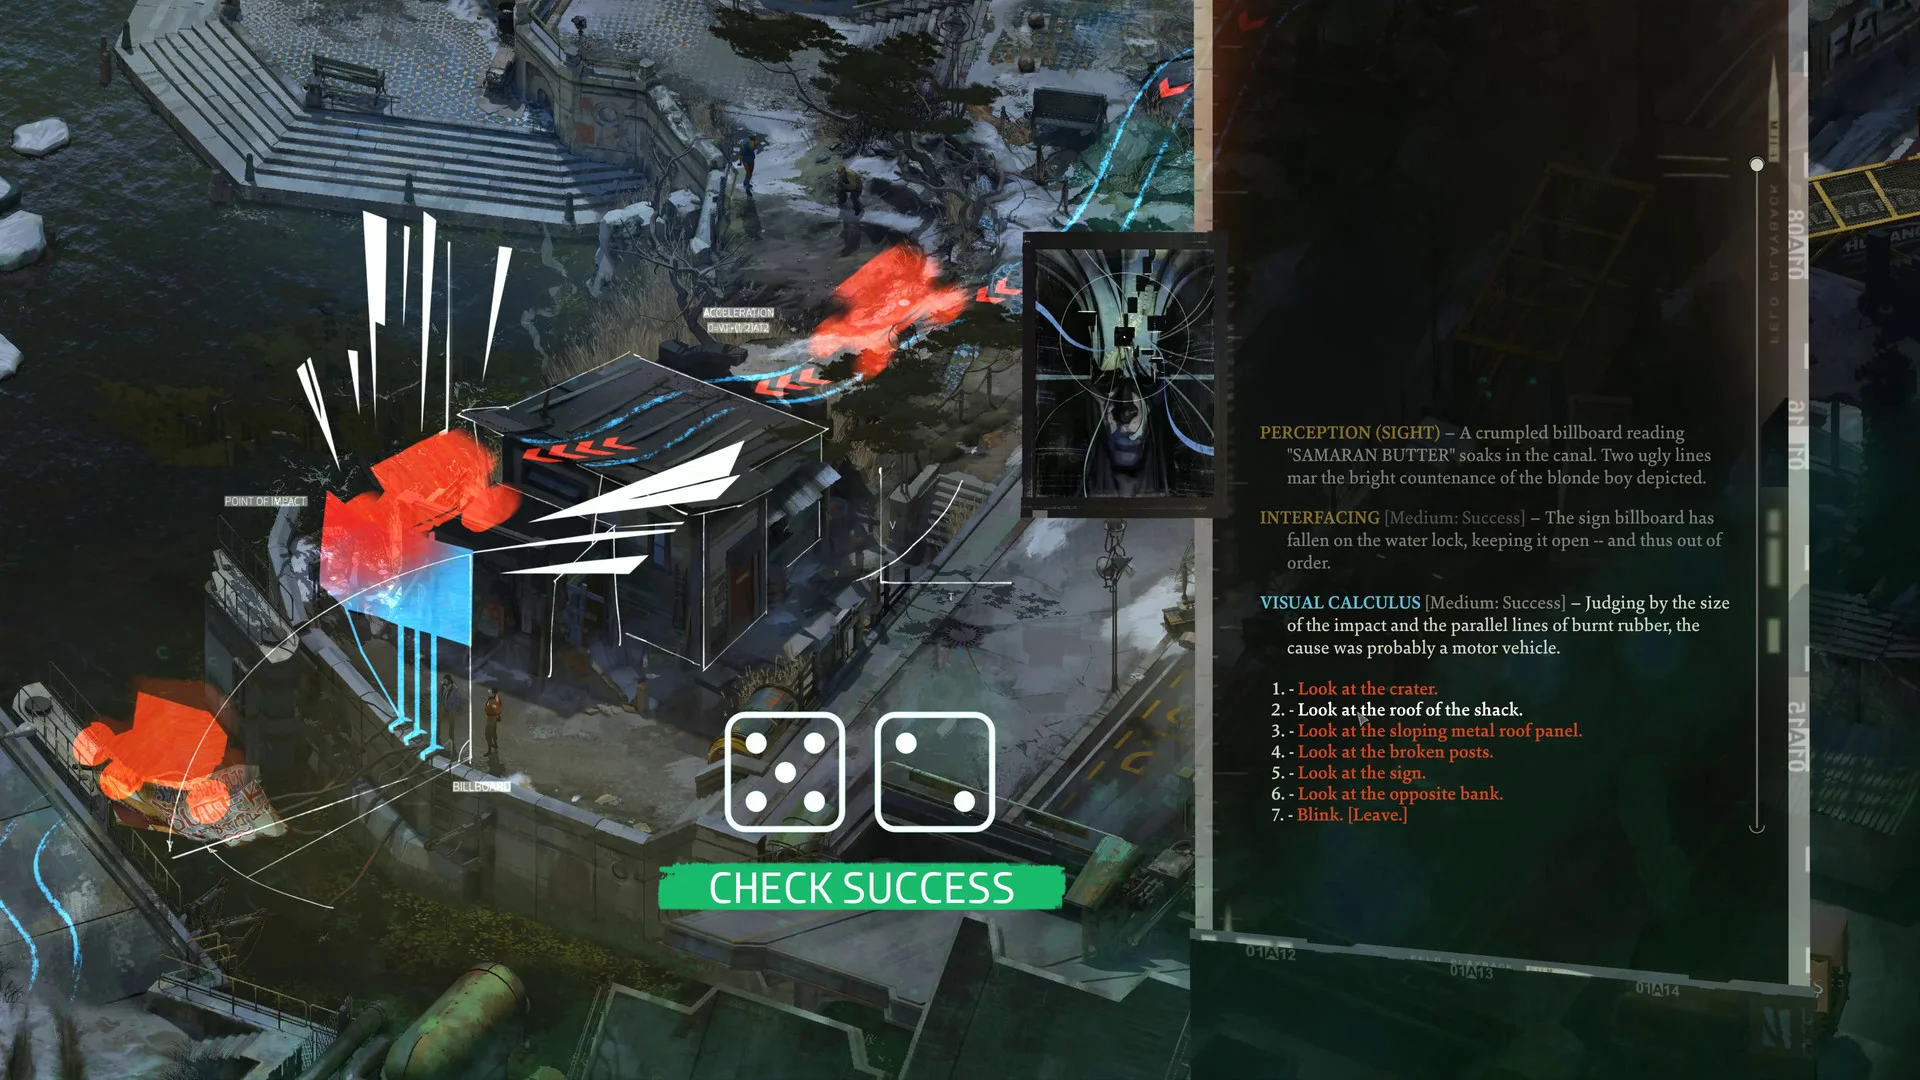
Official Disco Elysium screenshot showing a green Check Success banner and dice beside a Visual Calculus explanation in the dialogue panel.
The green Check Success banner and dice show a successful roll. On the right, Visual Calculus explains the new clue. A failed roll can lead to a different scene or leave a retryable check for later.
  1. After you choose, look for the dice and the success or failure result, then read the new dialogue. In the picture, Check Success appears in green while Visual Calculus gives a clue about the scene. The result text tells you what your detective learned; the banner alone does not.
  2. The game distinguishes White Checks and Red Checks. A failed White Check can often be tried again after you improve the relevant skill or change the situation. A Red Check is a one-attempt choice with an outcome that plays out. Look for the check-type label when it appears; the red colour used for the Physique attribute is not by itself proof that a dialogue check is a Red Check.
  3. If a White Check is closed after failure, record the skill it named and continue another lead. Return when you gain a point in that skill or find new information. If a Red Check fails, follow the scene it creates. ZA/UM designed many failures as story outcomes, not as a simple game-over screen.

No single screenshot can show every possible result. The Visual Calculus success in this example does not mean another detective would succeed here; your stats, clothing, thoughts and dice result can differ.

8. Find the Thought Cabinet and read a thought first

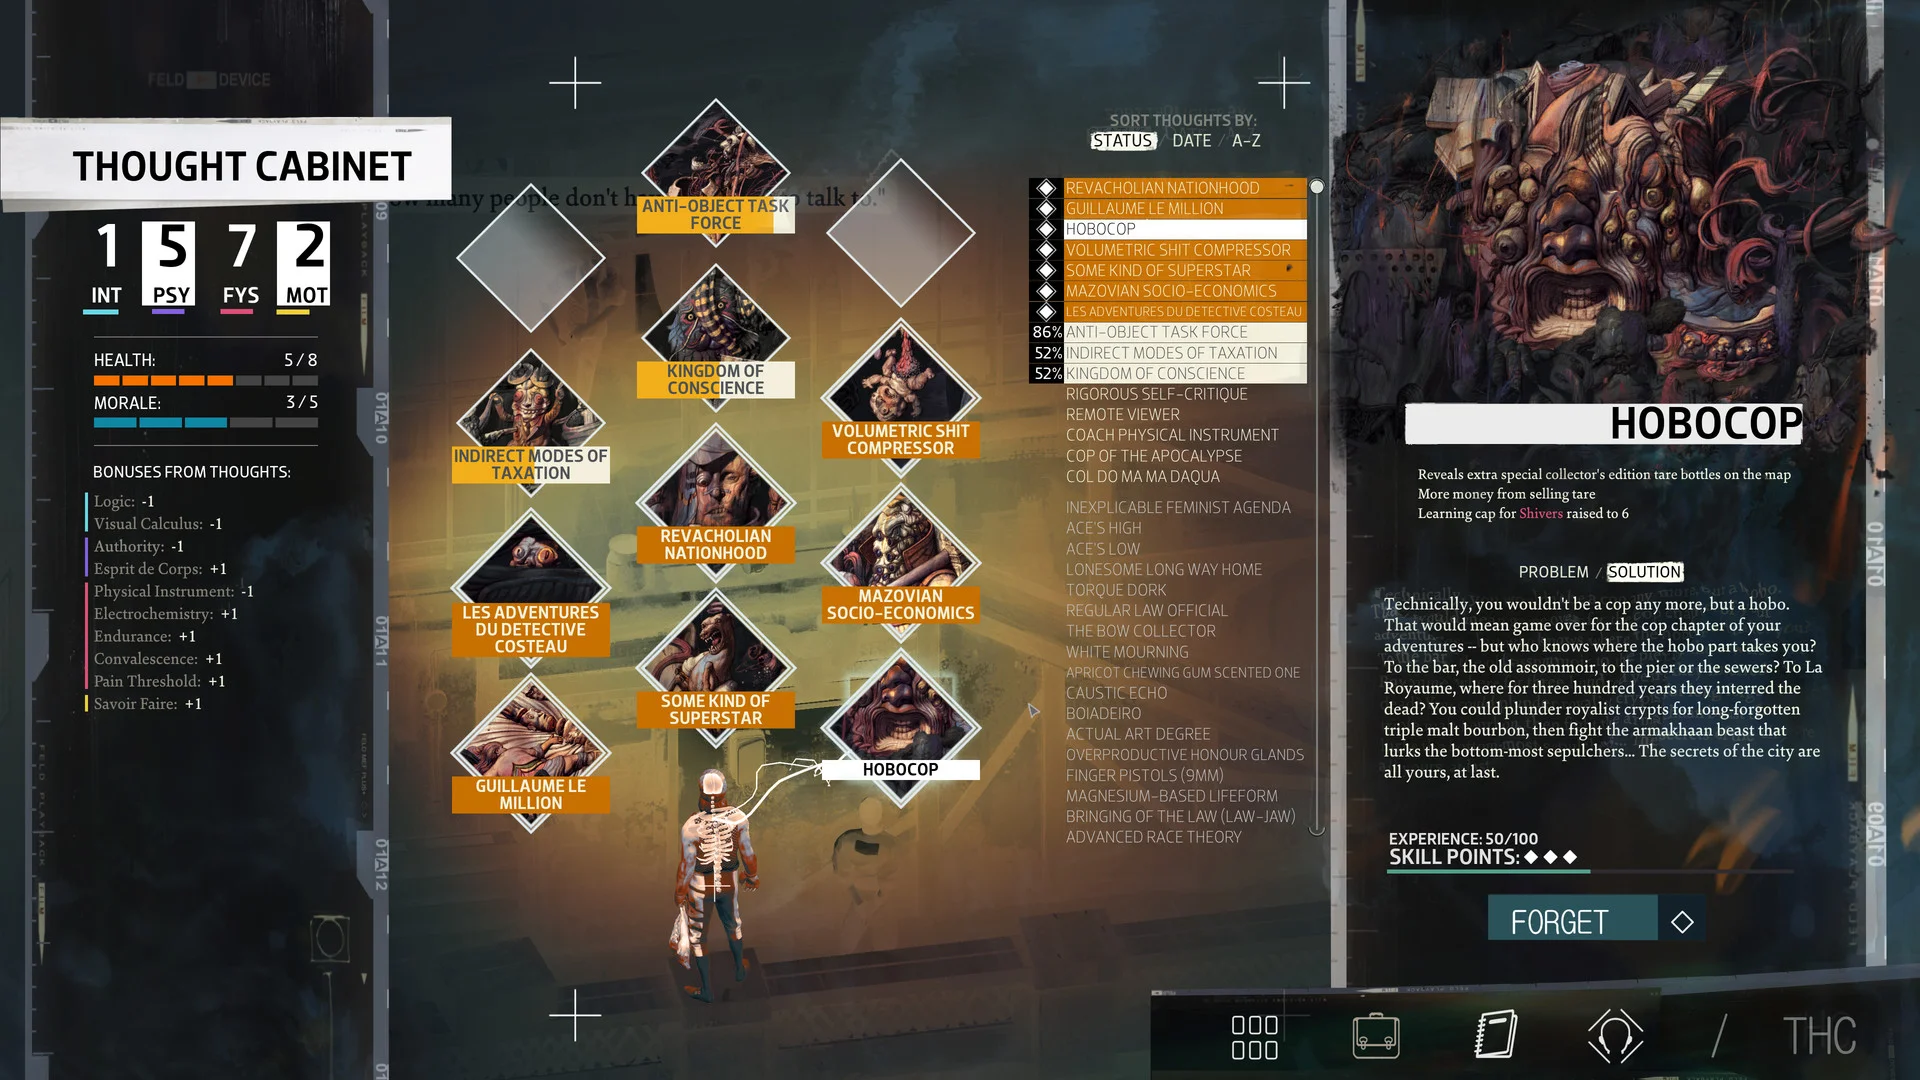
Official Thought Cabinet screen: diamond thought slots fill the centre, a list of named thoughts sits beside them, and Hobocop details appear in the right-hand panel.
Open the diamond-shaped Thought Cabinet icon along the bottom. The centre holds thought slots; select a thought name in the list to read its description and any current effects on the right.
  1. Look for the diamond-shaped head icon along the bottom of the screen and select it. Confirm the title Thought Cabinet at the upper left. You should see large diamond slots in the middle and a list of thoughts to their right.
  2. Select one of your available thoughts from the list. Read the right panel before using a slot. The picture has Hobocop selected and shows a Forget button because this developed character already holds that thought. A new player's list and buttons will be different.
  3. When you choose to internalize an available thought, it takes a slot and in-game time to finish processing. Its final benefits or drawbacks may not be obvious at the start. The developer explains that thoughts come from what you say, learn and do in the world; they are not ordinary inventory objects you can put on like a jacket.

This is a long-term character choice. Do not fill every slot just because it is empty. Read the thought, consider whether it suits your detective and come back when you want to spend the space. Forgetting a completed thought uses a Skill Point, according to ZA/UM's own explanation.

9. A useful loop for your first investigation

  • Walk toward a person or a bright interaction marker. Inspect it, then talk to someone nearby. The world screenshot shows what those circles and outlines look like.
  • In dialogue, read what your skills say, but make your own choice. When an option names a skill and difficulty, pause and check its odds before selecting it.
  • If a check seems too hard, open the Character Sheet to see the named skill, then Inventory to see whether clothes change it. A failed White Check may be worth revisiting; a Red Check is a one-time story turn.
  • Check orange Health and blue Morale after risky scenes. Use the right kind of recovery item before either bar reaches zero.
  • Open Thought Cabinet when the story gives you a new idea. Read the right panel before internalizing; there is no prize for filling slots without understanding them.

If something looks different from these pictures

  • Cannot find the Character Sheet: look for the small square-grid icon along the bottom, then confirm the screen heading. Do not choose the suitcase; that opens Inventory.
  • Cannot find clothing bonuses: open the suitcase icon, choose Clothes on the right, select an item and read its plus and minus effects.
  • Cannot find the Thought Cabinet: look for the diamond-shaped head icon along the bottom, then read the named thoughts in the list beside the slots.
  • Failed a check: read whether the game calls it White or Red. Improve a White Check's named skill or seek another clue before retrying. Continue the story after a Red Check's result.
  • These images are official developer examples with different builds and story moments. Your detective's numbers, outfit, available thoughts and platform controls will not match all of them.

Get Pixel Twelve's biggest stories first.

Add as a preferred source on Google