Pixel Twelve
Cuphead Beginner Guide: Map, Controls, Weapons and Parrying

How To

Cuphead Beginner Guide: Map, Controls, Weapons and Parrying

A visual first-time guide to Cuphead that shows the map, Xbox control menu, stage HUD, shop, weapon and charm screens, parry timing, results and co-op revival in nine official gameplay frames.

By Harold FinkGame: CupheadVerified Sep 26, 2026
Guide Type
How To
Last Verified
Sep 26, 2026

Guide details

Overview

A visual first-time guide to Cuphead that shows the map, Xbox control menu, stage HUD, shop, weapon and charm screens, parry timing, results and co-op revival in nine official gameplay frames.

Start here: learn the screen before you chase a perfect grade

Cuphead is a hard game, but your first job is small: finish the opening tutorial, find a stage on the island map and learn where your health and equipment live. You can try a boss more than once. A failed run still teaches you what comes next, so do not treat every restart as lost progress.

The screenshots below come from a 2017 official Xbox gameplay video and show different stages, not one exact first playthrough. Xbox button letters are visible in some pictures. If you use a keyboard, PlayStation or Switch controller—or changed your Xbox buttons—follow the action name in the menu rather than copying a letter from someone else’s setup.
1. Find a stage from the island map

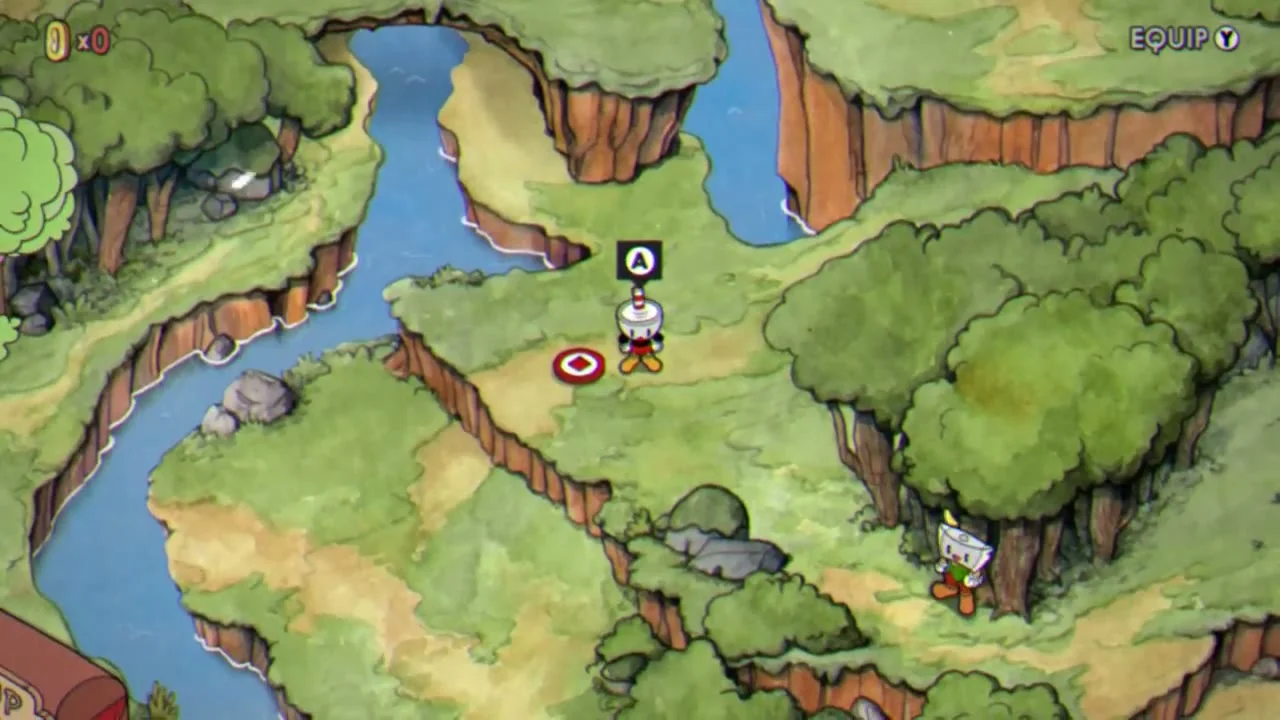
Cuphead stands on the Inkwell Isles map beside a red stage marker, with a confirm prompt above him, a coin counter at upper left and Equip at upper right.
On the map, walk to an entrance until a confirm prompt appears above your character. The coin counter is at upper left; Equip is shown at upper right in this Xbox example.
  1. After the opening tutorial, move Cuphead or Mugman along the paths on the island map. In the picture, Cuphead is near the middle, the small red marker is beside him and the confirm prompt appears directly above his head. When you see that prompt at an entrance, use your own confirm button to open it.
  2. Look at the upper-left corner before you enter. That little coin symbol and number are your spendable coins. A gold coin in a run-and-gun stage is something you can collect; a boss fight is about finishing the battle. You do not have to buy anything to try an entrance.
  3. The upper-right Equip prompt opens your loadout. You can return here after a shop visit. Buying an item and wearing it are two separate steps, so the map is your checkpoint for checking gear before another fight.

2. Check the control names, not somebody else’s button layout

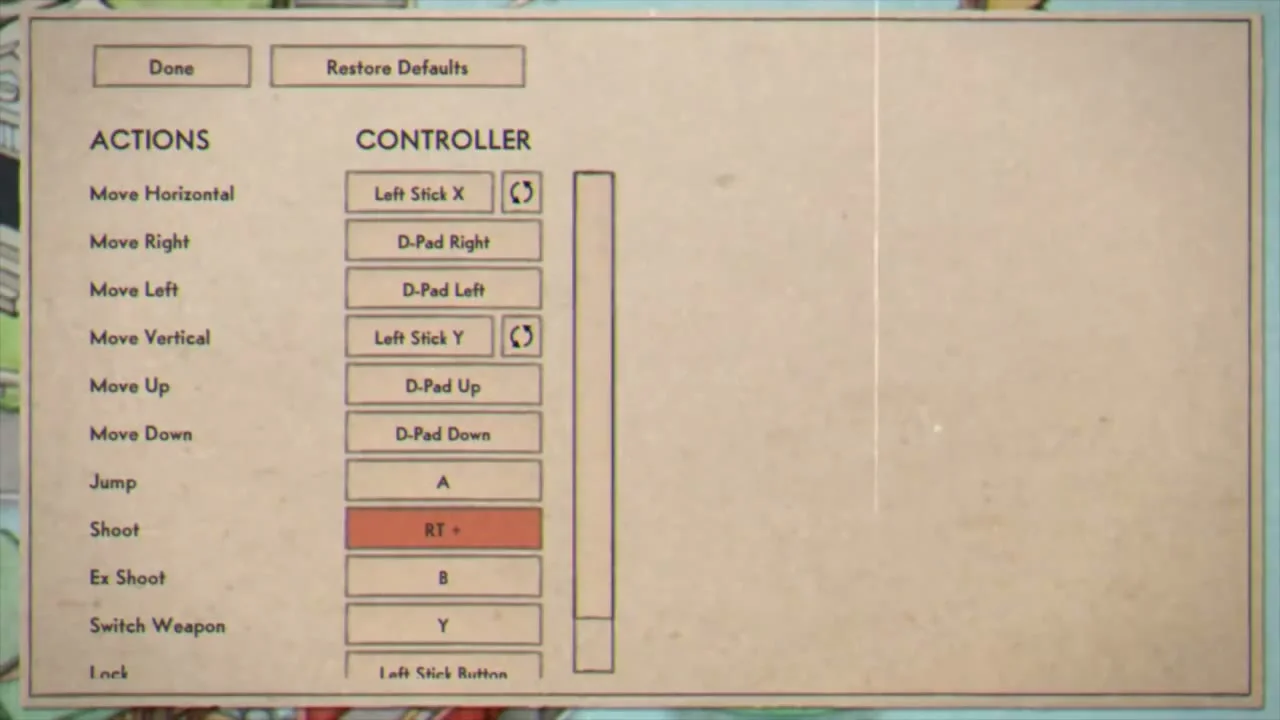
The Xbox control screen lists Actions at left and the assigned Controller buttons at right, including Jump, Shoot, EX Shoot, Switch Weapon and lower actions.
Read the left Actions column first. This video’s right-hand buttons were remapped; your own menu tells you what Jump, Shoot, EX Shoot and Dash currently use.
  1. Open the game’s options or controls screen and find the list headed Actions. In the screenshot, actions run down the left and assigned buttons are in boxes on the right. Look for Jump, Shoot, EX Shoot, Switch Weapon, Lock and Dash; scroll if Dash is below the visible area.
  2. If aiming while jumping feels awkward, select an action’s button box to change it, then use Done near the top to keep the new layout. The screenshot’s highlighted Shoot assignment is an example chosen for the video, not a default button you must copy.
  3. Return to the tutorial or a stage and test movement, one jump, a dash and a few shots before worrying about a boss pattern. Knowing which finger performs Dash matters more than choosing a “best” control layout on your first day.

3. Read the lower corners during a stage

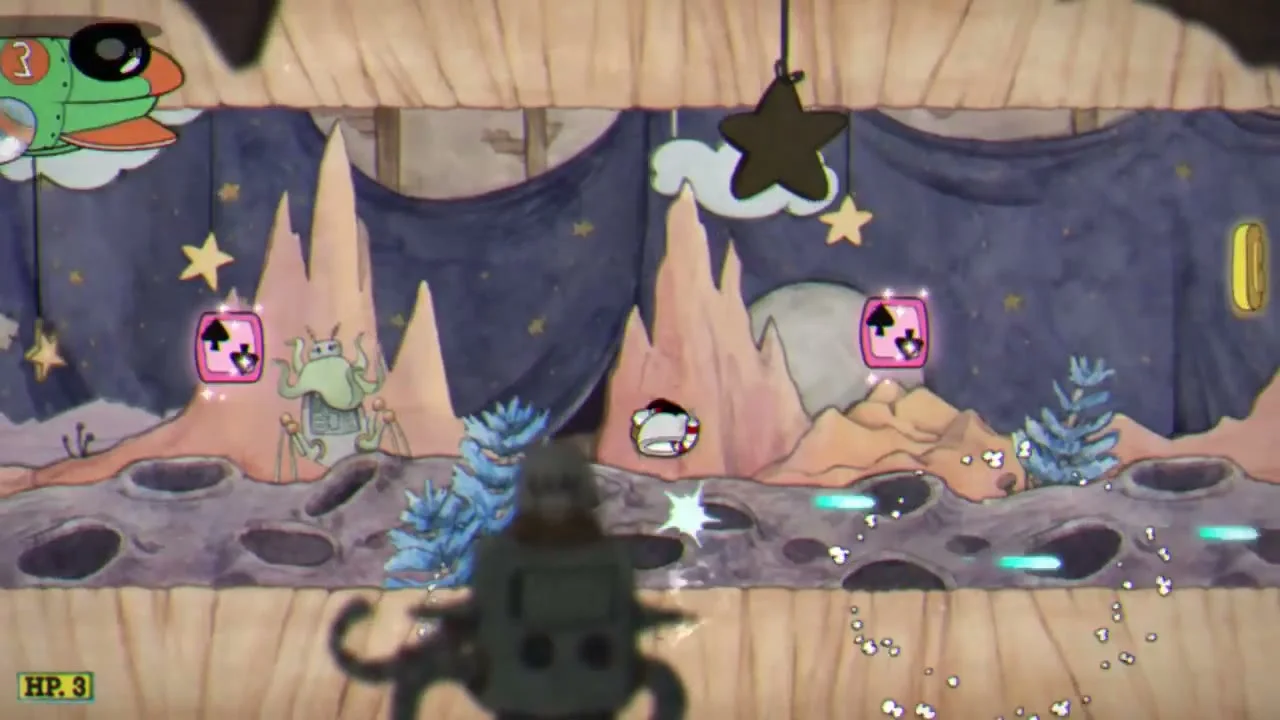
Cuphead stands inside a run-and-gun level with pink objects overhead, a gold coin to the right and an HP:3 readout at lower left.
The player is near the middle. Check **HP** at lower left; the pink objects above can be parry chances, while the gold coin near the right edge is a collectible in this stage.
  1. First, locate your character—Cuphead has the red shorts, while Mugman wears blue. In the screenshot, Cuphead is near the middle of a side-view stage. The environment moves across the screen as you travel; watch where the next platform or hazard is, not only where your shots land.
  2. Find HP in the lower-left corner. The picture says HP:3, meaning this example still has three hit points. Your value can change after a hit or with a different charm. If HP drops, spend the next few seconds leaving room to dodge instead of rushing forward.
  3. The small card shapes beside HP are your attack meter. A successful parry and ordinary fighting help fill it. An EX Shoot uses a card for a stronger move. If the card area is empty, keep playing safely rather than mashing EX and wondering why nothing happens.

This picture comes from a later run-and-gun example, so do not expect the exact enemies or coin to appear immediately. The useful thing to recognise is the same HUD layout: your character on the stage, HP low on the screen and the card meter beside it.

4. Spend a coin at the shop only after reading the item

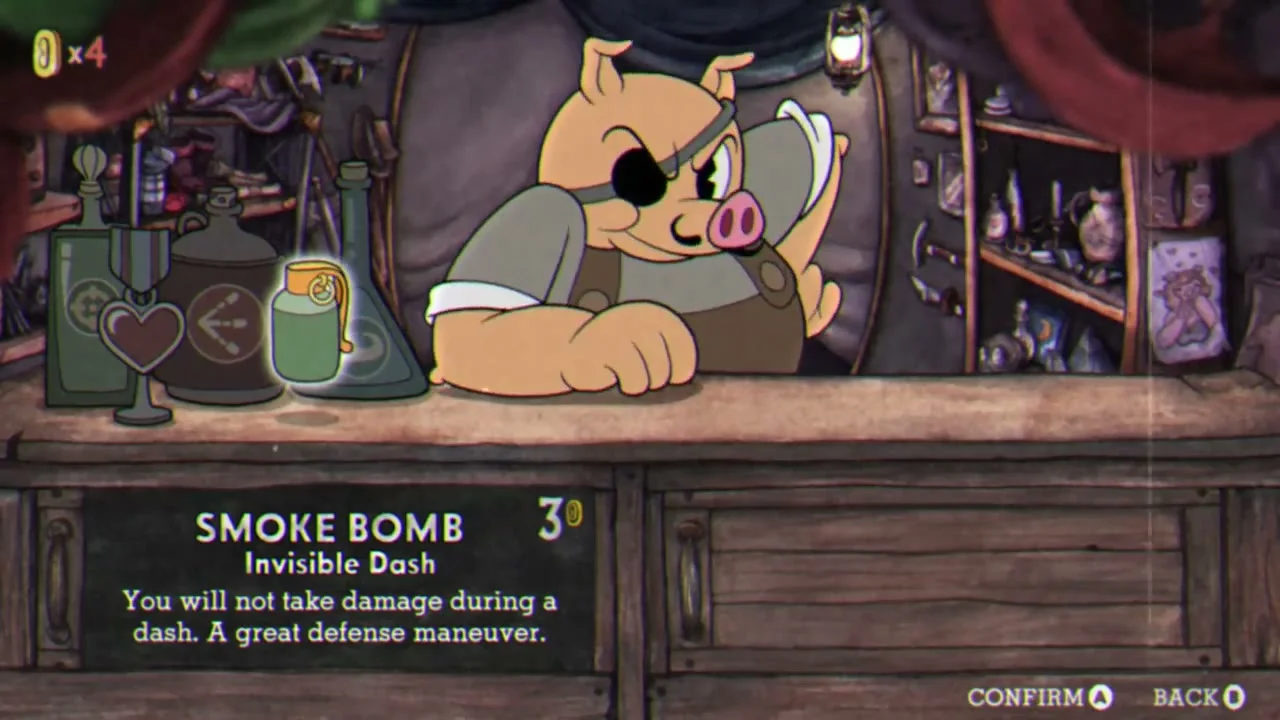
Porkrind stands behind his shop counter while Smoke Bomb is selected with a three-coin cost and a short description.
The shop panel names the item, price and effect. Smoke Bomb costs three coins in this example and makes a dash avoid damage; check your current coin count before buying.
  1. On the island map, walk into the shop entrance and use the on-screen confirm prompt. Inside, the vendor Porkrind stands behind the counter. The lower panel displays the currently selected item, its coin cost and what it does.
  2. Move between items and read that panel before confirming. The screenshot has Smoke Bomb selected and shows a cost of three coins. Its description explains that you do not take damage during a dash. That can help if you often get clipped while crossing an attack, but it is a choice, not something everyone must buy first.
  3. If you cannot buy an item, compare its price with the coin counter at the upper-left of the shop screen. Collect coins from a run-and-gun stage and come back. Do not confuse the small card meter used in battle with coins used in the shop.

5. Equip a weapon after you buy it

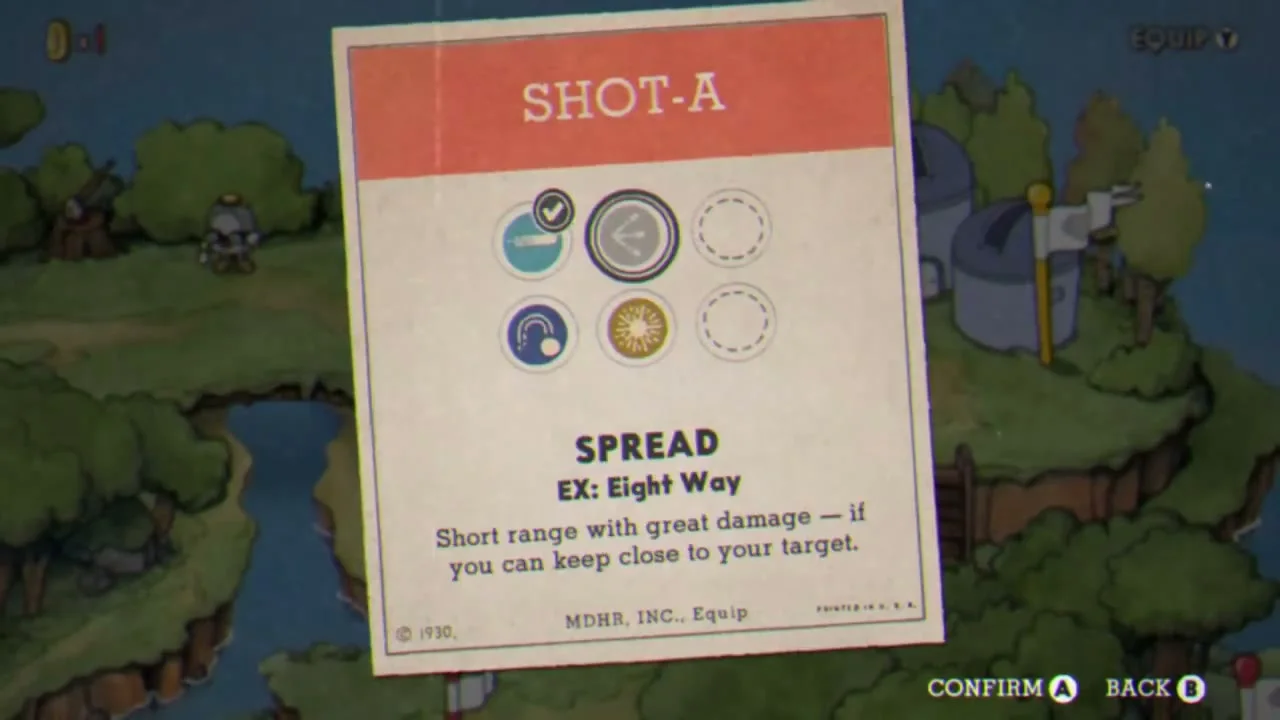
The Shot-A equipment card shows weapon icons and a selected Spread description saying it is short range with strong damage.
The **Shot-A** card is a weapon slot, not the shop. Select an owned weapon icon and read the description; Spread is powerful nearby but does not reach across the screen.
  1. Go back to the island map and open Equip using the prompt at the top of your screen. Choose a shot slot such as Shot-A. The card in the image shows several circular weapon icons; the selected one is described under the icons.
  2. Select an icon you actually own, then read its range and effect. The screenshot describes Spread as a short-range shot. If you equip it and stand far from the boss, many pellets will miss. Move closer only when the stage gives you a safe opening.
  3. Confirm the choice and check that the icon in the slot changes. If you own a second weapon, put it in the other shot slot, then check which action name switches weapons in the controls menu. This lets you change range during a fight without returning to the map.

6. Put a purchased charm in the Charm slot

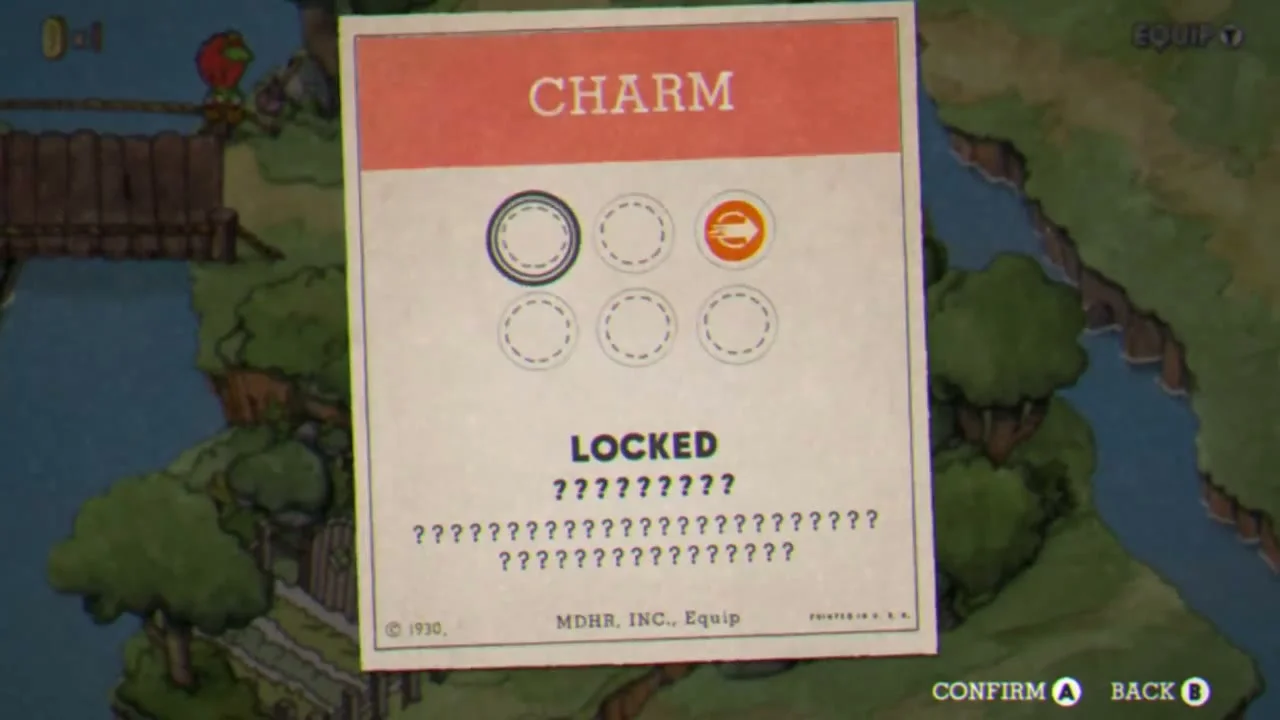
The Charm equipment card shows circular choices: one selected blank slot, several locked choices and one orange unlocked charm icon.
On the **Charm** card, an empty circle does not provide an effect. Select an unlocked item, read its description and confirm to equip it.
  1. From Equip on the map, move to the card headed Charm. The screenshot shows six circles. Most are dotted or locked; the orange icon near the top right is one of the available choices in this example.
  2. Highlight a charm you own and read the text below the circles before confirming. The video’s cursor is on a locked slot, so the word LOCKED appears. That does not mean all charms are unavailable; move to an icon you bought.
  3. Confirm the item. If you bought Smoke Bomb but Dash still behaves normally, come back here and make sure that charm—not a blank slot—is equipped. The shop sells it; Equip activates it for your next fight.

7. Parry a pink target by pressing Jump again in the air

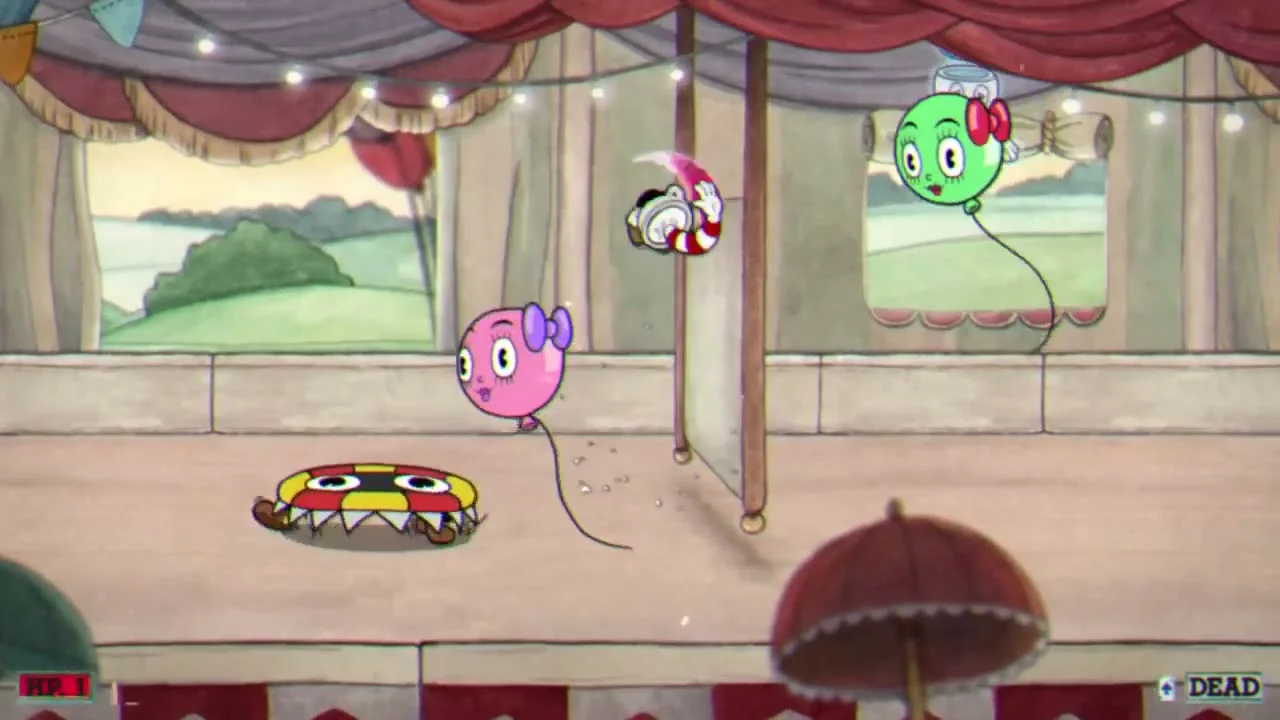
Cuphead leaps toward a pink balloon during a boss scene and shows a pink parry swipe, while a green balloon and other hazards remain nearby.
Only the **pink** balloon in this example is a parry target. Jump toward it, then press your assigned Jump action again while Cuphead is airborne and close enough to touch it.
  1. Look for an object that is clearly pink. In the screenshot, the balloon on the left is pink and Cuphead is just above it with a pink swipe. The green balloon to the right is not the target for this parry. Colour is your quick clue in a busy scene.
  2. Jump toward the pink object. While still in the air, press Jump again as you reach it. If Cuphead swipes and bounces, you timed the parry. If you simply hit the object or fall past it, try again from a safer position; do not repeatedly jump into a dangerous cluster just to fill the meter.
  3. Watch the card meter after a successful parry. Parrying can help build the energy used for EX moves. Once you have a card, check your assigned EX Shoot action and use it during a clear opening rather than while you are trying to dodge.

This screenshot is from a later boss, not a promise that the first island sends you to this scene. The same pink-object rule is introduced in the game’s tutorial and keeps coming back in different forms.

8. Read the result screen before trying for a higher grade

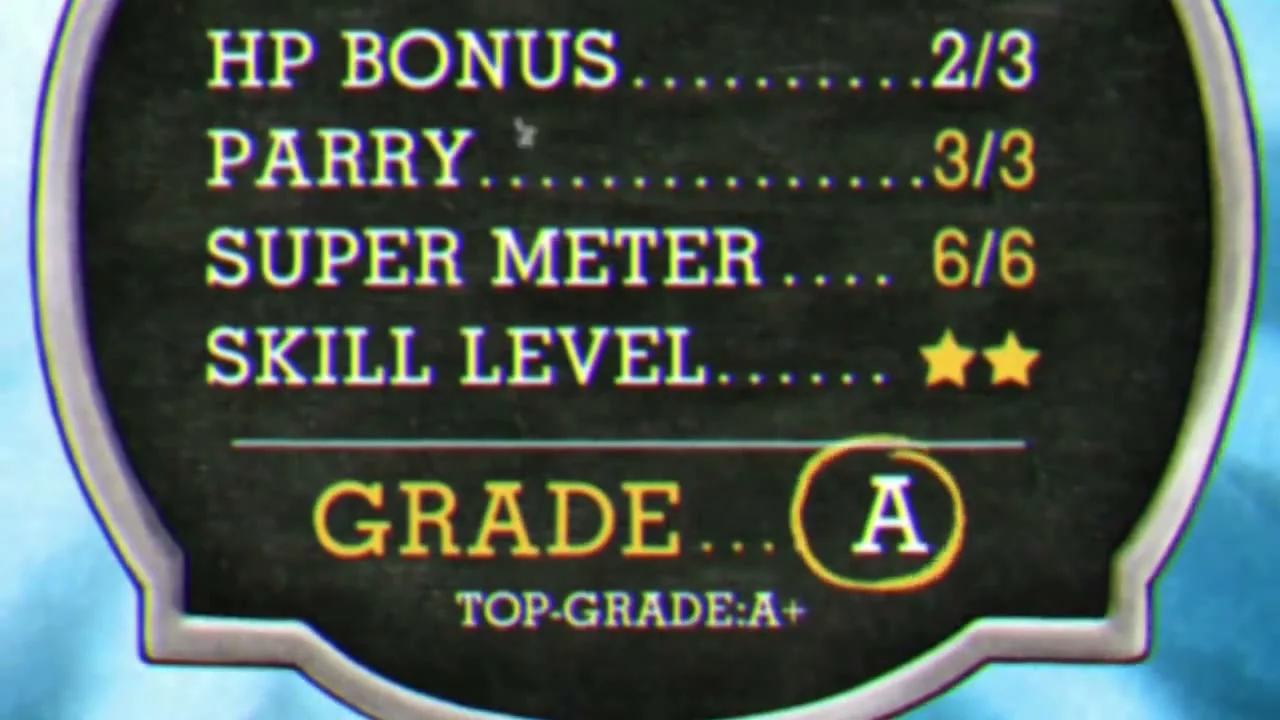
A Cuphead stage results card lists HP Bonus, Parry, Super Meter, Skill Level and an A grade.
After a completed stage, the results card separates surviving with HP, parries and meter use. The A grade shown is one example, not the score required to enjoy the game.
  1. After you clear a stage, pause on the result card. In the screenshot, HP Bonus, Parry and Super Meter have their own lines above the final grade. Read the line you want to improve next time instead of judging the whole run by one letter.
  2. If HP Bonus is low, spend a practice run watching attacks and keeping space to dodge. If Parry is low, look for a safe pink target instead of forcing one at every chance. If the meter line is low, learn when to use an EX move you have charged.
  3. A grade is optional for an ordinary first playthrough. Clearing the stage and recognising a new boss phase are real progress. Re-enter from the map only when you want to practise, not because a lower grade means the game rejected your win.

9. Playing together? Revive a partner’s ghost

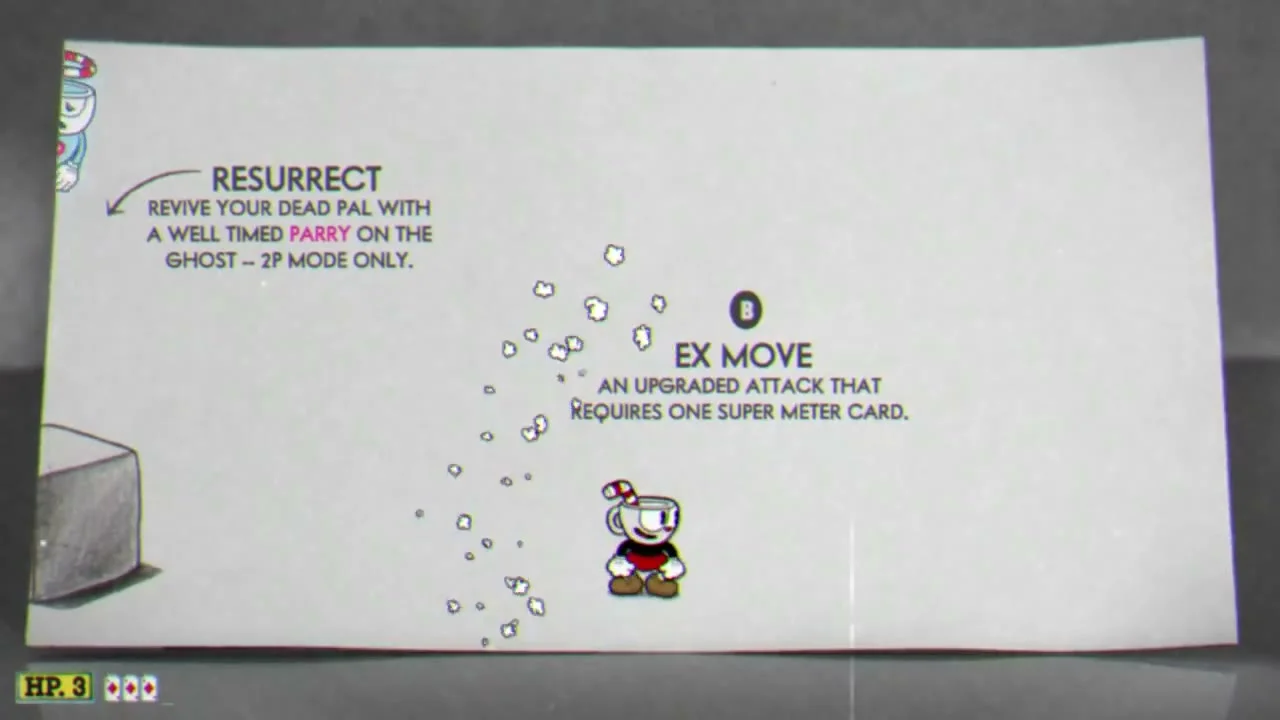
The in-game Cuphead tutorial page says Resurrect and explains that a timed parry on a dead partner’s ghost revives them in two-player mode.
This is the tutorial’s **two-player** instruction. When your partner becomes a ghost, jump toward that ghost and parry it before it floats away.
  1. In local co-op, watch both players’ HP displays along the bottom. If your partner is knocked out, a small ghost rises from where they fell. The tutorial screenshot labels this move Resurrect and says it works in two-player mode only.
  2. Jump toward the ghost and press Jump again while close enough to parry it. If the parry connects, your partner comes back. It is risky when bullets fill the screen, so clear space or wait for a safe moment if one exists.

If you are playing alone, ignore this step. The ghost rescue is a co-op tool, not a way to revive yourself in single-player.

A simple loop for your next three attempts

  • Attempt one: read your Jump, Shoot and Dash assignments. Enter a stage from the map, locate HP, then concentrate on surviving long enough to see the first attack change.
  • Attempt two: watch for one pink object you can reach safely. Jump, press Jump again in the air and check whether your card meter gains energy. If it is unsafe, skip it.
  • Attempt three: if you collected coins, read one shop item and equip it on the map. Try that one change before swapping several weapons and charms at once. After the fight, use the result lines to choose what to practise next.

When something is not working

  • Your shop purchase has no effect: return to the map, open Equip and check the matching Shot or Charm card. A bought item does not help while its slot is empty.
  • The guide’s Xbox buttons do not match yours: open the controls screen and read the action labels. The video shows a custom remap, so use your own Jump, Dash and EX Shoot assignments.
  • A parry keeps missing: make sure the target is pink, jump toward it and press Jump a second time while airborne. Practise on a safer pink target rather than forcing a parry during a crowded phase.
  • EX Shoot does nothing: check the small card meter beside HP. Build at least one card through play and parries, then use your assigned EX Shoot action.
  • You feel stuck on one boss: switch the practice goal from winning to identifying one attack. The next run is easier when you know where that attack begins and which part of the screen stays open.

Get Pixel Twelve's biggest stories first.

Add as a preferred source on Google