Pixel Twelve
Civilization VI Beginner Guide: Your First City and First Turns

How To

Civilization VI Beginner Guide: Your First City and First Turns

A step-by-step first-turn guide to Sid Meier’s Civilization VI, with twelve official gameplay images showing exactly which unit, menu, map clue and button to use.

By Mildred CrumpGame: Sid Meier's Civilization VIVerified Sep 26, 2026
Guide Type
How To
Last Verified
Sep 26, 2026

Guide details

Overview

A step-by-step first-turn guide to Sid Meier’s Civilization VI, with twelve official gameplay images showing exactly which unit, menu, map clue and button to use.

First, do these four things

Select the Settler and found a city. Then give that city a production job, choose a technology to research, and move your Warrior to see nearby land. When the game has no more orders waiting, use Next Turn. That is a complete first turn; you do not need to understand every victory type before you begin.

Civilization VI is turn-based: you decide what to do, then advance time one turn. The screenshots below come from 2K’s official PC tutorials. Your leader, map, available projects and exact button art can differ by platform or added content. Match the label and location in your game rather than copying a build time from a picture.
1. Recognise your first two units

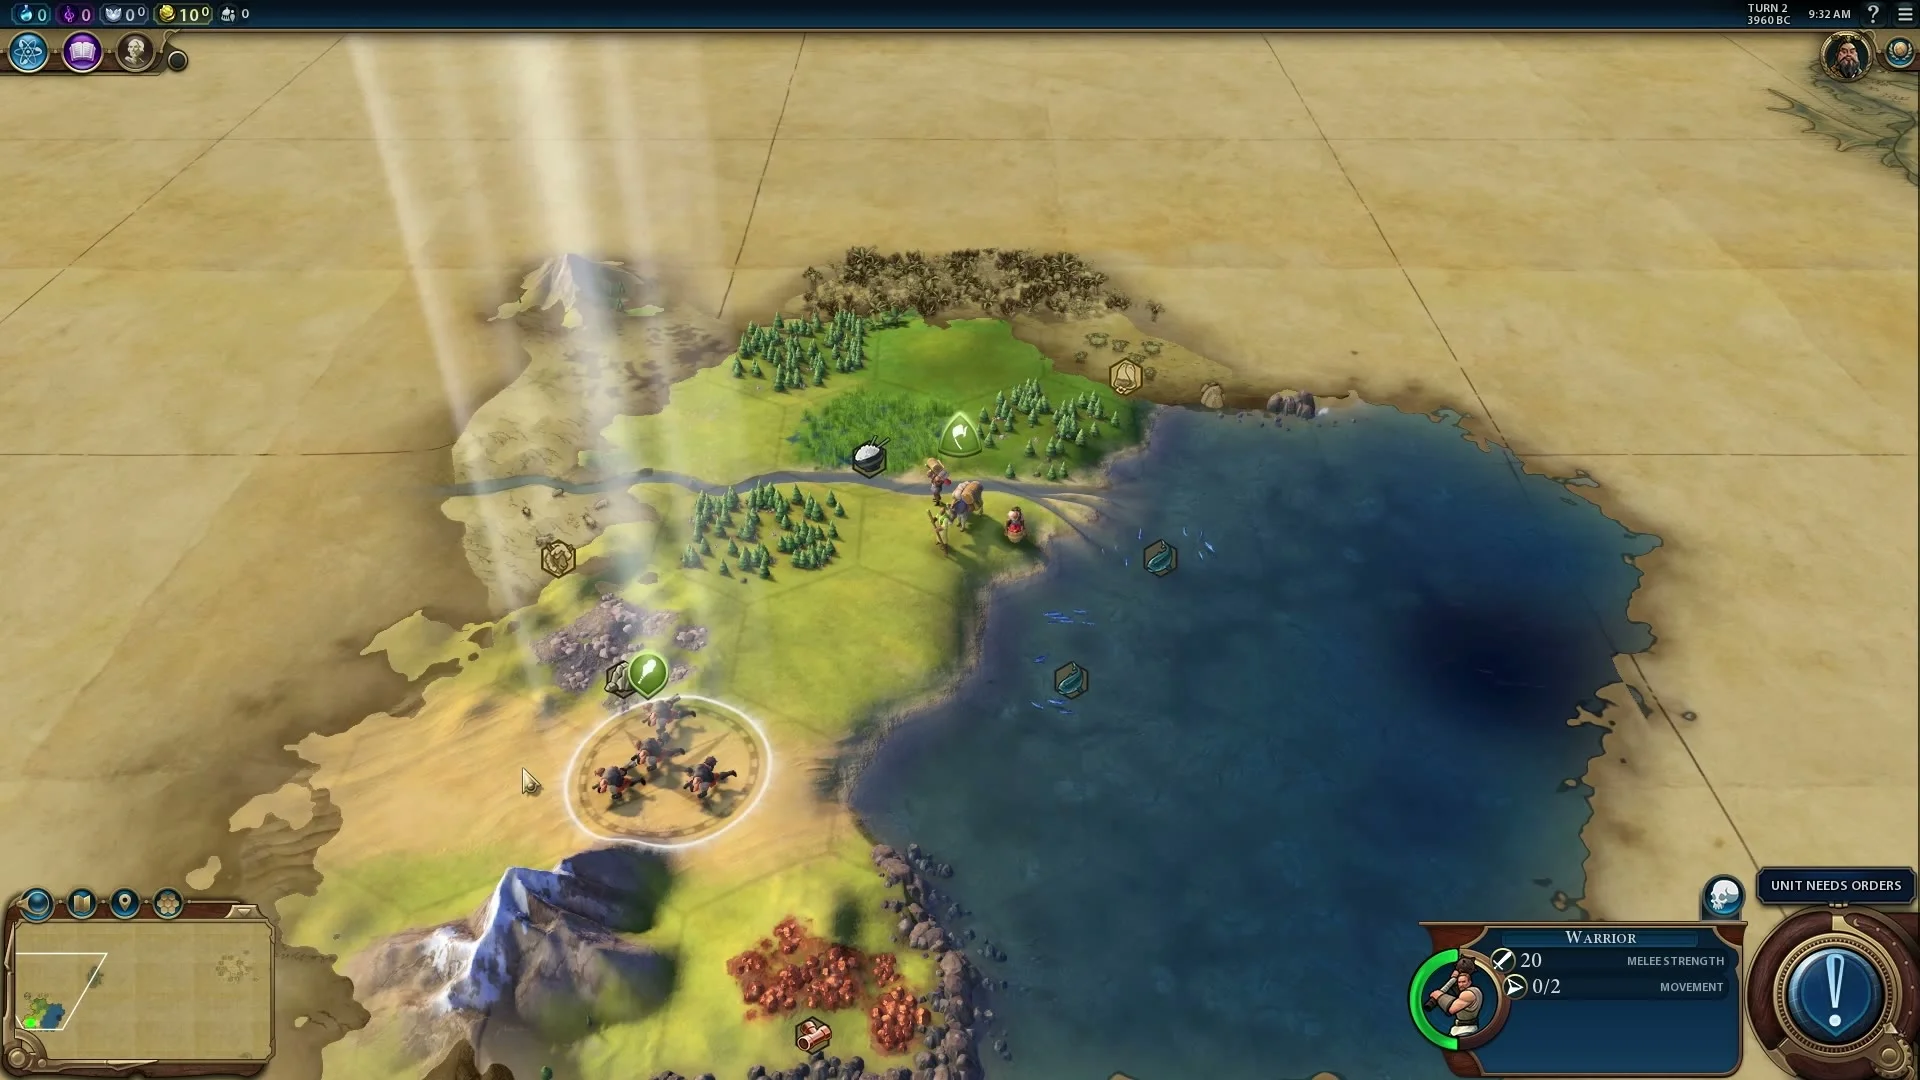
Civilization VI opening map with the Settler by a river and a selected Warrior lower on the screen.
The Settler carries belongings near the river; the Warrior is the group with weapons lower down. The selected unit’s name appears in the bottom-right panel.
  1. Look at the centre of the map when a new match begins. You normally have a Settler and a Warrior. In this picture, the Settler is near the river at the top of the explored land. The group of armed people lower down is the Warrior. A glowing ring shows which one is selected.
  2. On PC, click one of the units. Read the name in the bottom-right unit panel before giving an order. Do not send the Settler exploring like the Warrior: the Settler is the unit that makes your first city. The tan, unfilled map around them is unexplored land, not a place you need to click yet.

2. Pick a practical place for the first city

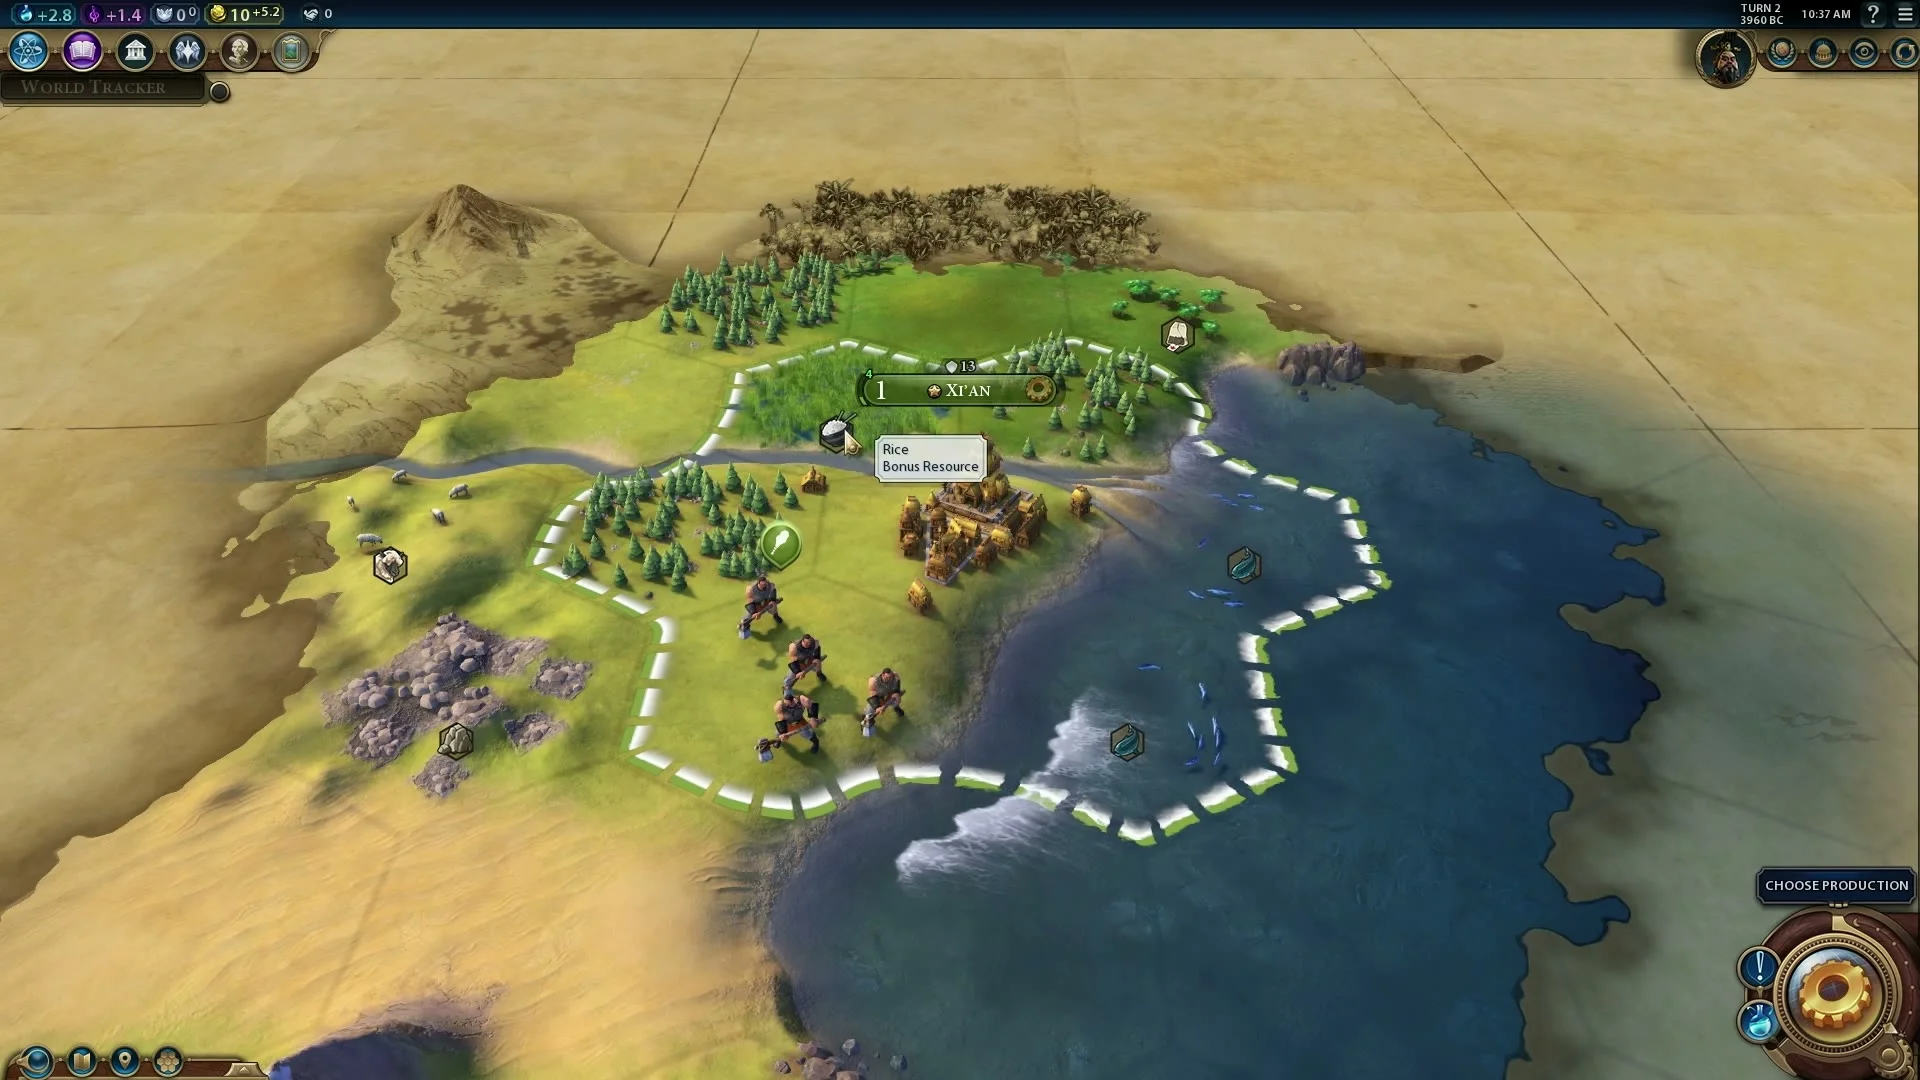
Civilization VI city area with a Rice tooltip over a resource beside a river.
A mouse hover can reveal a tile’s name: this tooltip says Rice. Look for food resources near the place where you plan to settle.
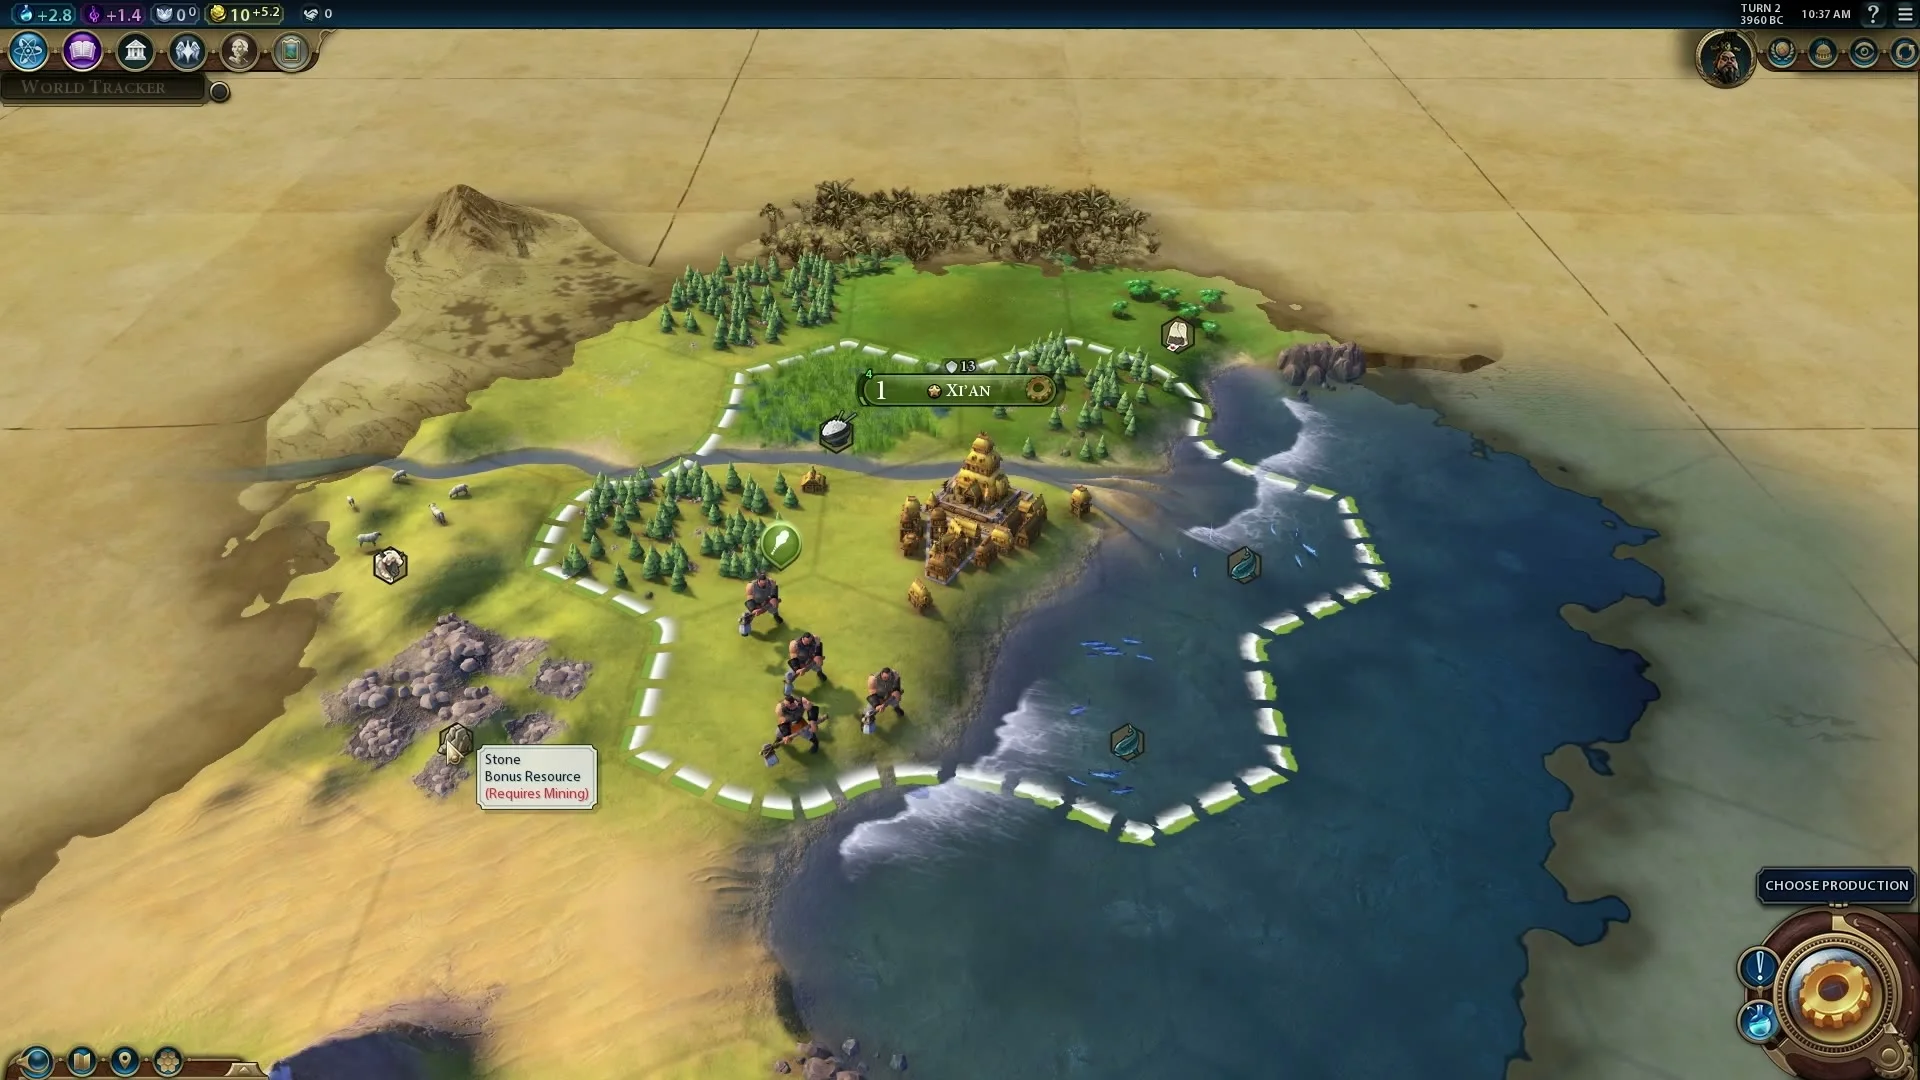
Civilization VI map with a Stone tooltip and hills near a first city.
This tooltip says Stone and Requires Mining. Resource labels tell you what is nearby and sometimes what technology will help use it.
  1. Before founding a city, inspect the tiles around the Settler. A river is a thin winding line of water; the 2K example places its city beside one. Rivers and lakes provide fresh water, which gives a new city more room to grow. Look for visible food sources such as Rice or Wheat and useful hills or Stone nearby. Hover over a symbol if you cannot recognise it.
  2. Do not march across half the map searching for a perfect site. Every turn spent walking with the Settler is a turn without a working city. If the starting tile has fresh water and several useful tiles within a short distance, it is a reasonable first choice. A coast may be useful too, but water at the edge of the map does not replace checking the city’s fresh-water situation.

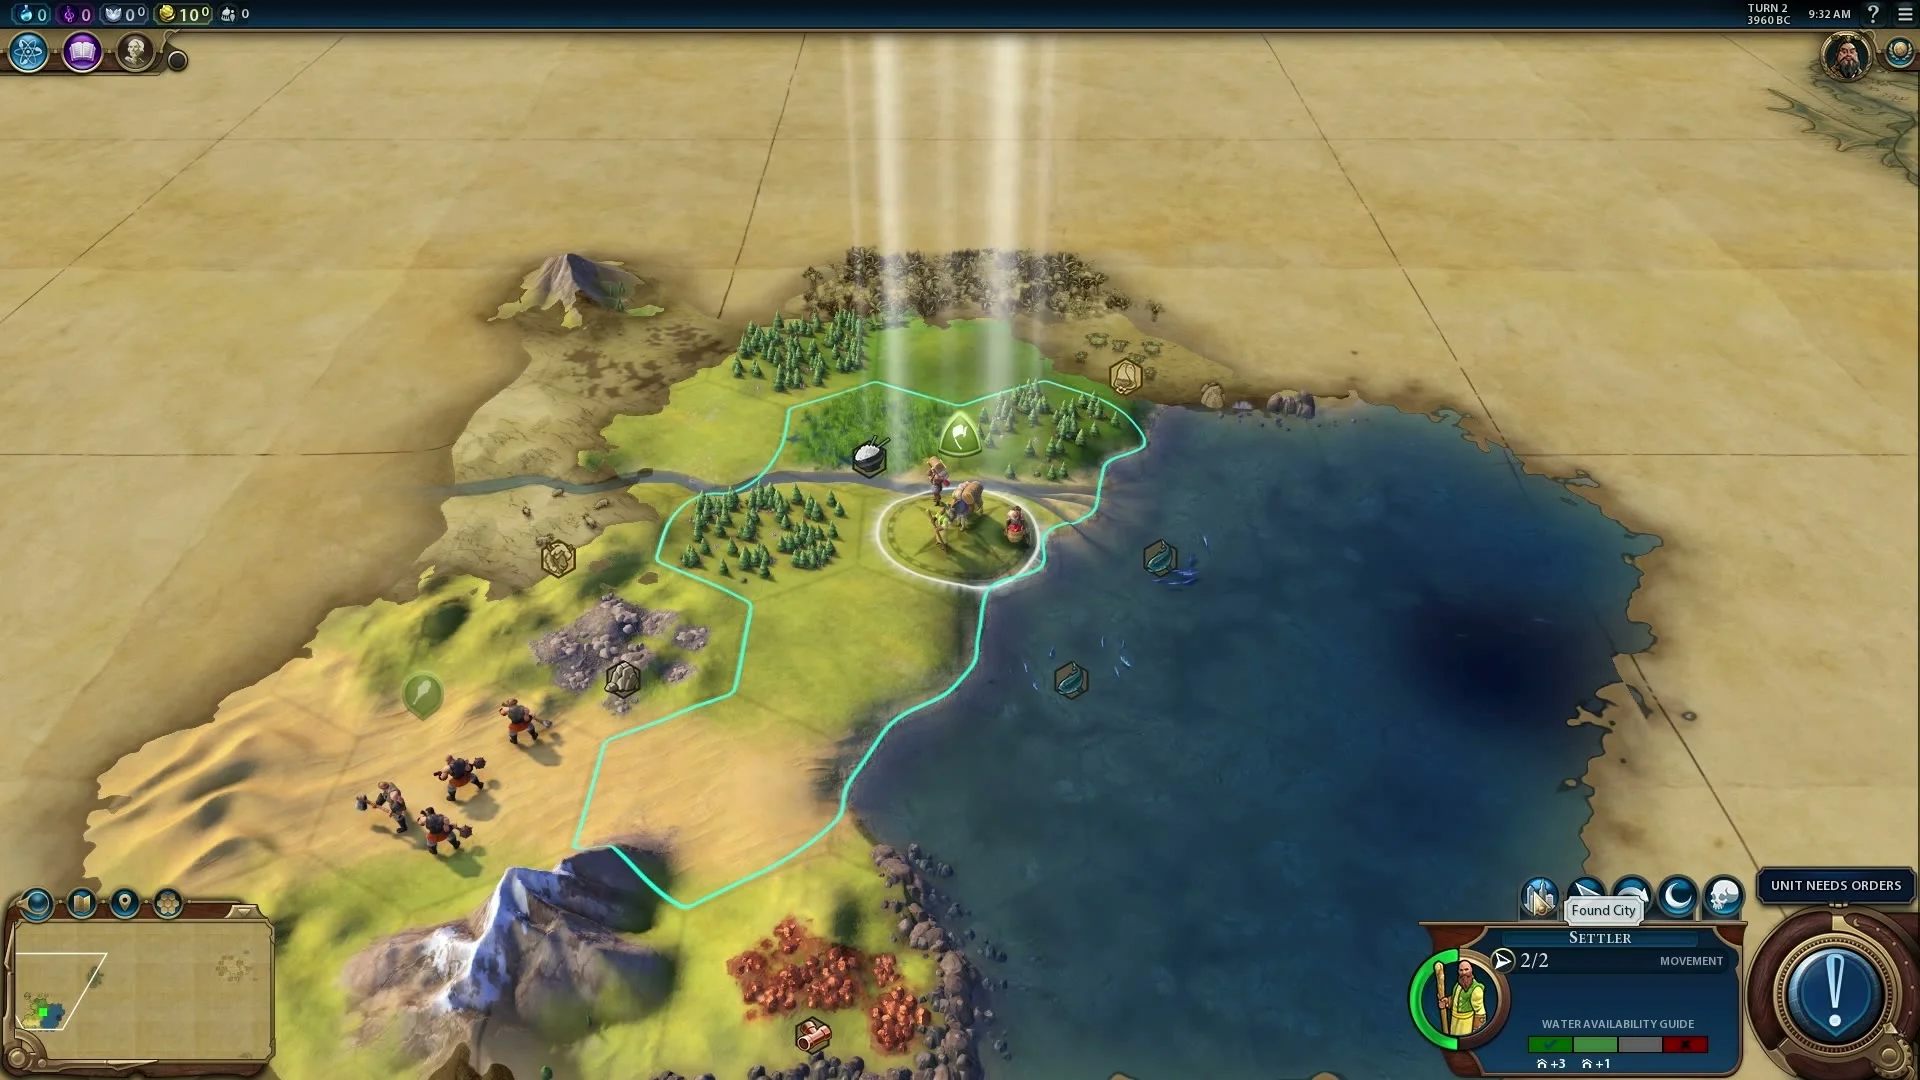
3. Select the Settler and press Found City

Selected Settler with a Found City tooltip above the bottom-right unit panel.
With SETTLER shown at the bottom right, look just above it for the small Found City action. The tooltip confirms you have the right button.
  1. Click the Settler so the lower-right panel says SETTLER, not WARRIOR. In the screenshot, the unit is by the river, a light outline appears around possible water locations, and a row of small action icons sits above the portrait.
  2. Hover over the city icon in that row until the tooltip reads Found City, then choose it. If that command is unavailable, check that you selected the Settler and that it stands on land where a city can be founded. The founding action uses the Settler; the Warrior remains available to move separately.

4. Read what changed after the city appears

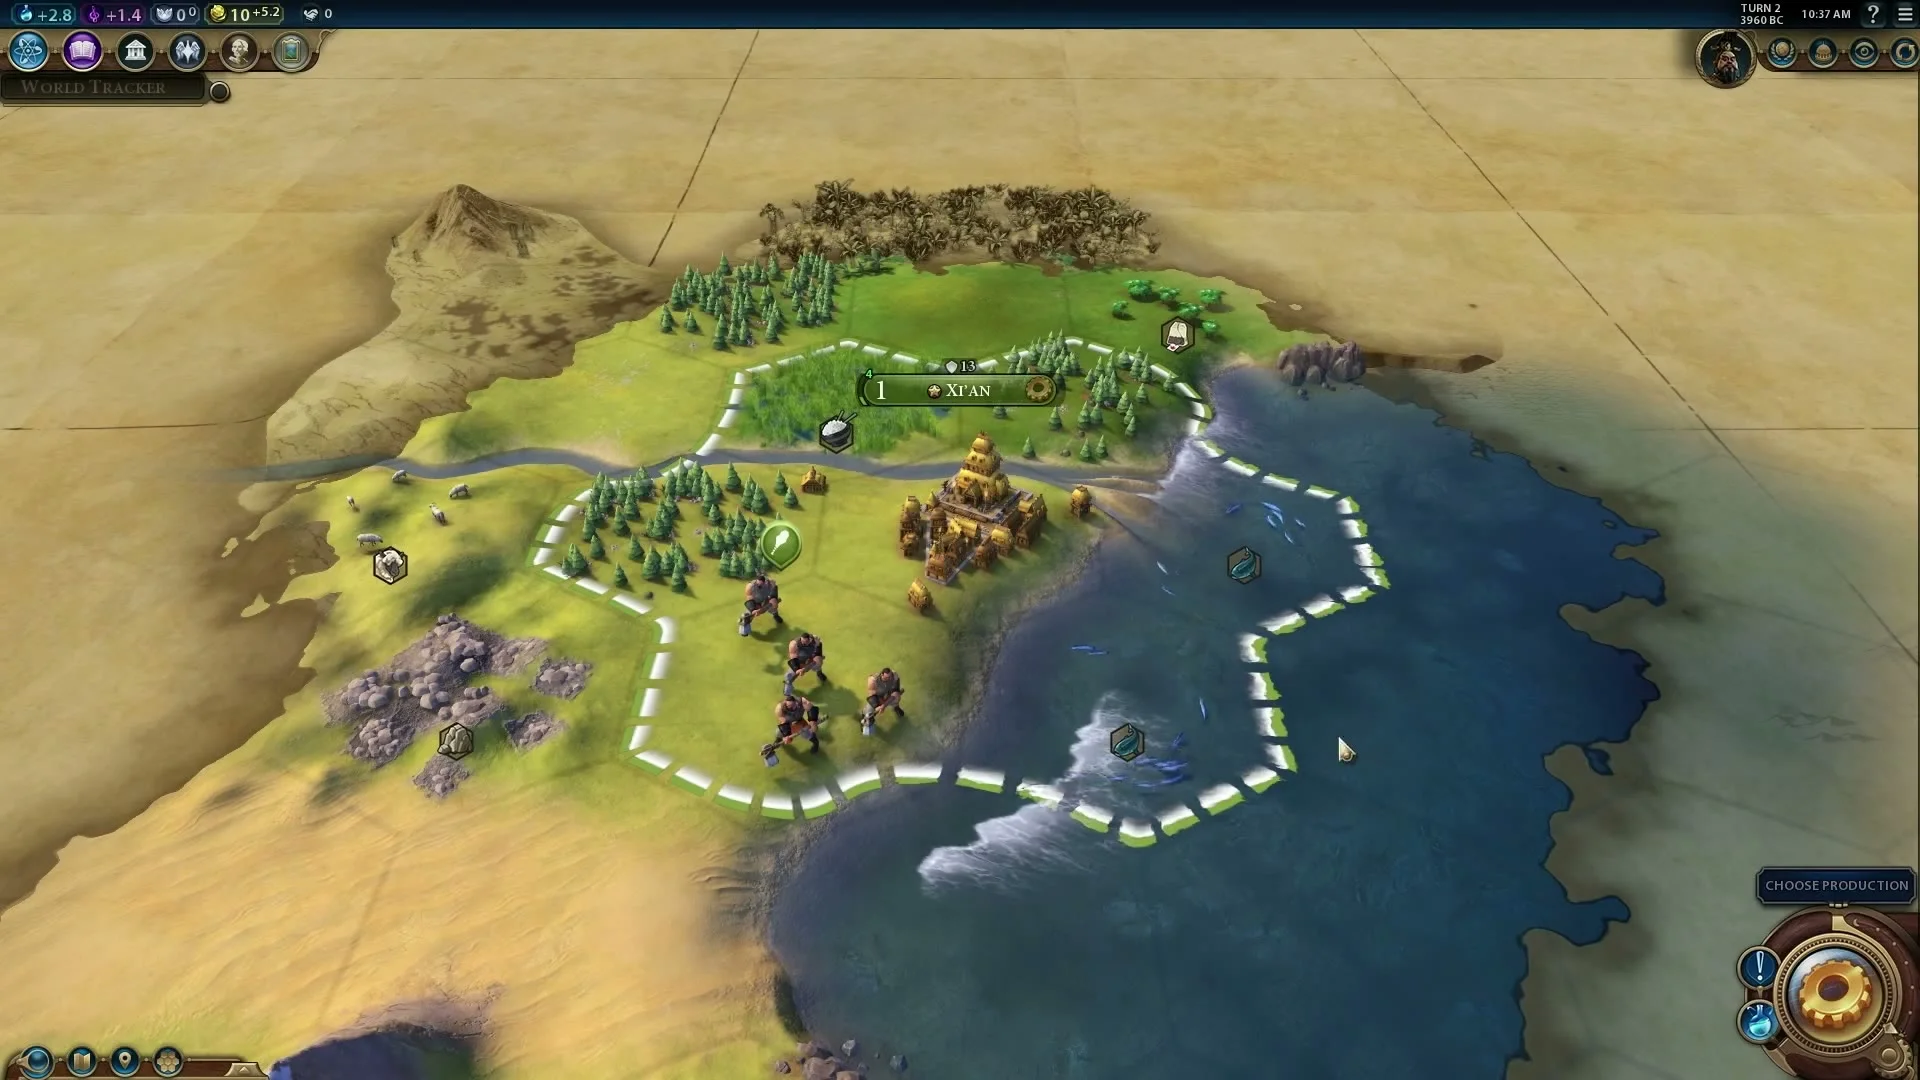
New Civilization VI city Xi’an with its name, population one and white dashed borders.
After founding, the city name and the number 1 appear above its buildings. The white dashed outline shows the land the city currently controls.
  1. The buildings in the centre are your new city. Its name is on the label above them. The 1 at the left of that label means one population, not a level or score. The dashed line around nearby land marks your starting territory; it grows later.
  2. Do not click every hexagon inside the border. A city begins collecting resources from the tiles it can work, and its choices are handled through the city panel. First, look to the bottom-right circular action control, where the game now asks you to choose production. That is the city’s next job.

5. Choose what the city builds first

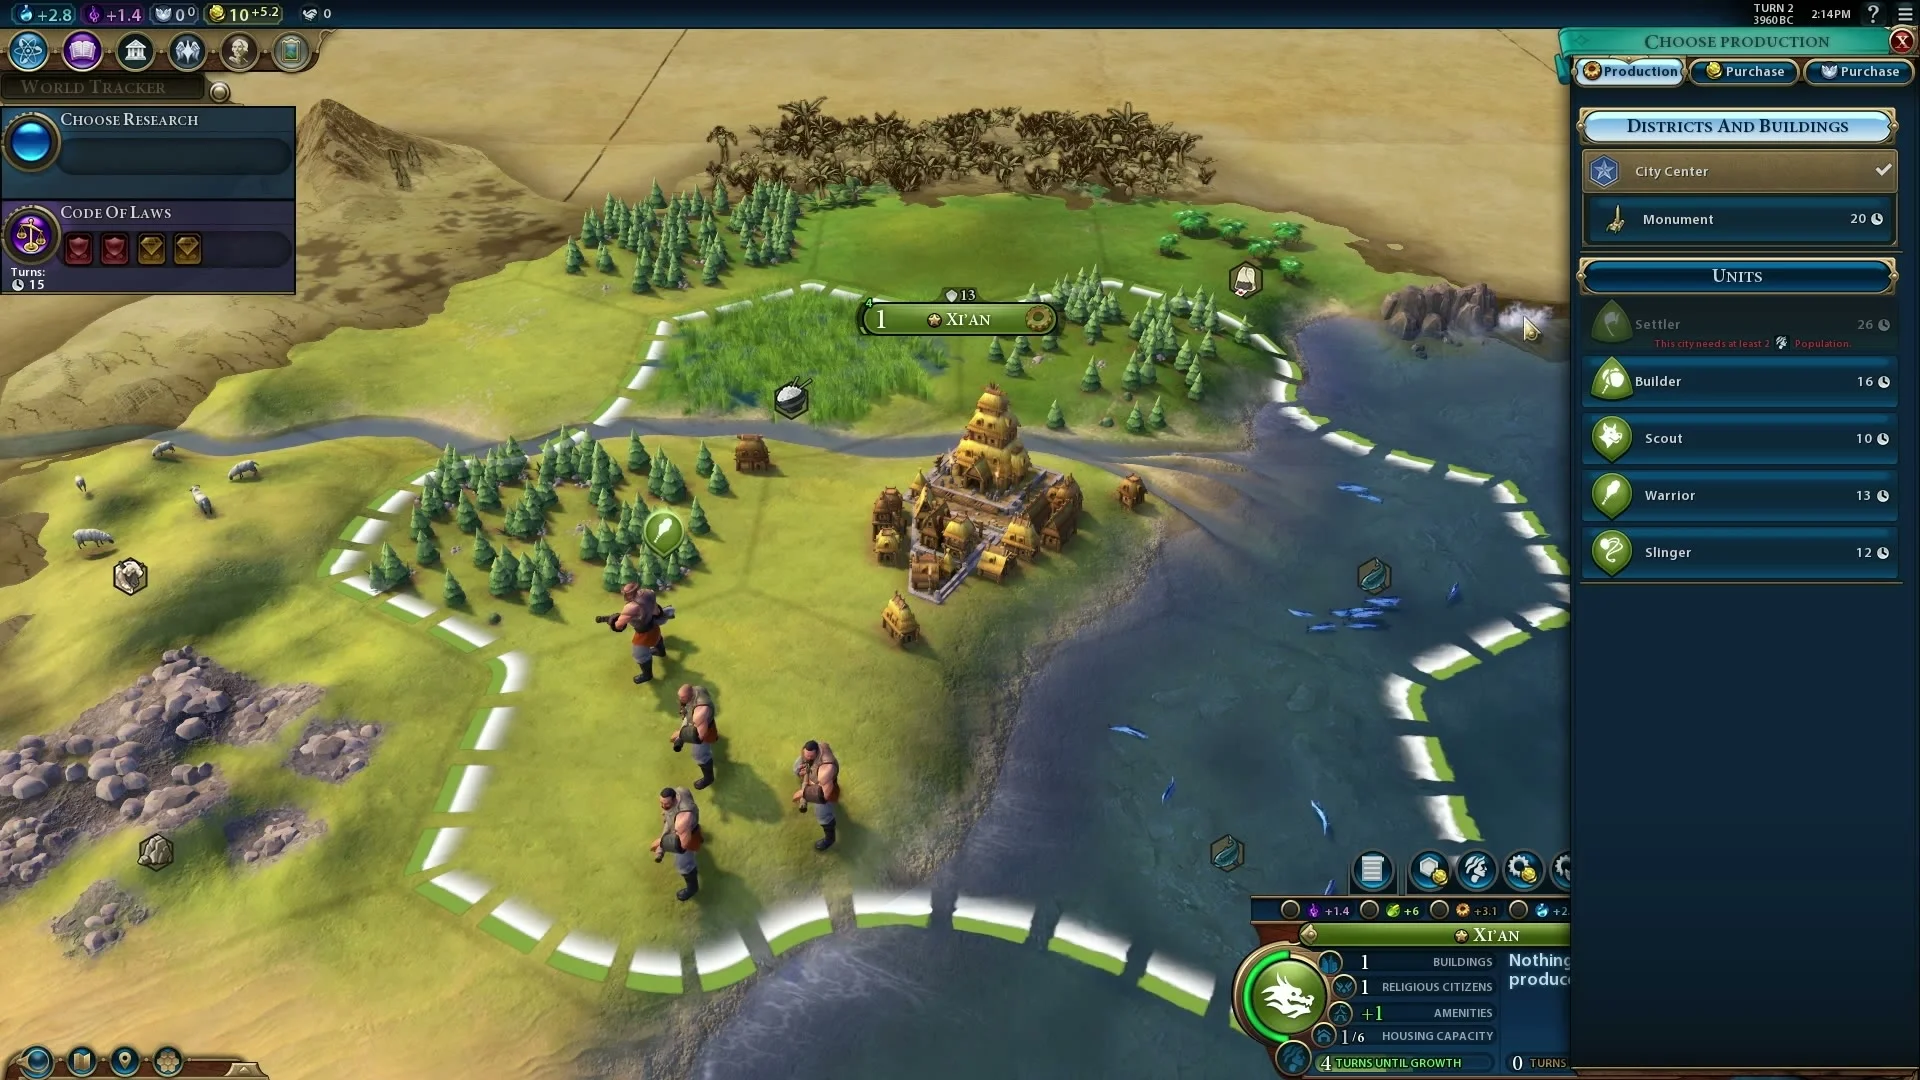
Civilization VI Choose Production panel listing Monument, Scout, Warrior and Slinger on the right.
The Choose Production panel opens on the right. Read each row’s name; the number beside it is the build time for this particular match.
  1. Select the city if its production panel has not opened automatically. Look for Choose Production by the large circular control at the bottom right. The menu shown here lists a Monument under buildings, and units such as Scout, Warrior and Slinger below. Choose one row to start construction.
  2. For a first match, a Scout is a straightforward way to reveal more map, especially if you want to find nearby city sites. A Warrior or Slinger is useful if you expect early danger. A Monument produces culture, which helps unlock civics. There is no universal best opening order: pick the one that solves the problem you can see. The turn count beside an option depends on your city and game settings, so it will not always match this screenshot.

6. Choose one technology to research

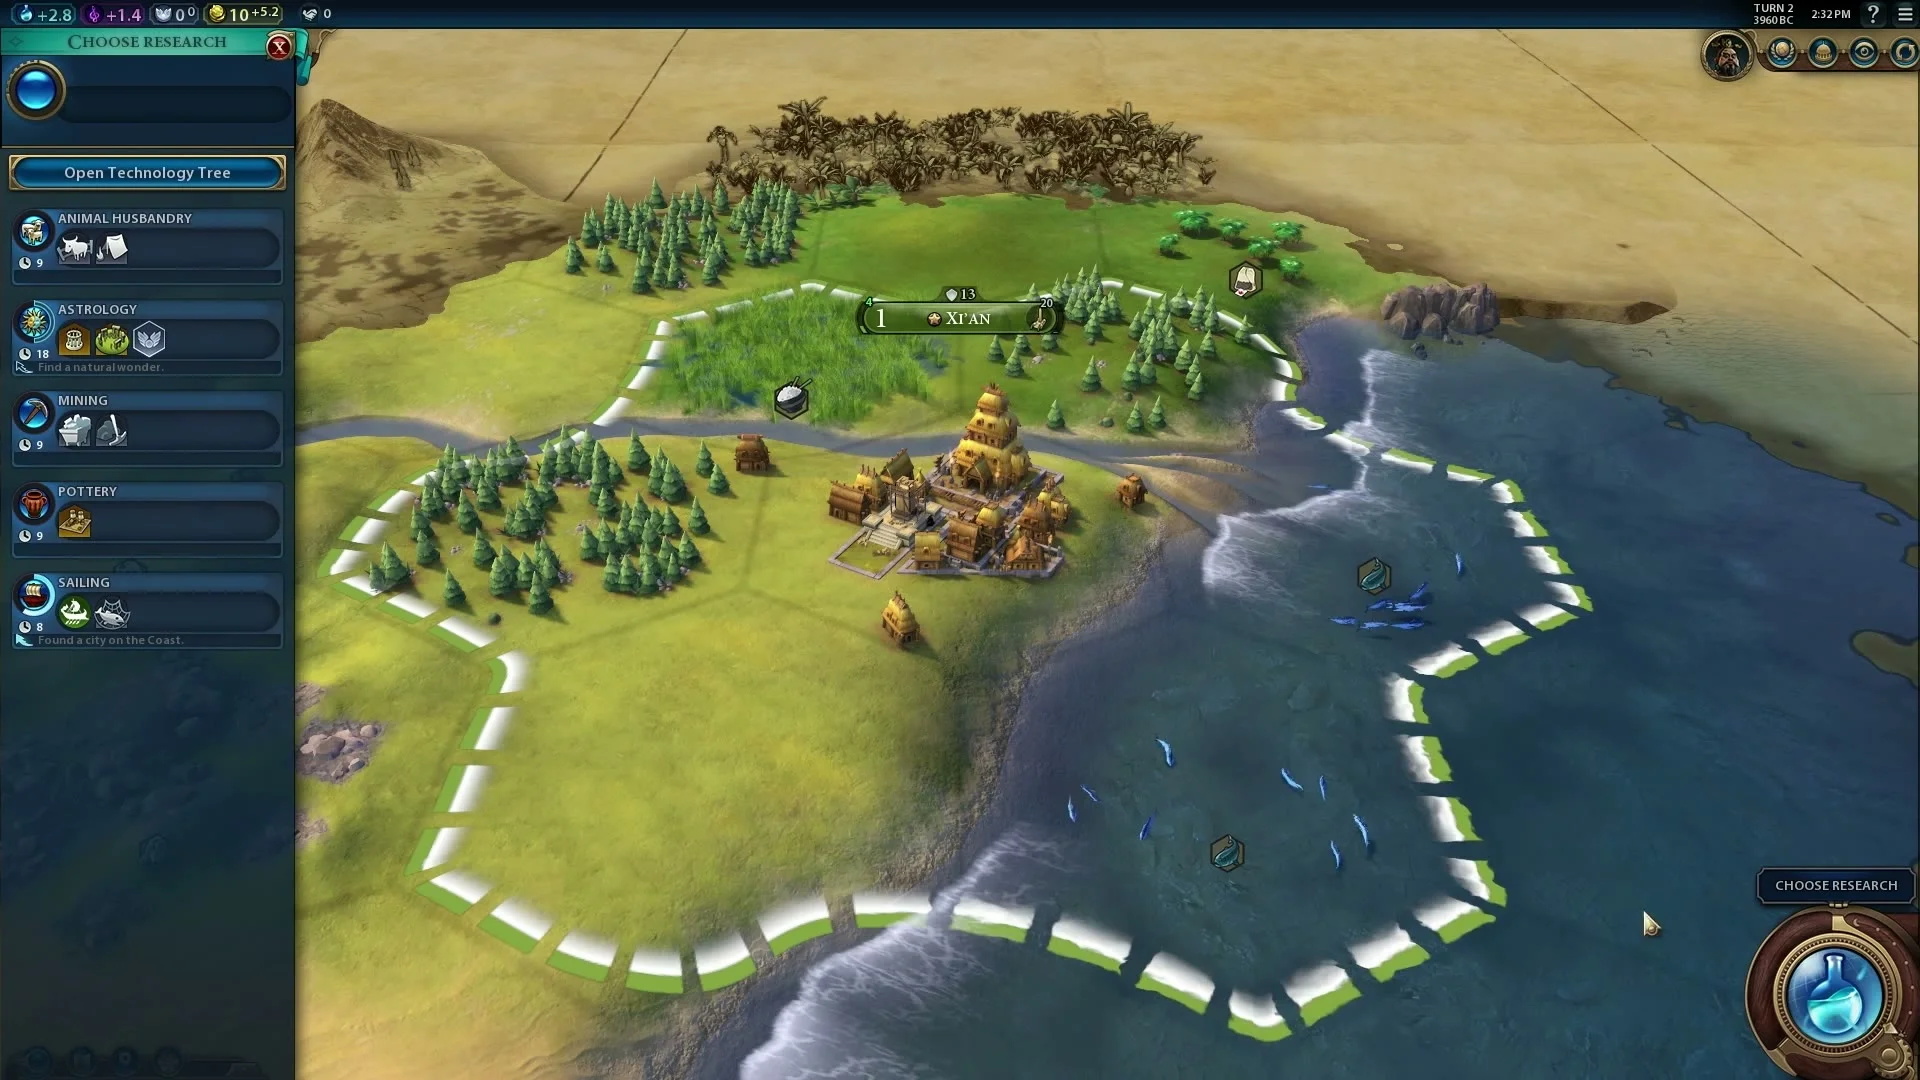
Civilization VI Choose Research menu open on the left with Animal Husbandry, Astrology, Mining, Pottery and Sailing.
The Choose Research list opens on the left. The blue science control is at the lower right; click a named technology to begin it.
  1. After your city has a job, look for Choose Research in the left-side tracker or the blue science button at the bottom right. Open it. The screenshot lists early options such as Animal Husbandry, Mining, Pottery and Sailing; your choices may vary with your game.
  2. Pick a technology that has an obvious use near you. The Stone tooltip in the earlier picture says it Requires Mining, so Mining is one sensible choice for that start. Do not assume every resource is ready to use just because it is inside your border: a technology and, later, a Builder may be needed to improve it. If you cannot decide yet, choose a broadly useful early option and keep playing; research progresses over turns.

7. Understand the top bar without memorising every icon

The small numbers at the top left show resources you gain each turn. In the pictures, the blue science symbol is for research, the purple symbol is for culture and the gold coin is money. The World Tracker directly beneath them shows what is currently being researched and which civic is underway. A civic is a political or social idea that unlocks more choices, separate from technology.

You do not need to open every icon before your first turn ends. After you choose research and production, check that the tracker shows a named project instead of Choose Research, and that the city no longer says Choose Production. That is enough to know both jobs are underway.

8. Move the Warrior to uncover a safe direction

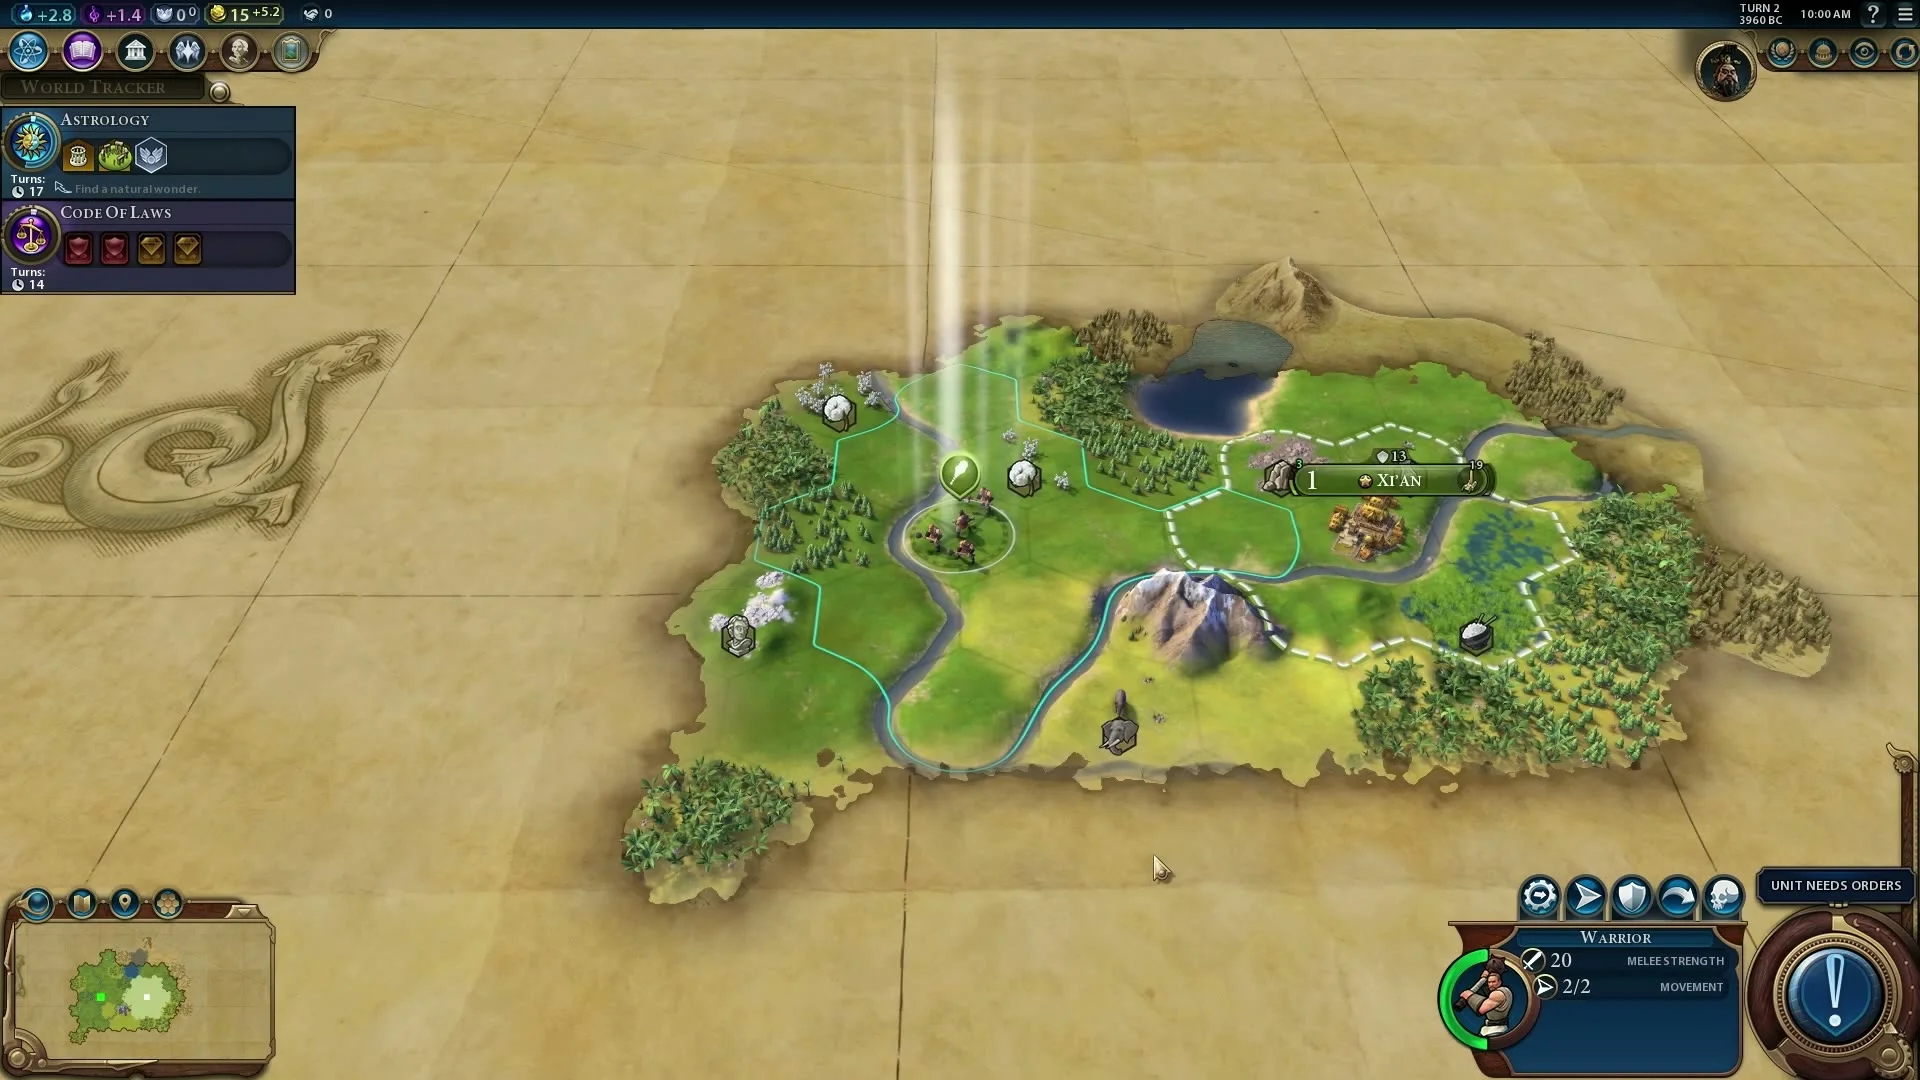
Selected Warrior west of a city with movement two of two and a map edge covered in parchment.
The unit panel says WARRIOR and 2/2 movement. The tan parchment marks land you have not explored yet.
  1. Click the armed group so the bottom-right panel says WARRIOR. On PC, right-click a nearby land tile to order a move. Do it one or two tiles at a time while you learn the map. The 2/2 in this example means the Warrior still has its movement available; the number falls as it travels.
  2. Aim toward the tan edge of the map rather than marching the Warrior far from home immediately. Revealing land helps you spot rivers, resources, other people and possible threats. Hills give a view of more terrain. If an enemy appears, pause before moving again: an early Warrior is useful for both scouting and protecting the new city.

9. When a Scout is ready, send it farther than the Warrior

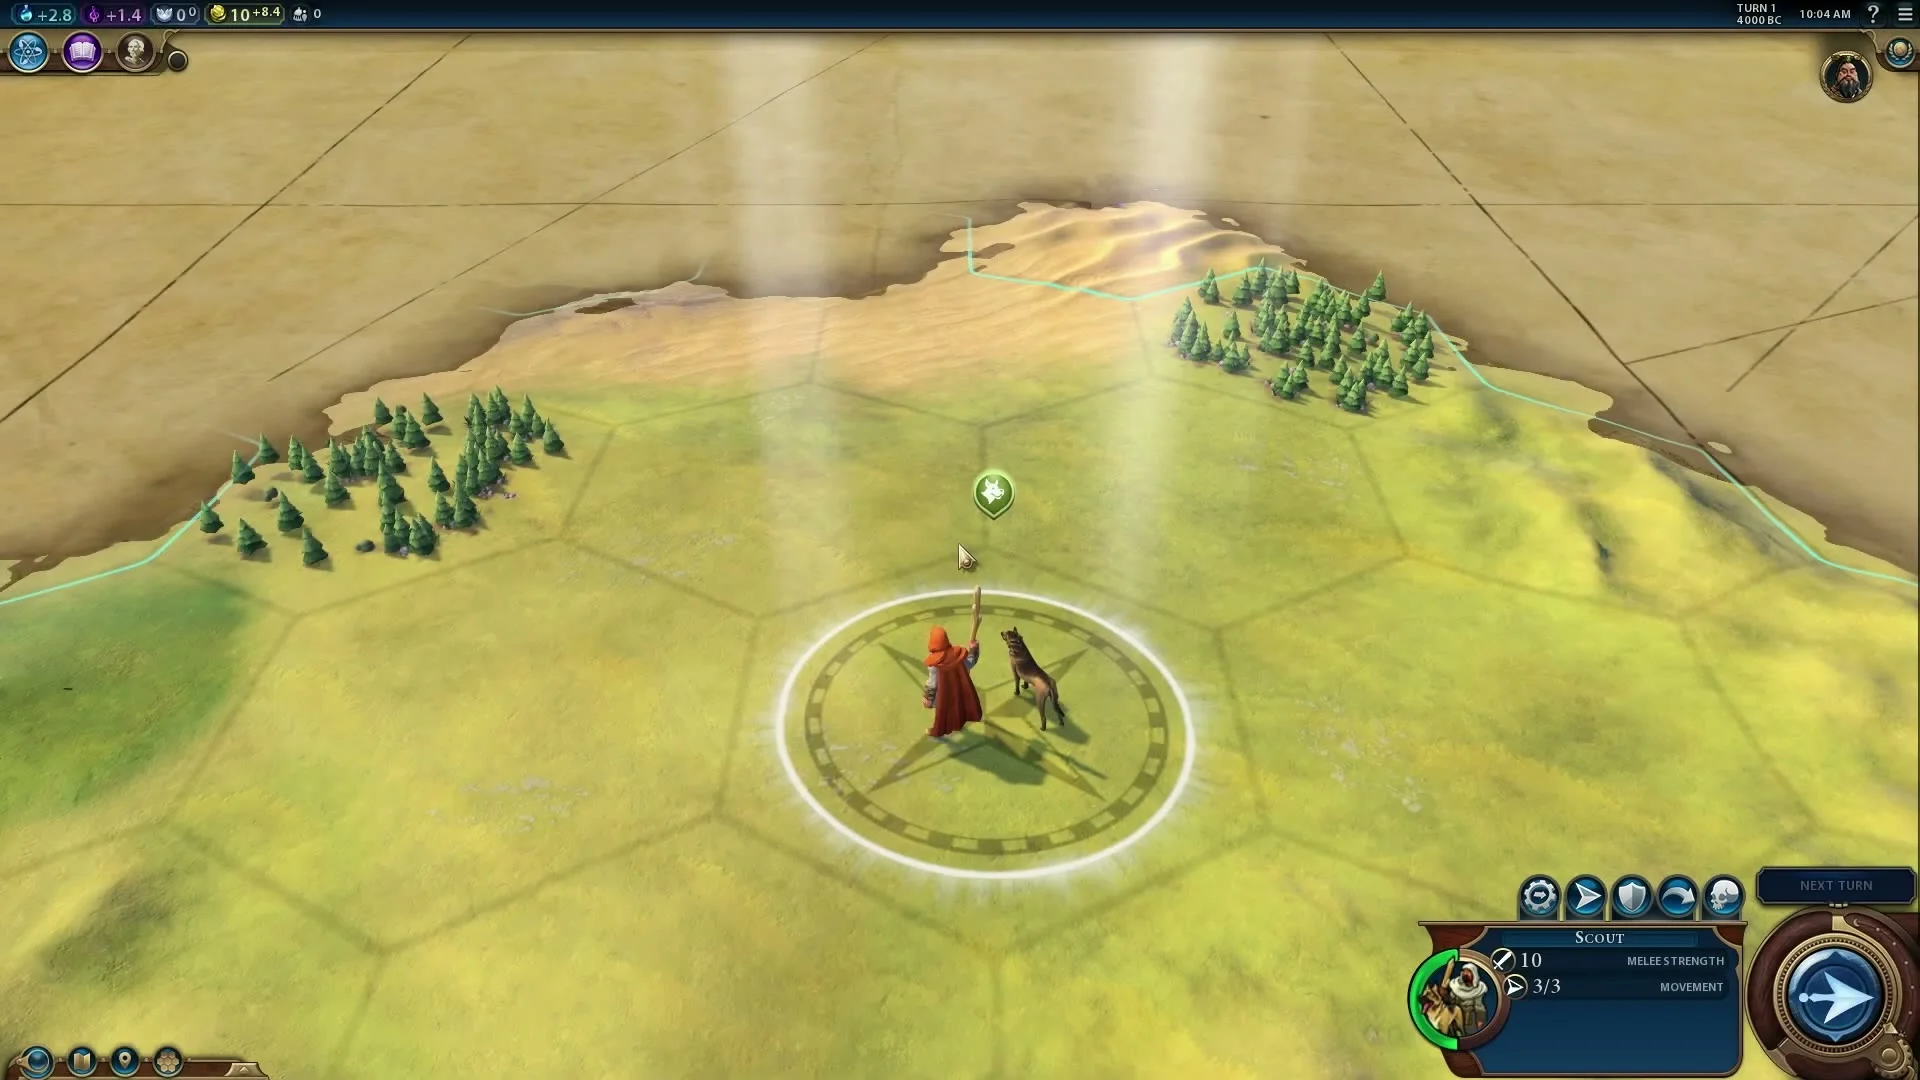
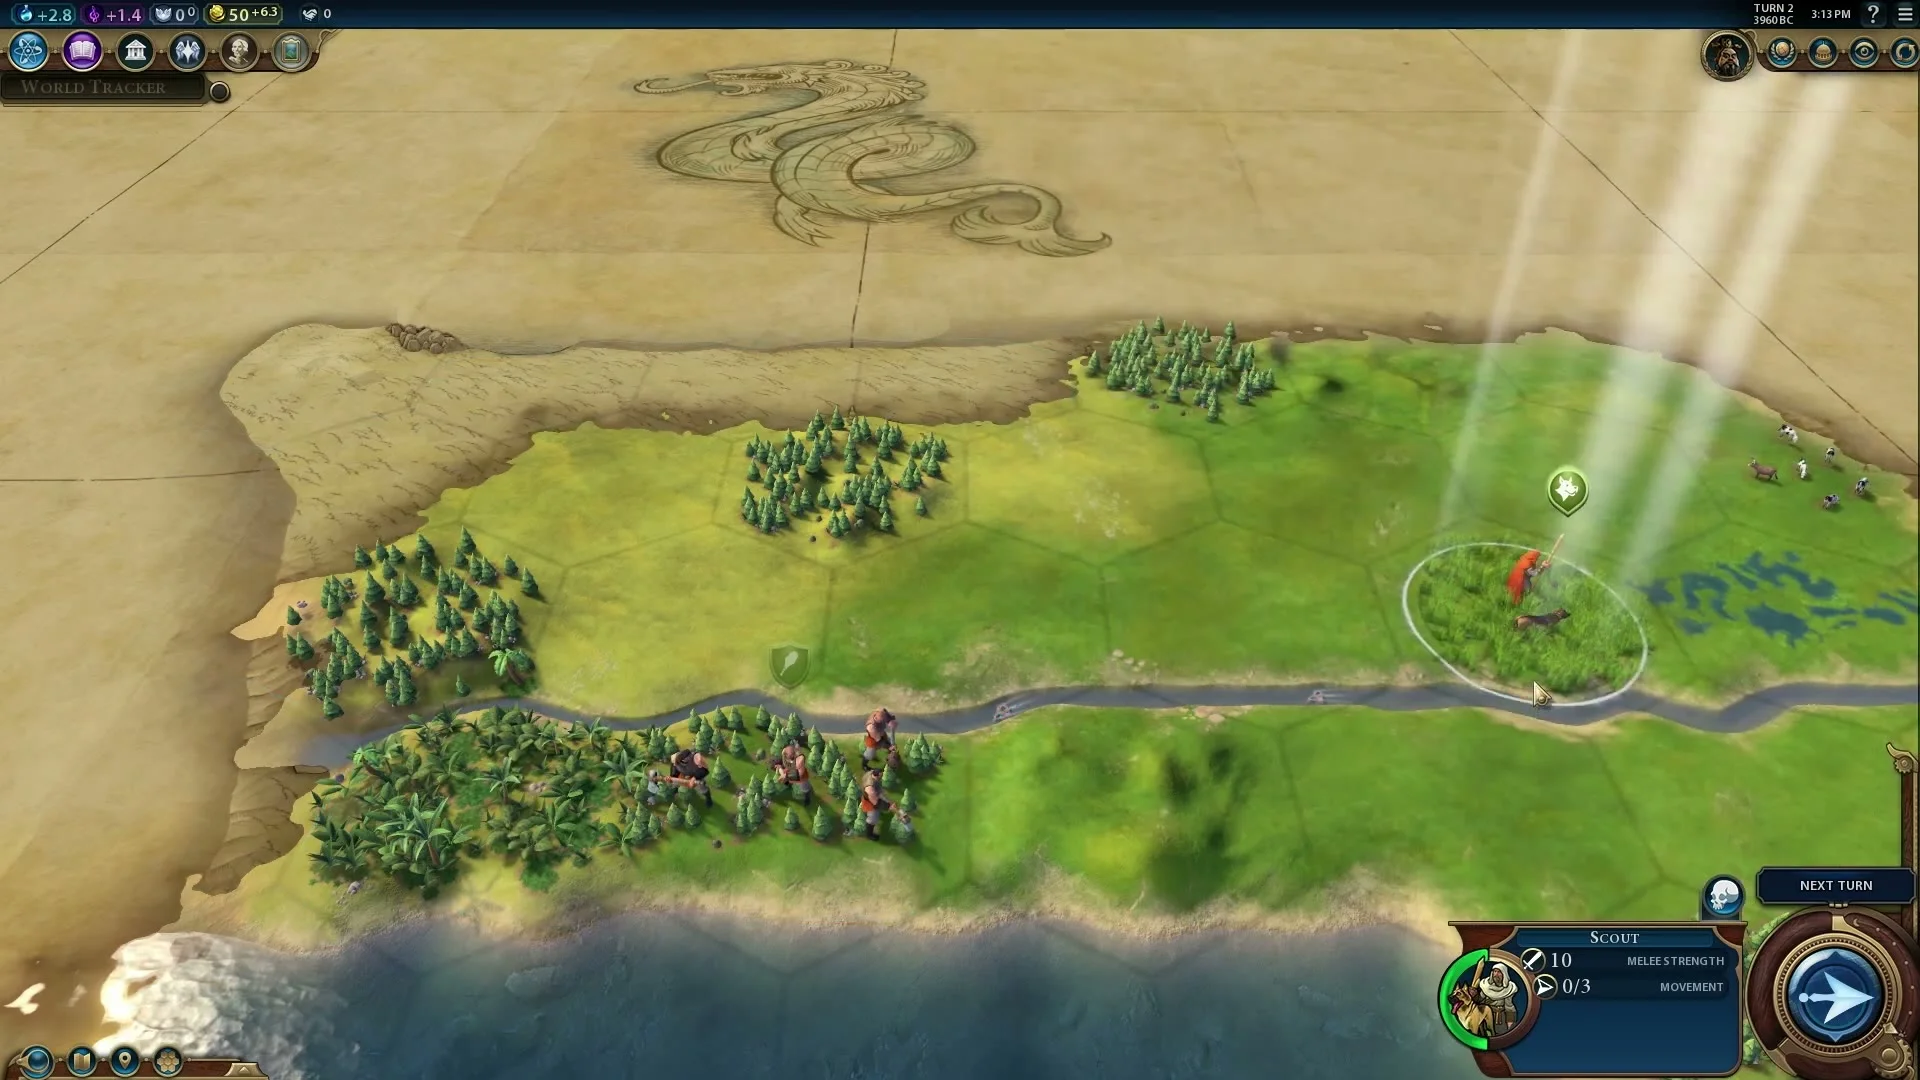
Selected Scout with a travel staff and animal companion, showing three of three movement in the unit panel.
The SCOUT label and 3/3 movement appear in the bottom-right panel. This is a separate exploring unit, not a Settler.
  1. If you chose a Scout in production, wait until the city completes it. The unit appears on or near the city. Select it and confirm the panel says SCOUT. The official tutorial picture shows a red-cloaked explorer with an animal companion; your Scout may look different with another civilization or update.
  2. Move the Scout toward the unexplored edge while keeping an eye on the remaining movement number. Its job is to reveal the map, not to found a city. If a hostile unit appears, do not send the Scout into its tile. Keep the Warrior closer to danger and use the Scout to inspect safer directions.

10. Check food and the city’s growth bar

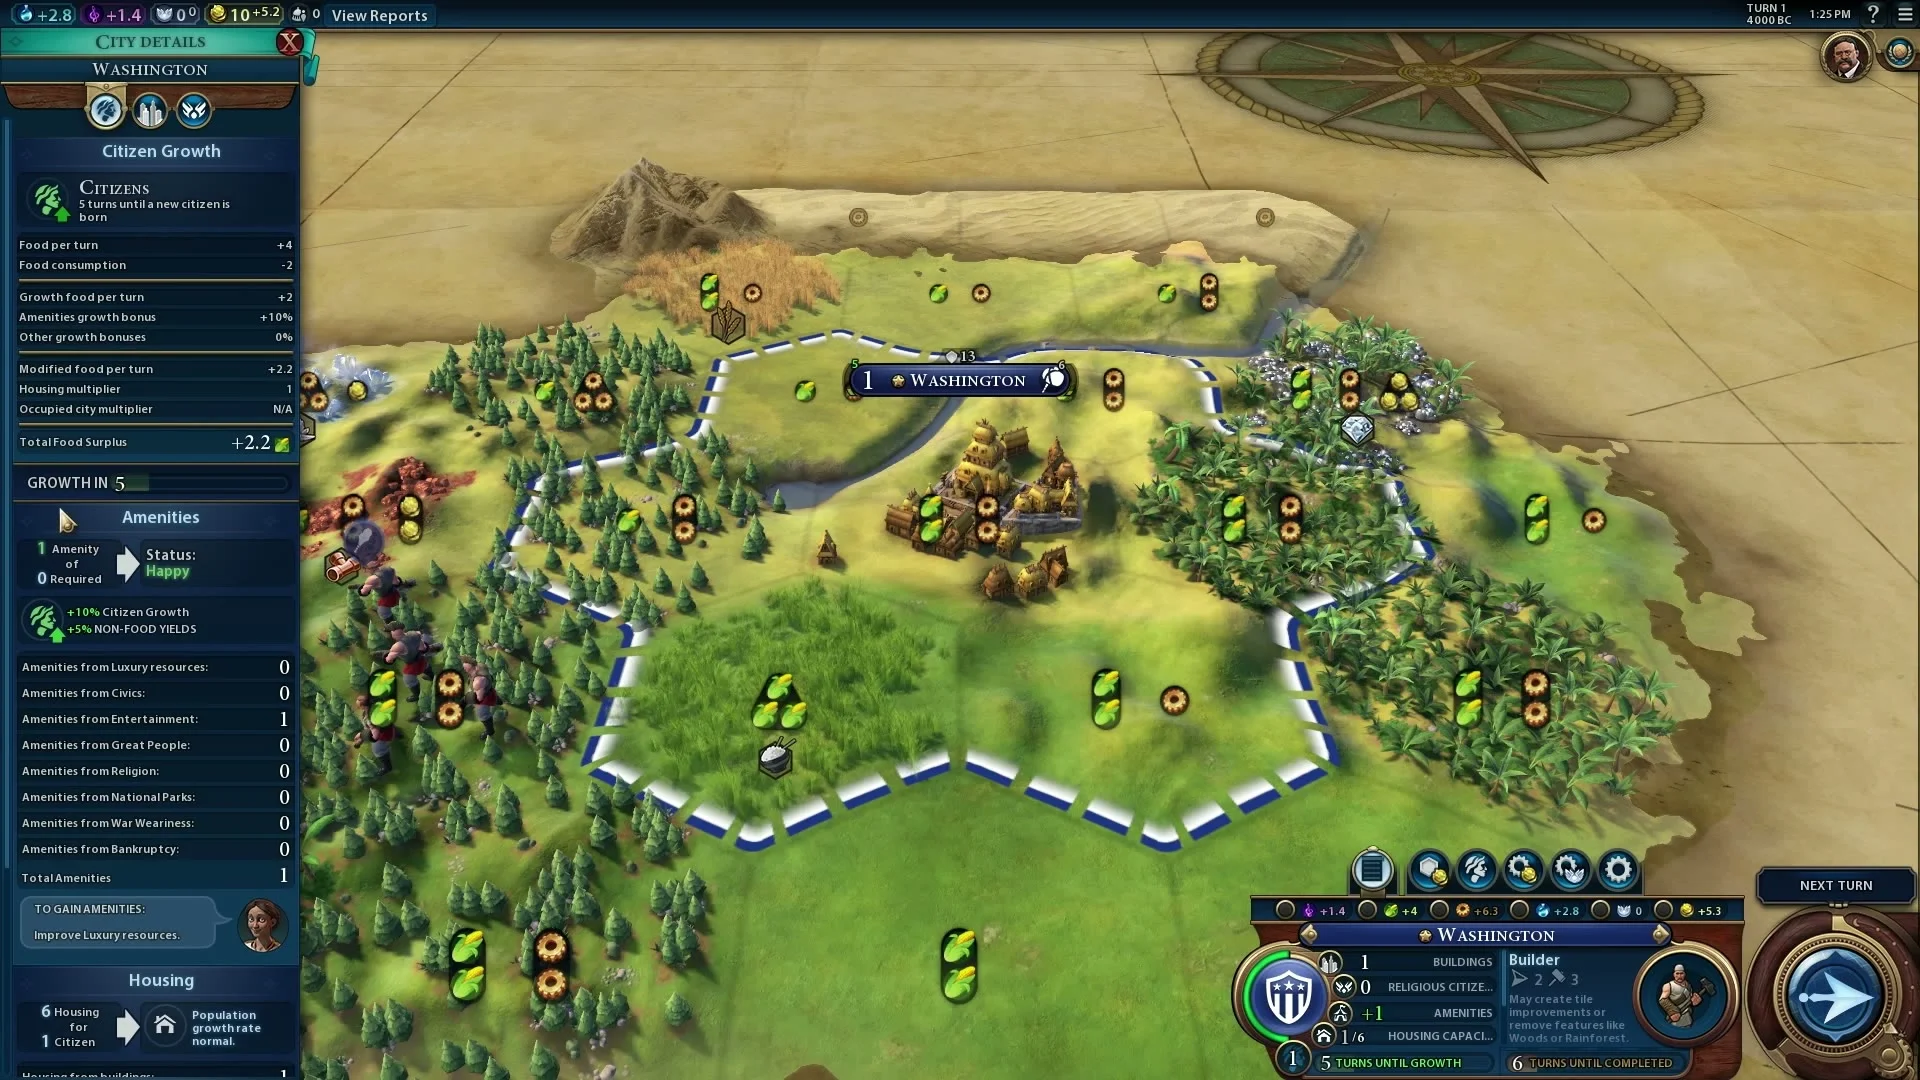
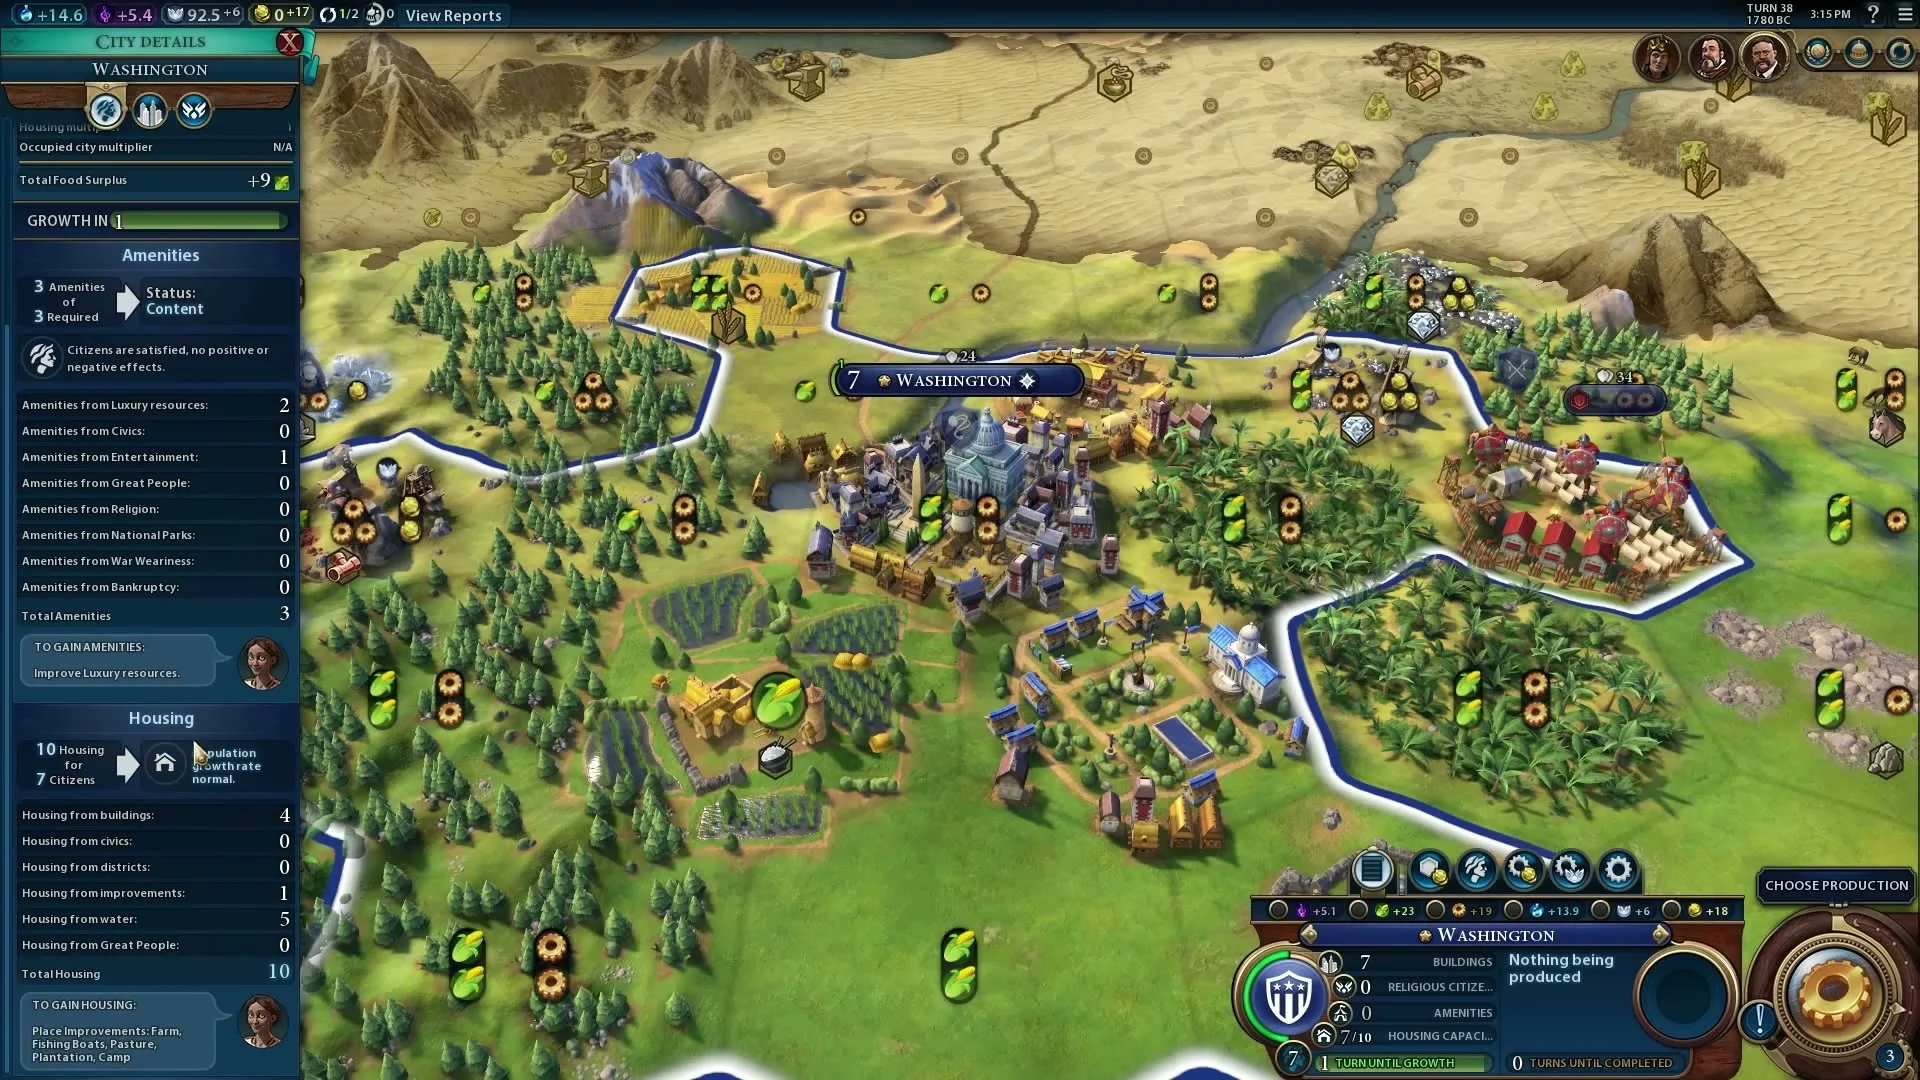
Civilization VI City Details panel showing food per turn, growth progress, amenities and housing beside Washington.
Open City Details by selecting a city. The left panel shows Food per turn and a Growth in 5 bar in this example.
  1. Click the city name or city centre to open its details. In this official example, the City Details panel is on the left. Near the top, Food per turn and a green growth bar tell you whether the city is moving toward another citizen. Your numbers will differ.
  2. Green food symbols on the map show food from tiles. A farm can raise food on some suitable tiles after you have a Builder and the necessary rules unlocked. You do not need to build a farm on turn one. For now, check that growth is progressing and compare the nearby food tiles if one city is much slower than another.

11. Notice housing before growth slows

Civilization VI city details with Housing shown as ten for seven citizens in Washington.
In City Details, find Housing below Amenities. This later city has 10 Housing for 7 citizens, leaving room for growth.
  1. Stay in City Details and scroll down below Amenities to Housing. The screenshot shows 10 Housing for 7 citizens. Housing is the room a city has for people; when population gets close to its limit, growth slows.
  2. Fresh water helps a new city begin with more housing. Much later you can add housing through suitable buildings, districts and improvements. You do not need to solve a housing problem that does not exist yet. The reason to notice this panel now is simple: if food looks fine but growth later becomes slow, Housing is one of the first places to check.

12. End the turn and repeat a simple check

Civilization VI map with a Scout selected and the large Next Turn arrow at bottom right.
The large blue arrow in the bottom-right circle says Next Turn after the required orders have been handled.
  1. Look at the bottom-right circle. It may show an exclamation mark or a message such as Unit Needs Orders, Choose Production or Choose Research. Use the label to find the missing action. When those choices are handled, the circle becomes the large Next Turn arrow shown here.
  2. Click Next Turn once. The city advances its build job and research, units regain movement, and new notices may appear. On the following turn, use the same short check: city job, research, unit movement, then Next Turn. You can save the match at any point and return later; no fast reaction is required.

If your first turn feels stuck

  • There is no city yet: select the unit whose panel says SETTLER. Find Found City in the action row above the bottom-right unit panel. Do not send the Settler away with the Warrior.
  • The bottom-right circle has an exclamation mark: read the label beside it. It is usually pointing to a unit that still needs an order, a city without production or a technology you have not chosen.
  • You cannot improve a resource immediately: hover over its icon. The Stone example explicitly says it requires Mining. Research comes first; a Builder can make eligible improvements later.
  • The city is growing slowly: click its name and open City Details. Check Food and, once population rises, Housing. A new player does not need to master districts and governments just to finish the first few turns.
  • A screenshot looks a little different: these pictures are from official PC tutorials. Leader, map, DLC and console control prompts can vary, so follow the same menu label on your screen.

Get Pixel Twelve's biggest stories first.

Add as a preferred source on Google