Pixel Twelve
Alien: Isolation Motion Tracker and Map Guide: Find Your Objective and Save Safely

How To

Alien: Isolation Motion Tracker and Map Guide: Find Your Objective and Save Safely

A visual first-timer route through Alien: Isolation’s motion tracker, map, safe movement, item wheel and save points, using five official interface and gameplay images.

By Eugene PickettGame: Alien: IsolationVerified Sep 28, 2026
Guide Type
How To
Last Verified
Sep 28, 2026

Guide details

Overview

A visual first-timer route through Alien: Isolation’s motion tracker, map, safe movement, item wheel and save points, using five official interface and gameplay images.

Start here: what this guide covers and which controls to check

Alien: Isolation is a survival game set on the Sevastopol space station. You play Amanda Ripley, looking for a way through its rooms while an alien and other dangers can move nearby. A glowing dot on your tracker is not a safe route, and a circle on your map is not an enemy. This guide separates those clues so you can take the next step without guessing.

  • Keyboard in the official Feral Steam manual: hold Space for the motion tracker, press Tab for the map, hold Q for the item wheel, press C to crouch, and use E when a save prompt appears.
  • If your buttons differ: from the main menu open Options → Game → Input Mapping for keyboard or Control Scheme for a controller. Check the live control label there. The pictures below show what to recognize, so the route still works with another button layout.

The screenshots are examples from the official game manual and game media. Your exact objective words, unlocked rooms and items will change as the story moves forward. Match the parts of the interface, not the mission text in a single example picture.
1. Read the objective and find the green handheld tracker

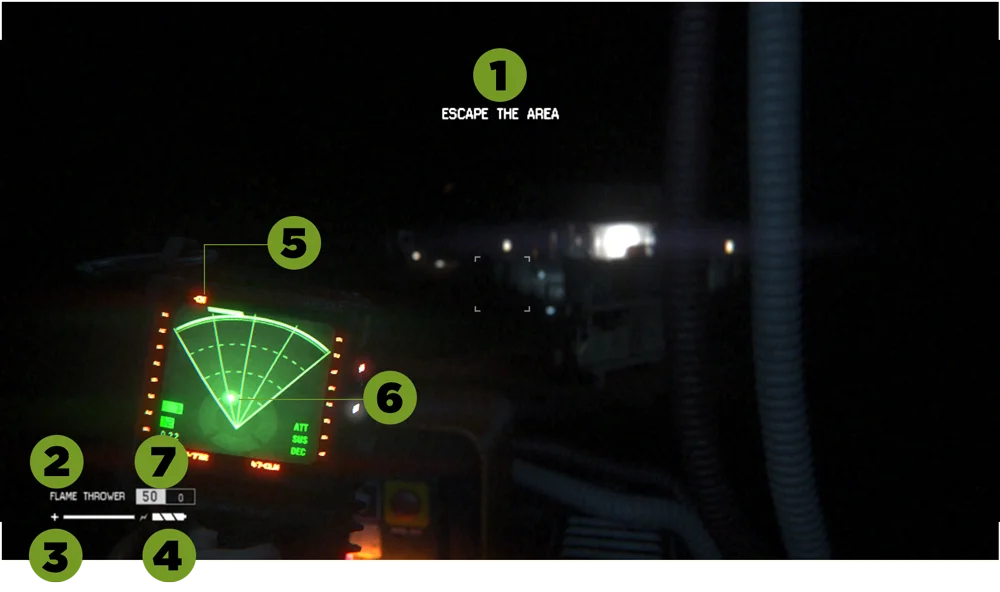
Official Alien: Isolation game-screen diagram with a bright objective update at the top and green tracker held at lower left; numbered callouts 1, 5 and 6 identify the objective text, direction and motion area.
Look at the top for the new objective text (1). The green handheld screen at lower left is the tracker; the manual labels its objective direction as 5 and movement indicator as 6.
  1. Play until Amanda has found the motion tracker. In an ordinary corridor, hold the tracker control: Space in the Feral default keyboard layout. Amanda raises a small green screen in front of you. If nothing appears, check Input Mapping or continue the story until you actually pick up the device.
  2. When the game gives a new objective, read the short text near the top of the play screen. In the picture it says “ESCAPE THE AREA.” That wording is only an example; it tells you what to do next, not which enemy is nearby.
  3. Look at the green tracker screen and then look up at the room again. The tracker occupies part of your view. In the Feral keyboard layout you can hold the right mouse button or Control while it is raised to focus on the surroundings. Do that before crossing an open doorway.

The tracker helps you make a decision. It does not pause the game or make Amanda invisible. Stand near cover while reading it, then put it away when you need a clear view of the corridor.

2. Tell a moving danger from the direction of your objective

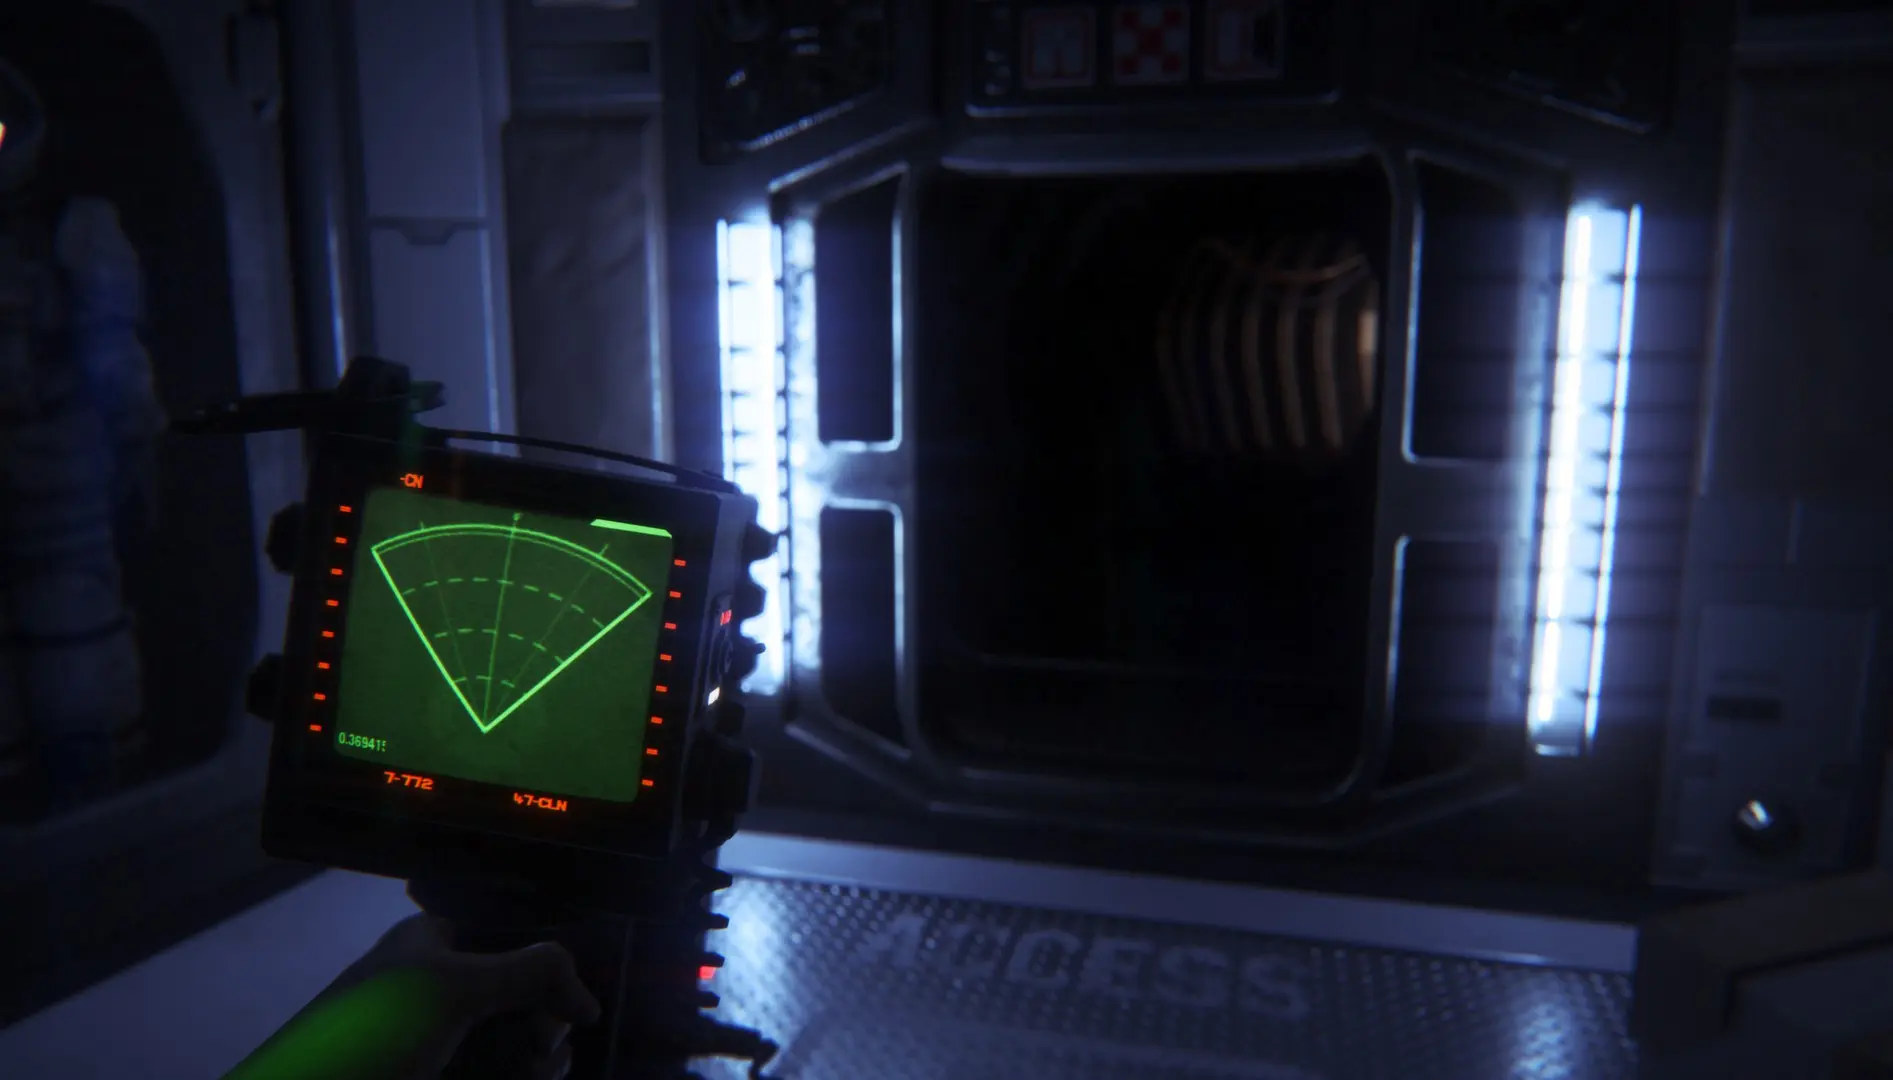
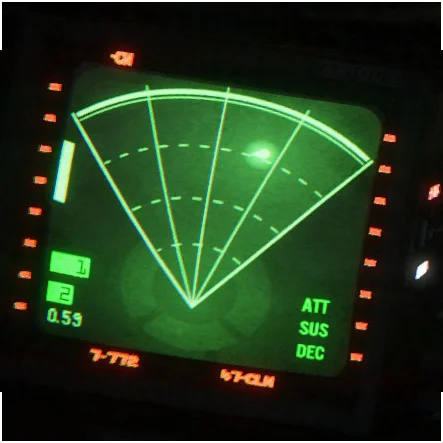
Official close-up of the Alien: Isolation green motion tracker, showing the forward cone, side and rear quarter-rings, a bright movement dot, a distance number at lower left and a rectangular objective marker at the edge.
The broad green cone points in front of Amanda. A flashing dot means movement; the small number at lower left gets smaller as the nearest moving thing gets closer. The small rectangular edge marker points toward your objective, not a monster.
  1. Find the broad fan-shaped area above the point at the bottom of the tracker. That cone is the area in front of Amanda. When something moves there, a bright dot flashes inside it. Do not treat the dot as a promise that the alien is the only thing in the room; it could be another moving person or threat.
  2. Check the curved quarter-rings below and around the cone. If one flashes, the movement is to a side or behind you rather than straight ahead. Stop at cover, turn slowly, and look at the room before walking toward a door.
  3. Read the small number in the tracker’s lower-left corner. A smaller number means the nearest detected movement is closer. If it falls while you are about to cross an open floor, wait or find another route instead of sprinting forward.
  4. Find the little rectangular marker touching the outer edge of the green display. That marker is the direction of the current story objective. Turn until it points ahead, then use the map in the next step to check which corridor actually connects to it. It is not an enemy blip.

Two limits matter: the tracker only notices movement, so a still danger may not appear; and its beeps can be heard. Check it briefly from cover, then lower it. A quiet-looking screen is not a guarantee that a room is empty.

3. Open the map to turn the direction into a route

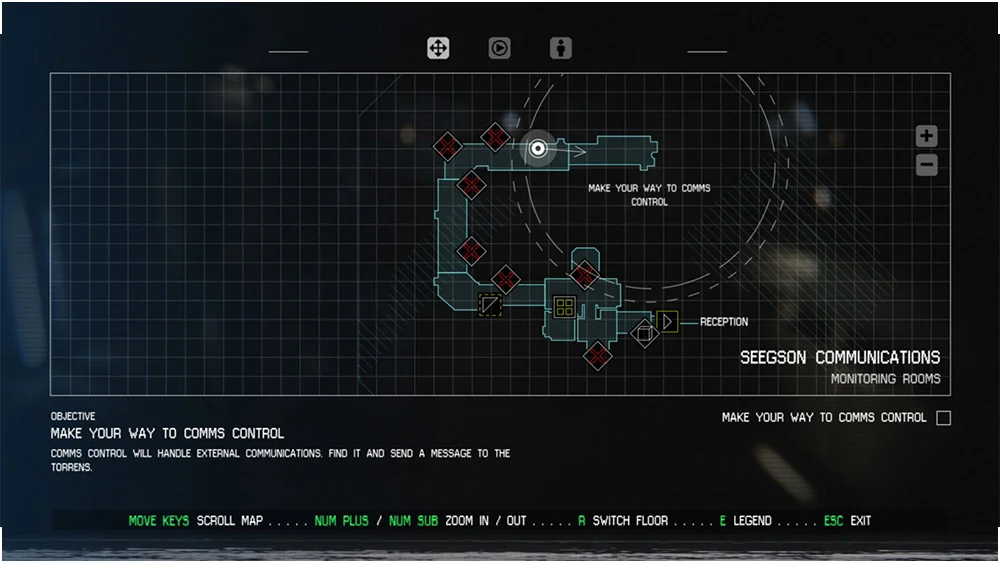
Official Alien: Isolation map screen with a room layout in the center, an objective sentence below it, a circular objective marker on the map and the symbol legend control at the bottom.
Read the objective sentence under the room plan. Find its circle on the plan above, then follow connected corridors from your position. The example mission says “MAKE YOUR WAY TO COMMS CONTROL”; yours may say something else.
  1. Press the map control: Tab in the Feral default keyboard layout. The map fills most of the screen with outlined rooms and corridors. Read the current objective below the map before choosing a direction. The pictured objective is only an example.
  2. Find the circle on the map that marks that objective. Compare it with the corridor connected to your current area. If a wall or locked passage blocks a straight line, follow an actual connected route. The tracker edge marker gives a direction, but it does not tell you which door opens.
  3. If much of the map is blank, you have not necessarily done anything wrong. New areas fill in as you explore. Look for a map terminal in the area to reveal places you have not walked through yet, then reopen the map to see the new layout.
  4. Use the symbol legend shown at the bottom of the map screen when an icon is unclear. The map can mark save points, locks, tools and exits. Check the icon before deciding a symbol means your destination.

A good first route is short: choose the next connected corridor, lower the map, look into that corridor, and only then move. Repeat at the next junction. You do not have to memorize the whole station.

4. Recognize an Emergency station and save before the next risk

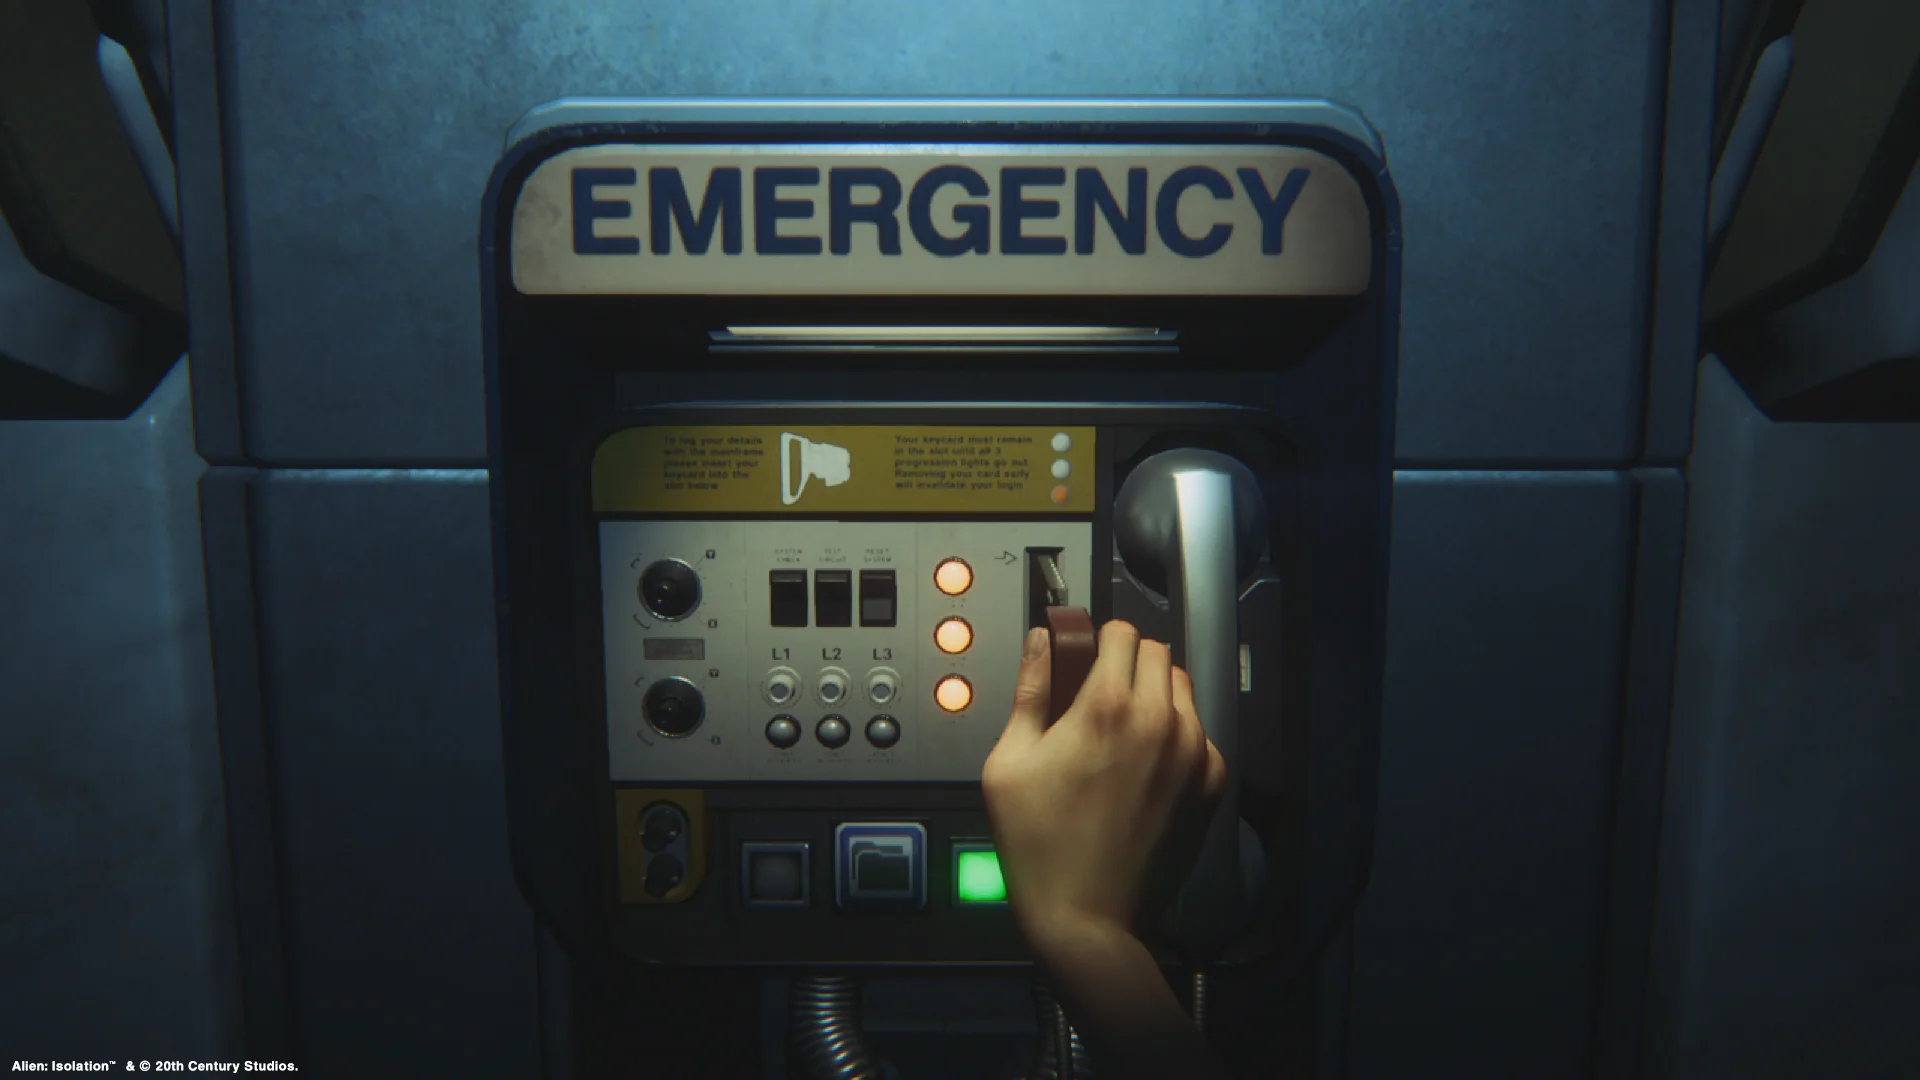
Official Alien: Isolation gameplay still of the wall-mounted Emergency save station, with a large EMERGENCY sign, handset on the right, three indicator lights and a green button.
The large EMERGENCY sign above the wall unit and the handset on its right are the easy visual clues. Approach until the game shows its save prompt; check the corridor before using it.
  1. On the map, identify the save-point symbol using the legend, then move to that room. In the world, look along the wall for a unit with a large EMERGENCY label above a handset, as in the picture. A green light near the bottom helps it stand out.
  2. Before interacting, look behind you and listen. Saving takes several seconds while Amanda remains exposed. If the tracker has just shown nearby movement, do not start a save with an enemy already in the same open corridor.
  3. Approach the station until the game displays its use or save prompt. On the Feral default keyboard, press E. Wait for the station animation and the save to finish before leaving. If the station cannot be used again immediately, that is normal: it has a short cooldown.

After a death, Load Current Save returns to the last save point. Load Previous Save goes one save farther back, and Load Mission Save starts a reached mission over. If the latest save leaves you trapped in danger, use the previous one instead of restarting the whole game.

5. Prepare an item before stepping out of cover

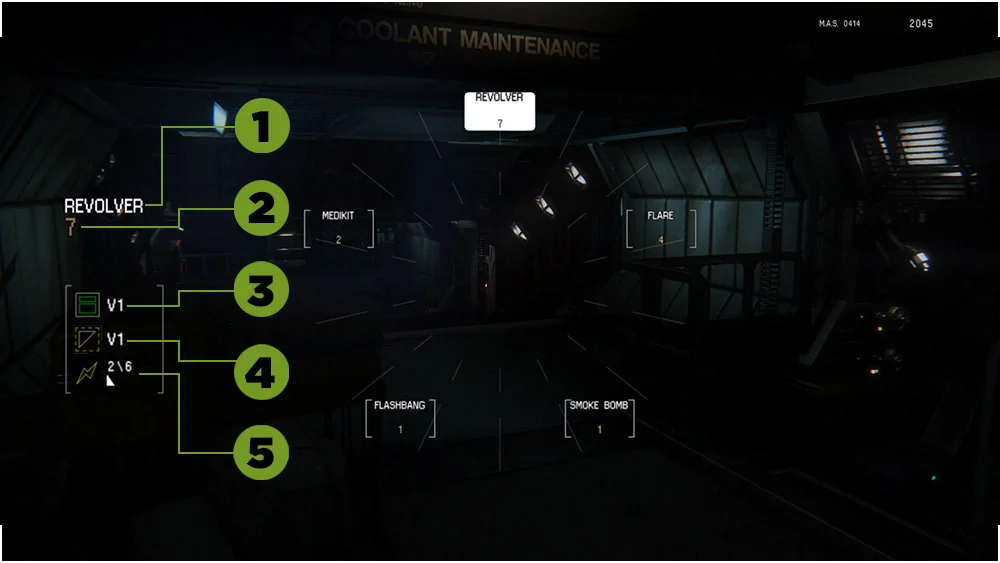
Official Alien: Isolation radial-menu screenshot with item names such as MEDKIT and FLARE around the middle, and ammunition, access tool, torch and battery indicators called out on the left.
Hold the item-wheel control and read the item names around the center. The row at left shows other supplies and tool levels; it is not the route to the objective.
  1. While you are still in a safer spot, hold the radial-menu control: Q in the Feral keyboard layout. Item names appear around the middle of the screen. In the pictured example, MEDKIT is left of center and FLARE is on the right. Your menu may show different items depending on what you have found.
  2. Move the cursor over the item you actually want and release Q to equip it. Check the held-item display before moving. If you need to craft, find the relevant blueprint first; then choose the item in the wheel and inspect the required component slots.
  3. Do not start reading a long crafting menu in the middle of an exposed hallway. The game does not pause while you craft. Prepare, use the tracker briefly, then cross only when your route and nearby movement make sense.

You can complete much of the opening by moving quietly and choosing a route, not by using every item you find. The item wheel is a preparation tool; it does not replace the map or guarantee safety.

One safe loop to use whenever you feel lost

  • 1. Map: read the objective sentence, find its circle, and pick the next connected corridor.
  • 2. Room: lower the map, find that corridor or door with your eyes, and spot nearby cover or an exit.
  • 3. Tracker: check the green cone and number briefly from cover. A flashing dot means movement; the edge rectangle means your objective direction.
  • 4. Move: walk or crouch to the next safe spot. Running is noisy and can draw attention. Recheck the map at a junction.
  • 5. Save: when you reach the EMERGENCY wall unit, make sure the area is quiet, follow the prompt and wait for the save to finish.

If the tracker points toward a wall, do not try to walk through it. The marker gives a direction, not a complete path. Use the map’s connected rooms. If the tracker shows no dot but you hear something nearby, trust your eyes and ears too: a still threat can disappear from the tracker.

Get Pixel Twelve's biggest stories first.

Add as a preferred source on Google