Pixel Twelve
XCOM 2 Beginner Guide: Your First Mission, Cover and Overwatch

How To

XCOM 2 Beginner Guide: Your First Mission, Cover and Overwatch

Learn the menu route, action points, concealment, cover, shooting, Overwatch and the Avenger with official screenshots and clear diagrams.

By Mason CarterGame: XCOM 2Verified Sep 26, 2026
Guide Type
How To
Last Verified
Sep 26, 2026

Guide details

Overview

Learn the menu route, action points, concealment, cover, shooting, Overwatch and the Avenger with official screenshots and clear diagrams.

What you do in XCOM 2

XCOM 2 has two parts: missions and the Avenger. On a mission, you choose where each soldier moves and what they do during a turn. Between missions, you return to the Avenger, a flying base where you manage soldiers, research and equipment. You do not need to understand the whole campaign before taking the first turn.

This guide follows the base game on PC. The official screenshots below show real game screens, but your soldier names, map and mission goal will be different. The dark-blue teaching diagrams explain choices; they are not screenshots. If you are using a console or the War of the Chosen expansion, some buttons and menus may differ, so follow the label on your own screen.
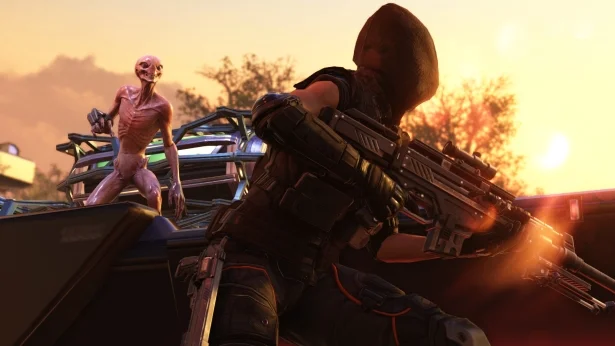
An XCOM soldier fires at an alien from behind cover in a mission.
This is the battlefield part of XCOM 2: soldiers, enemies and cover share one map.

1. Start a new game with the tutorial

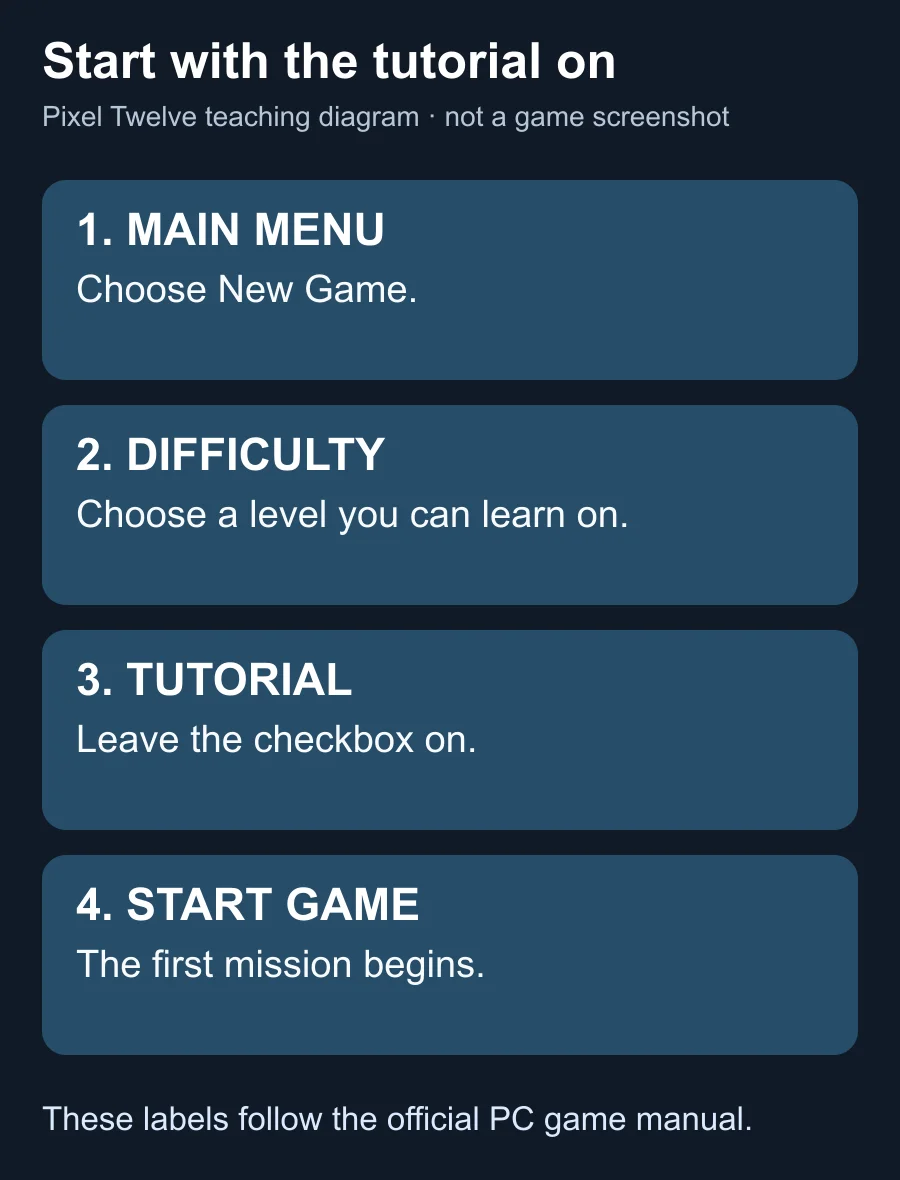
Original route diagram showing Main Menu, New Game, difficulty, Tutorial checked and Start Game.
Menu route diagram, not a screenshot. Leave Tutorial checked on your first run.
  1. Open XCOM 2 and wait for the Main Menu. Choose New Game. The next screen asks for a difficulty. If you are new, choose one that lets you learn without worrying about a perfect campaign.
  2. On the difficulty screen, find the box labelled Tutorial. Leave it checked, then choose Start Game. The tutorial introduces your first squad and the first mission while you play. If you untick the box, the game skips that guided opening.

The official PC manual describes that exact route. If you are loading an existing save instead, use Load Game from the Main Menu and keep following the on-screen prompts; the opening tutorial may already be behind you.

2. Find the important parts of the mission screen

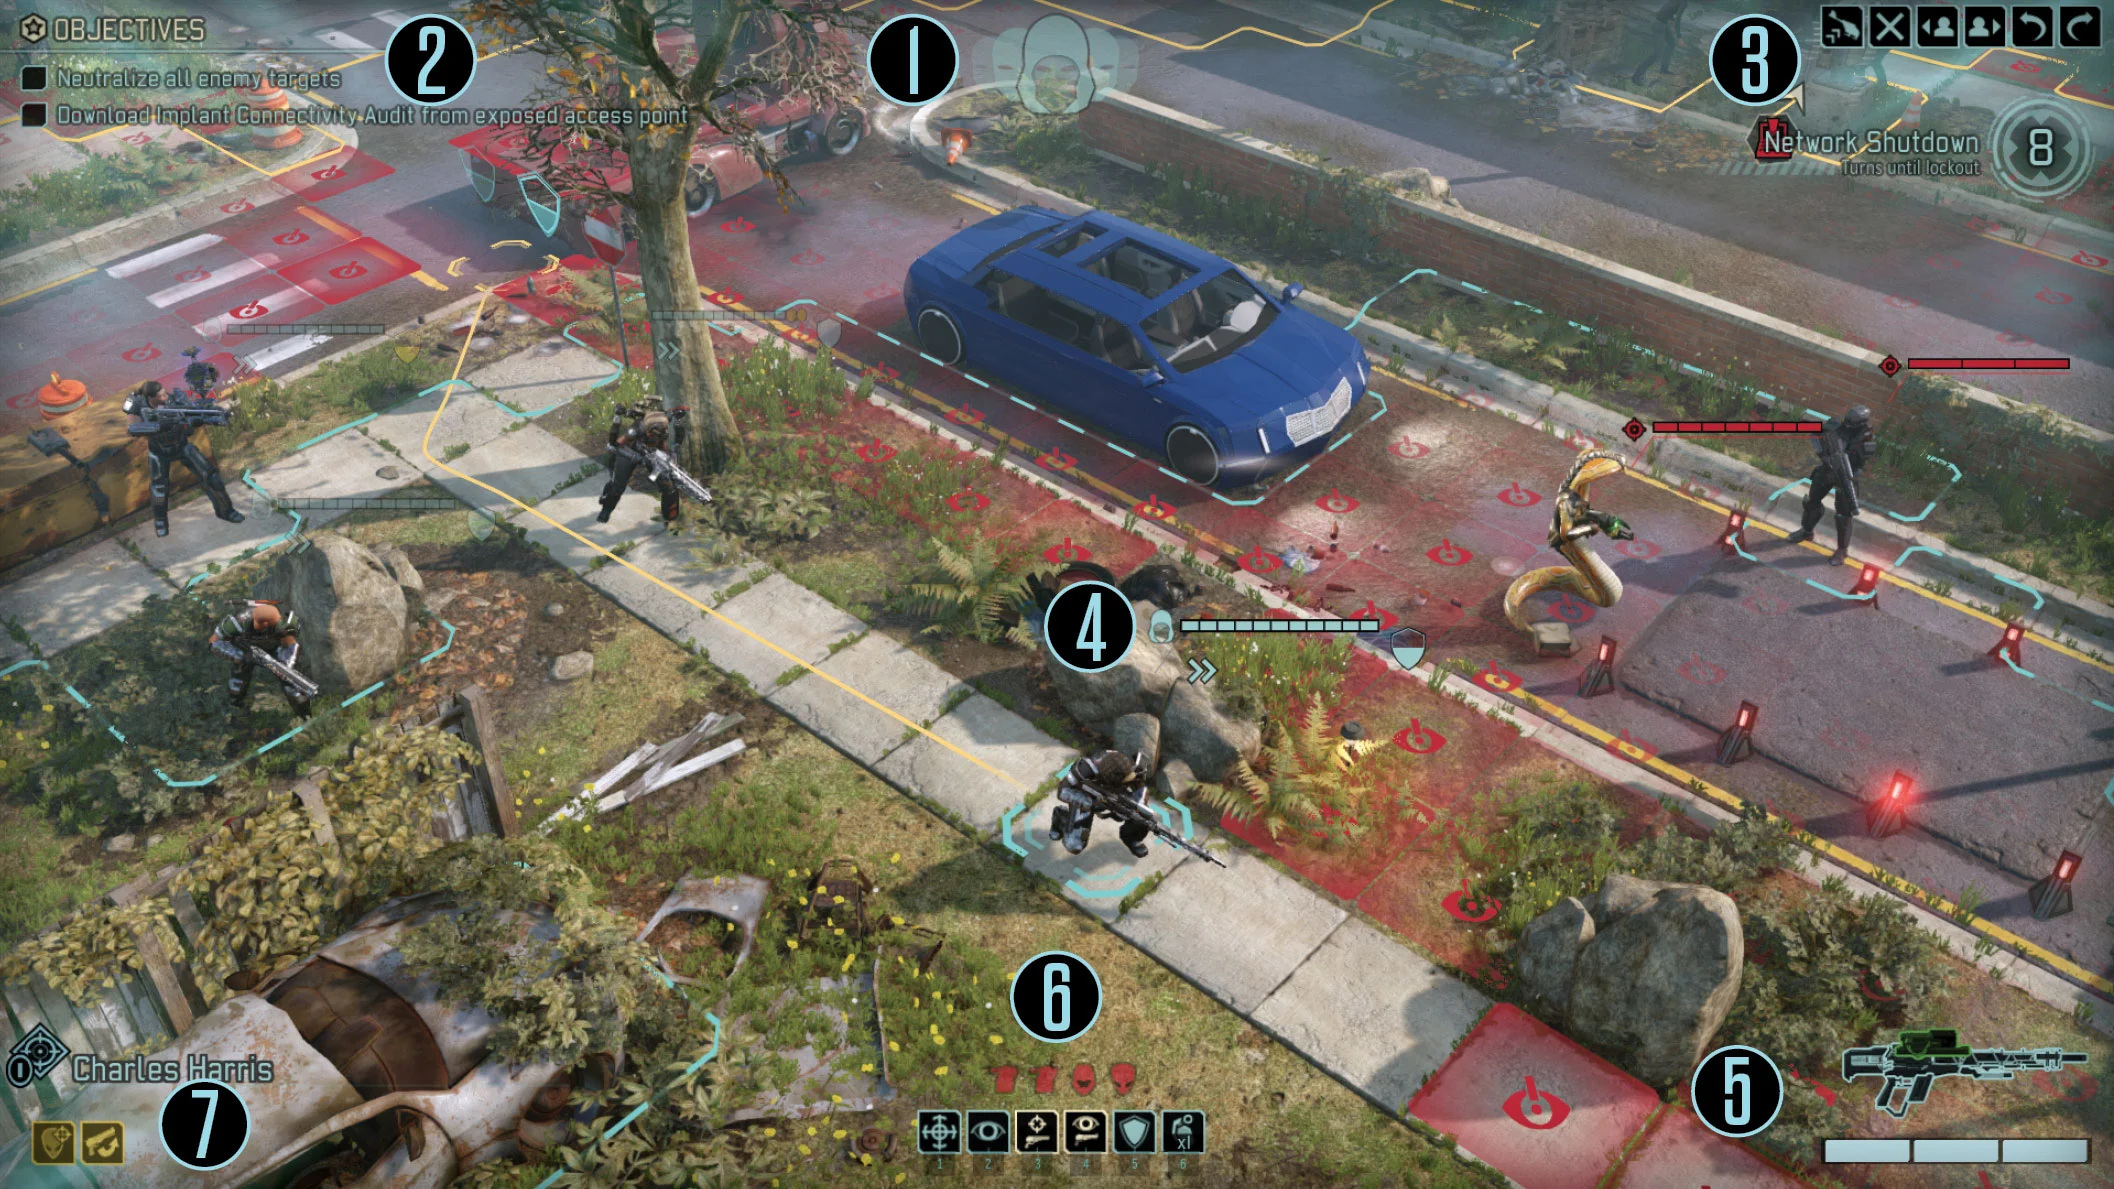
Official XCOM 2 manual screenshot with numbered markers for concealment, objectives, turn controls, unit flag, weapon, actions and soldier name.
Read the numbered labels: 2 is the objective at upper left; 3 is turn controls at upper right; 6 is the action bar at the bottom.
  1. Look at the upper-left corner first. The Objectives box tells you what this mission wants, such as defeating enemies or reaching a place. Do not assume every mission is simply a fight; the second line can give you another job or a timer.
  2. Look at the selected soldier. Their unit flag sits near the soldier and shows health, cover and the small chevrons for action points. At the bottom, the row of square icons is the Actions bar. An icon that is grey cannot be used right now. The weapon display and ammunition are at the lower right in this manual screenshot.
  3. At the upper right, find the controls for switching soldiers, rotating the view, calling evac when available, and ending the turn. Do not click End Turn until you have checked every soldier who still has an action. On PC, Tab cycles to another soldier.

3. Make the first move without losing the turn

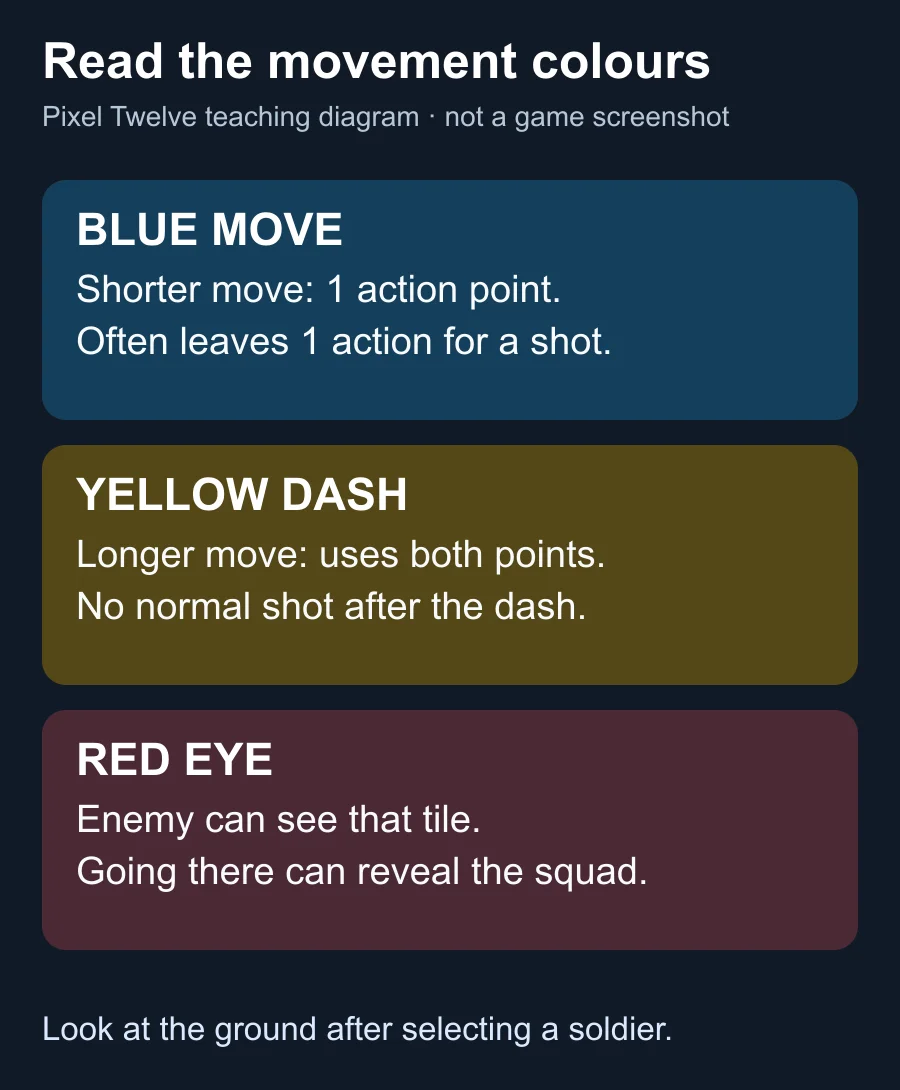
Original teaching diagram comparing blue one-action movement, yellow two-action dash and red-eye danger tiles.
After selecting a soldier, blue means one action point; yellow uses both. A red eye warns that the destination is watched.
  1. Click a soldier so their movement range appears on the ground. Move the pointer over a blue tile behind a wall, car or other solid object. The blue boundary means this move usually spends one of the soldier’s two action points. On PC, right-click the destination to confirm. If you prefer another path, hold Ctrl while setting waypoints as the official manual explains.
  2. Before confirming, look for a shield at the destination and check whether a red eye is painted over the tile. A yellow destination is a dash: it reaches farther but uses both action points. A red eye means an enemy can see the tile and you may reveal the squad. For a first turn, choose a blue tile in cover if there is one that keeps you moving toward the objective.

Blue does not guarantee a shot. A blue move leaves an action point, but some abilities have their own costs or restrictions. Select the soldier afterward and read which action icons are still lit instead of assuming every button is available.

4. Understand concealment and cover

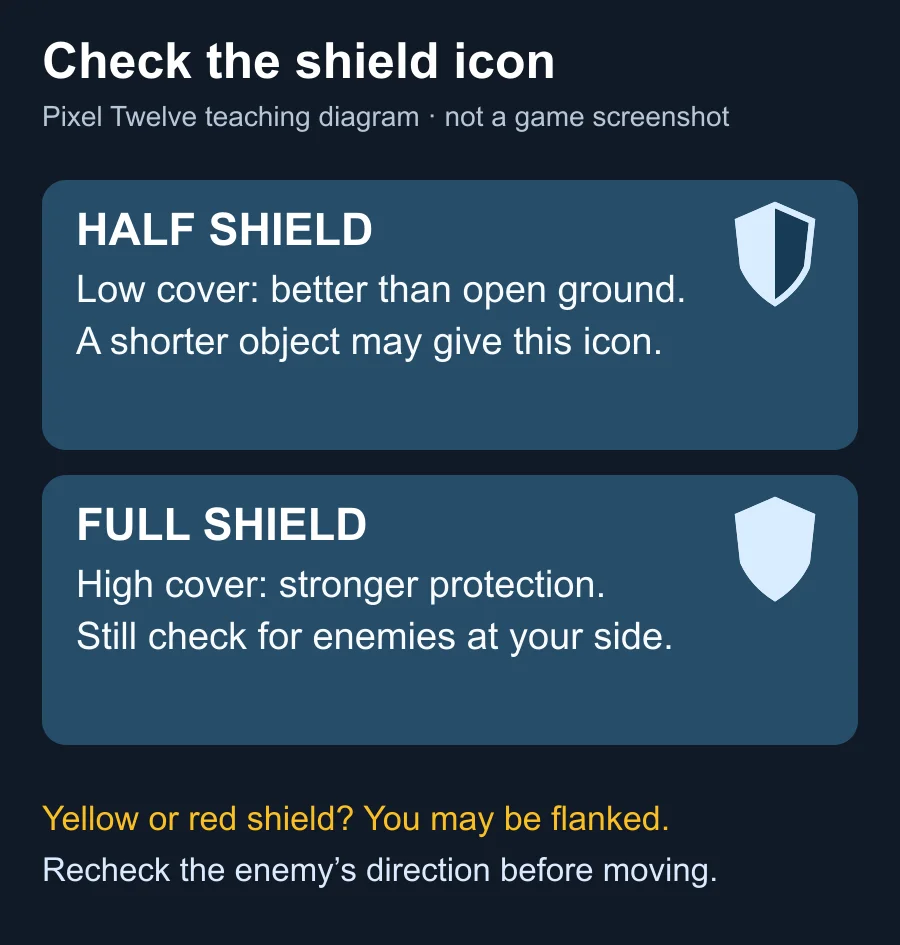
Original teaching diagram of a half shield and a full shield, with a warning about yellow or red flank markers.
The shield icon appears by a destination or soldier. A full shield is stronger cover; a coloured warning can mean a flank.
  1. When a mission begins hidden, look for the hooded Concealment icon near the top and the blue tint at the corners. The enemy has not spotted your squad yet. Moving into a tile with the red-eye marker or firing a weapon can break that concealment. You can use the hidden turns to put soldiers behind cover before your first attack.
  2. Hover over a destination and find its small shield icon. A half shield means low cover; a full shield means high cover. Both are safer than standing in the open. A yellow or red shield warning means a soldier is flanked or would be flanked from an enemy’s direction, so a wall on one side may not protect them from that attacker.

Do not move every soldier in one long yellow dash just because the objective looks far away. You can have a good-looking position on the map and still be exposed from the side. Place one soldier, check the new view, then place the next.

5. Choose a shot or Overwatch

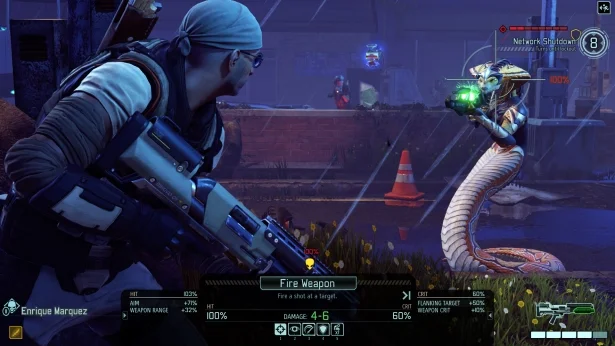
Official XCOM 2 battle screenshot showing the Fire Weapon action, target, hit chance and lower action bar.
When you choose Fire Weapon, check the target and the displayed chance before confirming a shot.
  1. Select a soldier with an action left and click the Fire Weapon icon on the bottom action bar. Hover or cycle to an enemy. The shot display shows the chance to hit and expected damage. A low number does not mean the game is broken; distance, cover and other conditions affect it. You can cancel before firing if the shot looks poor.
  2. If you do not want to fire now, look for Overwatch in the action bar. The soldier stays put and can shoot an enemy that moves into view during the enemy turn. On PC, the official manual also lists Y as the Overwatch hotkey. While your whole squad is still concealed, an Overwatch shot waits until concealment is broken, so do not expect hidden soldiers to shoot simply because a patrol walks past.

Reload is another action to recognise. If the ammo display is empty, use Reload before trying another shot. It spends time, so do it from cover when you can. Grenades and class abilities are useful later, but the first goal is to learn what your selected soldier can still do and what it will cost.

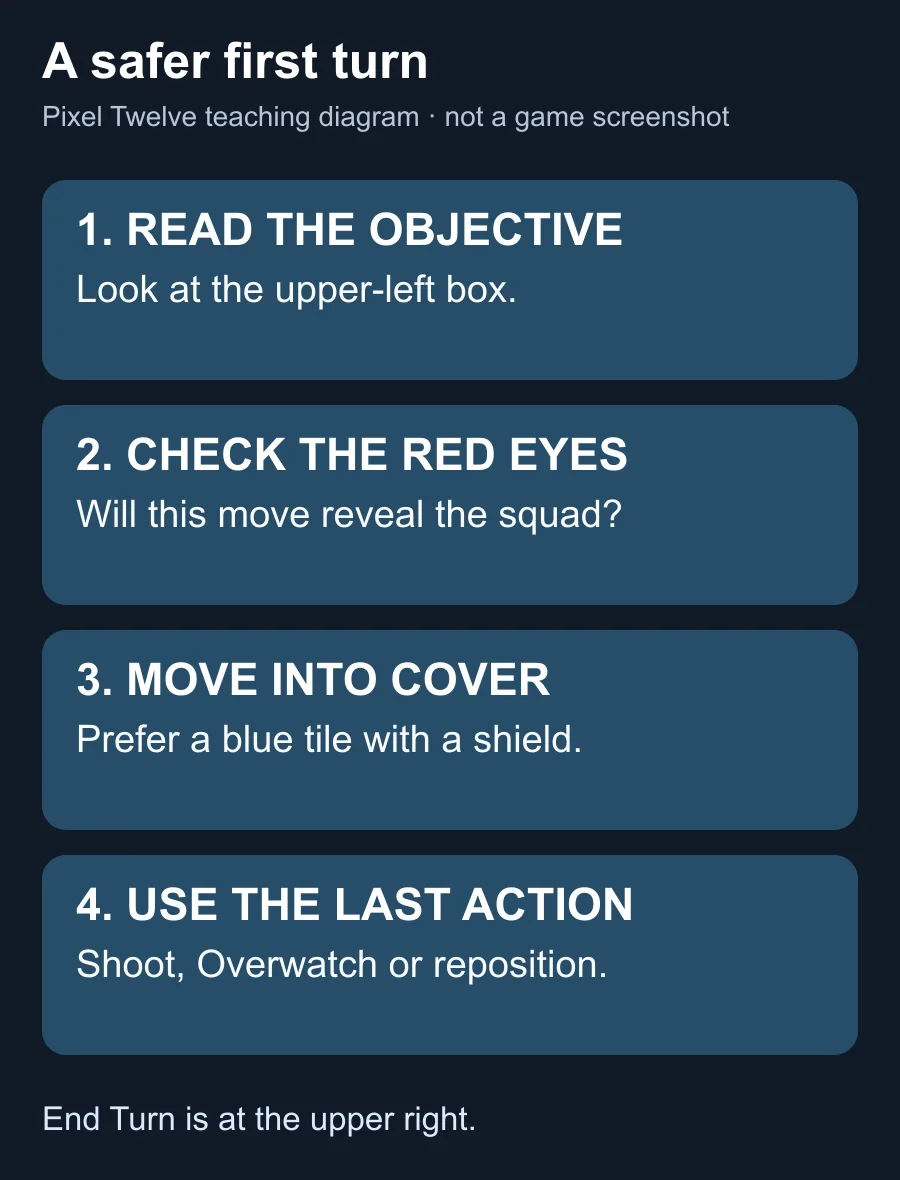
Original teaching diagram of the order: read objective, check danger tiles, move into cover, use the remaining action.
This turn routine is a memory aid, not a screenshot. End Turn is at the upper right after you have used the squad.

6. Follow the mission objective and know when to evac

  1. Read the upper-left Objectives box every time the mission changes or a new message appears. A timer may show turns remaining for one task. If the mission needs a rescue or extraction, work toward that destination instead of stopping for every enemy.
  2. When an evac is available, use Call Skyranger near the upper-right controls if you must place your own zone. A grid appears: a fully blue area is valid; red tiles block that spot. Click a valid location, then move the required soldier into the zone and use the Evac action. Some missions already mark an extraction zone for you, so look for that before trying to place another.

If a soldier is badly hurt, use the Carry Unit action with another soldier when the mission permits it. Evacuating a wounded ally can save them. Lost soldiers do not come back after a mission, so protecting the squad is part of a good result, even when the timer pushes you forward.

7. Find your way around the Avenger after the mission

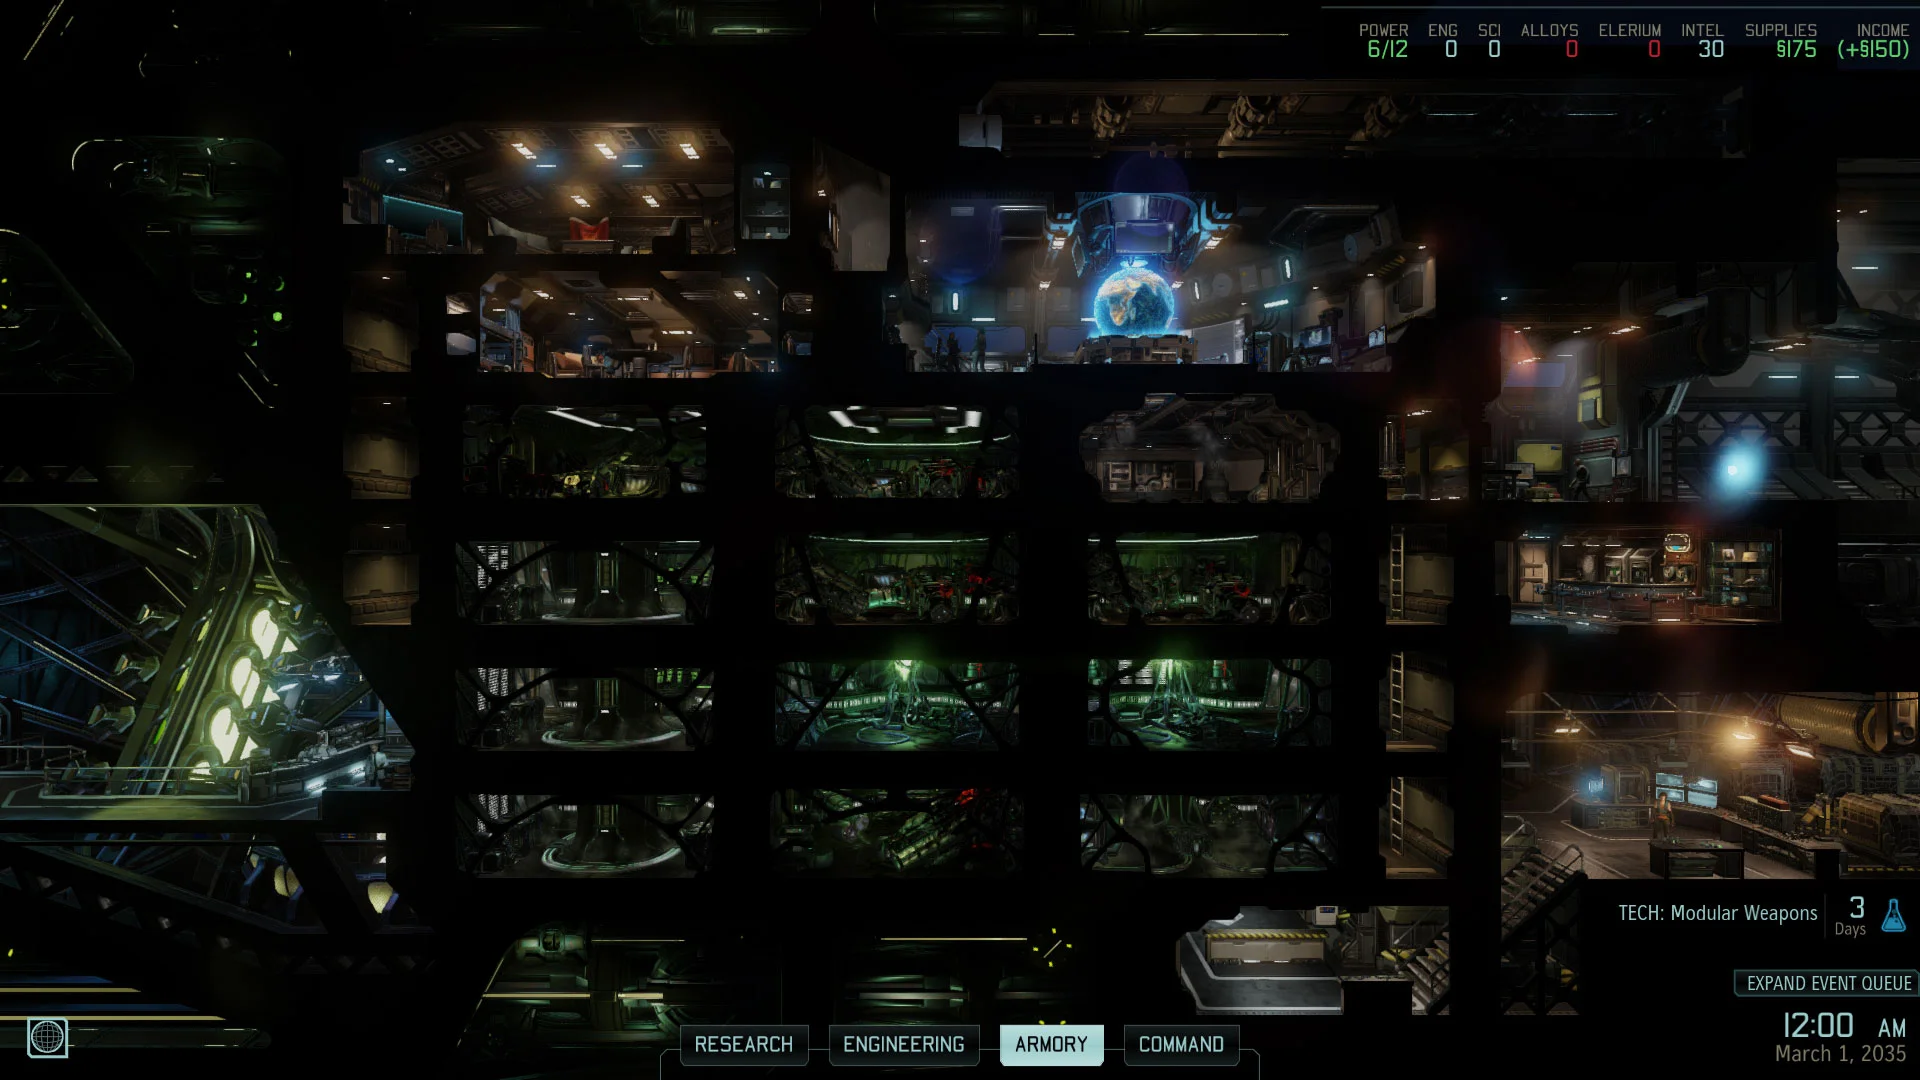
Official XCOM 2 manual screenshot of the Avenger rooms with Research, Engineering, Armory and Command labels along the bottom.
The Avenger is your base. Use the labelled rooms at the bottom to manage soldiers, research and equipment.
  1. After the mission, the Avenger is the cutaway ship view. Look at the bottom labels. Armory opens your soldiers: inspect who survived, view promotions and check loadouts. Research is where scientists work on one project at a time. Engineering is where you build equipment and facilities from available resources.
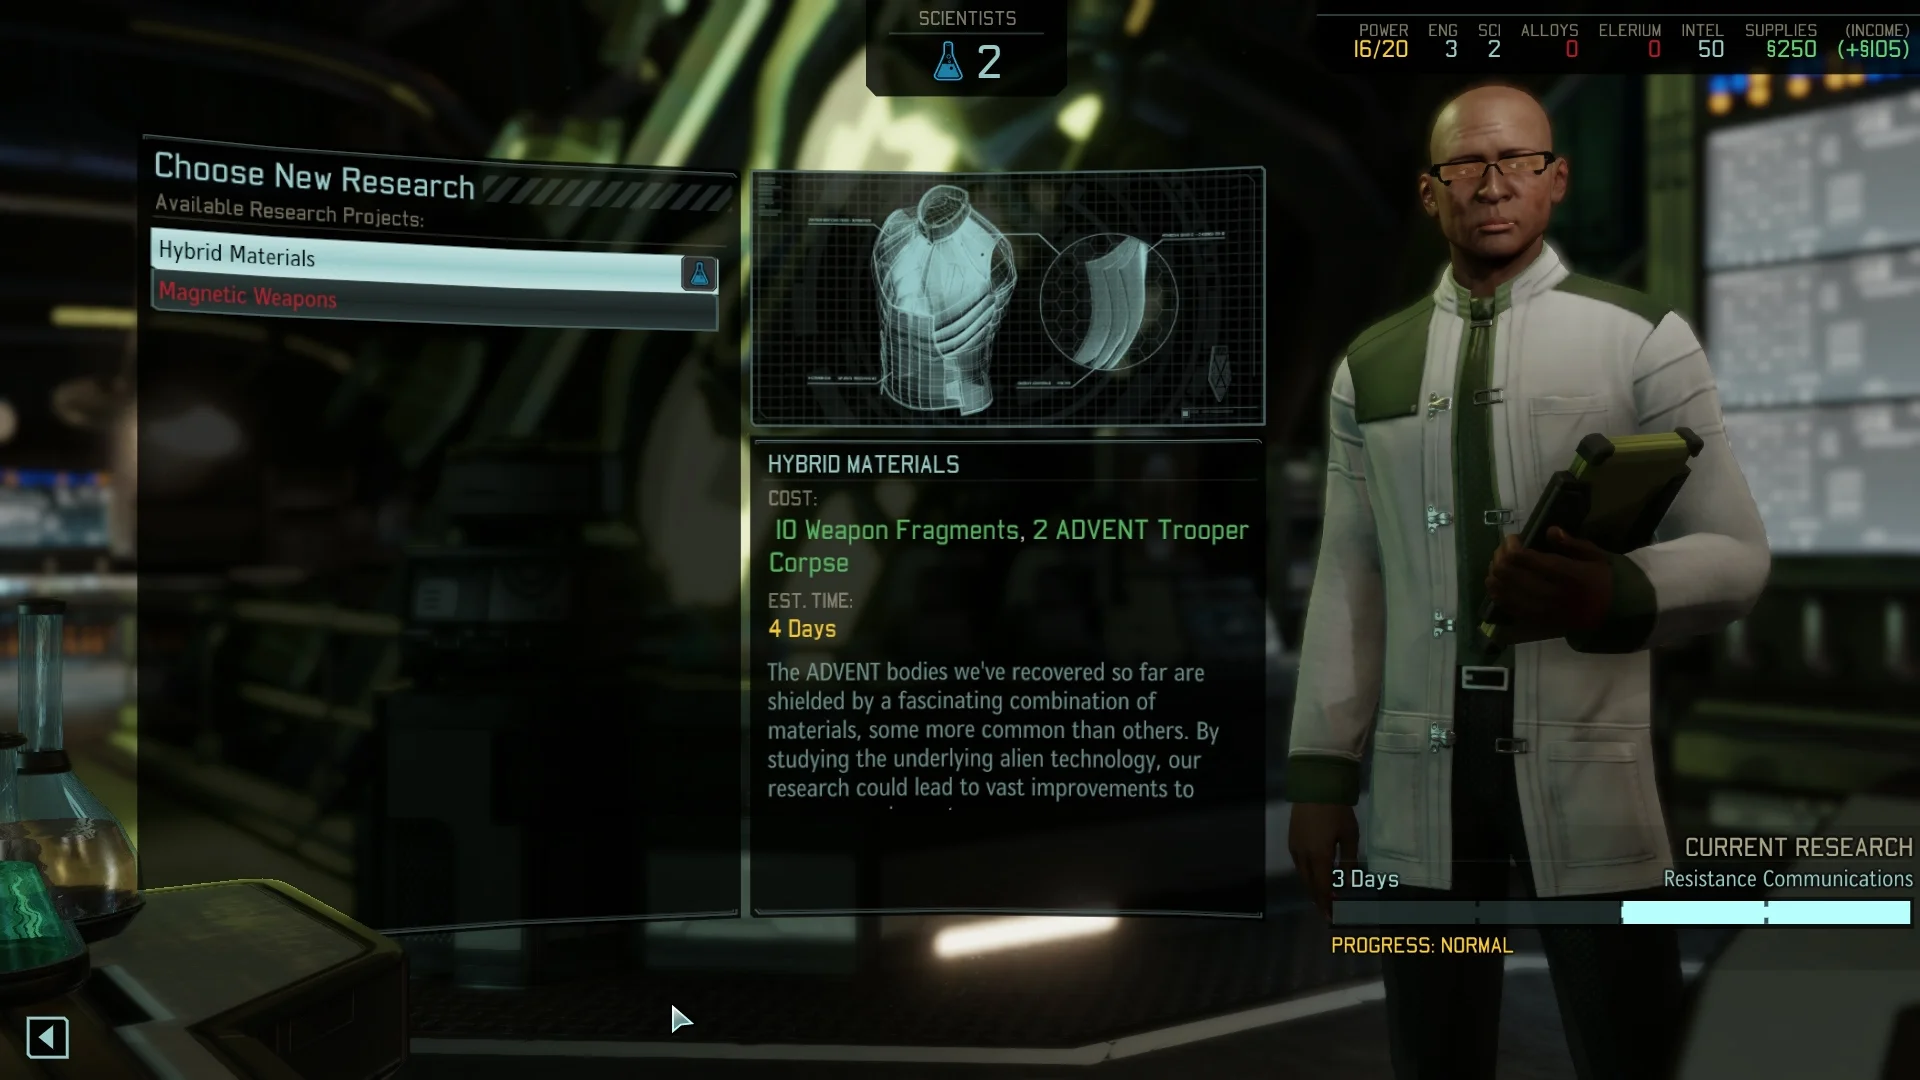
The Hybrid Materials research screen shows a scientist, project name and research details.
Research is a separate base decision: select a project and wait for its time to complete.
  1. If a soldier earned a promotion, open Armory, select that soldier and read the available ability choice. If a new research project is waiting, open Research and choose one. You do not need to buy everything at once; check supplies and the current objective before spending.
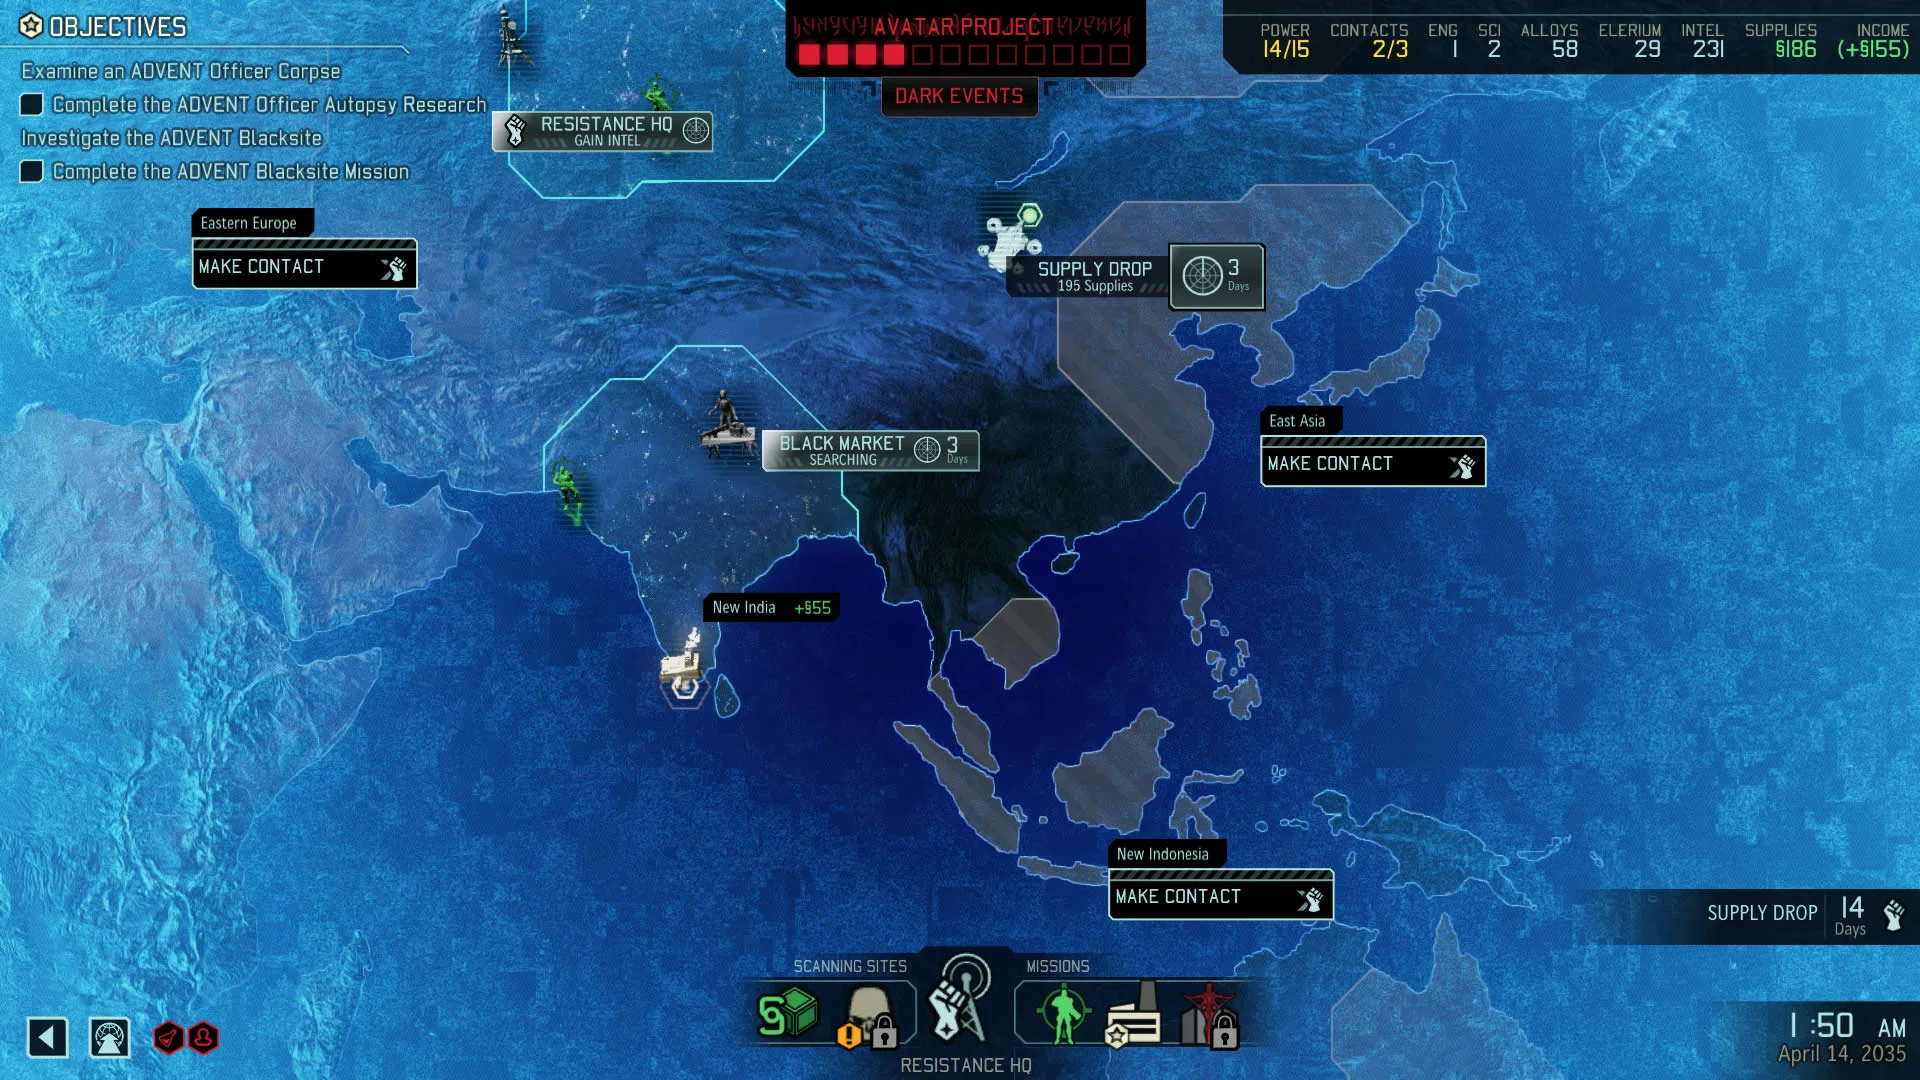
Official XCOM 2 manual Geoscape screenshot with regions, objectives, scanning sites, missions and a progress bar.
On the Geoscape, mission sites and other markers appear on a world map. The objectives remain visible at upper left.
  1. Choose Bridge to open the Geoscape. This is the world map where you scan, make resistance contacts and respond to missions. The scanning icon is beside the Avenger’s current location. Time moves while you scan, so stop and read any new mission or warning before choosing where to go next.

Quick fixes for a first campaign

  • Cannot find the Tutorial? Start from Main Menu → New Game → difficulty screen. Leave the Tutorial checkbox on before selecting Start Game.
  • A soldier cannot shoot after moving? The yellow dash used both action points. Next turn, try a blue move and recheck the action bar.
  • The squad is spotted unexpectedly? Look for the red-eye tiles and blue concealment tint before confirming a move. A noisy route can also reveal you.
  • A soldier still gets hit behind a wall? Check the half/full shield and the yellow or red flank warning from the enemy’s direction.
  • A shot button is grey? Check action points and ammo. Reload if needed, or select another soldier with Tab.
  • Mission is not ending after a fight? Re-read Objectives at the upper left. You may still need a rescue, interaction, timer condition or extraction.

For your first few missions, success is knowing where to read the objective, moving into useful cover, using each soldier’s remaining action, and returning to the Avenger with a squad you can keep improving. You can learn new classes and bigger campaign choices after those basics feel familiar.

Get Pixel Twelve's biggest stories first.

Add as a preferred source on Google