Pixel Twelve
Sunless Sea Beginner Guide: Your First Voyage, Fuel, Supplies and Port Reports

How To

Sunless Sea Beginner Guide: Your First Voyage, Fuel, Supplies and Port Reports

A beginner-friendly first-voyage route for Sunless Sea, with official interface screenshots, an original HUD diagram, port-docking instructions and a practical return-to-London checklist.

By Eugene PickettGame: Sunless SeaVerified Sep 27, 2026
Guide Type
How To
Last Verified
Sep 27, 2026

Guide details

Overview

A beginner-friendly first-voyage route for Sunless Sea, with official interface screenshots, an original HUD diagram, port-docking instructions and a practical return-to-London checklist.

Start here: what is a voyage in Sunless Sea?

You are the captain of a small ship on the Unterzee, a dark underground sea below Fallen London. You read stories in port, choose what to buy, then steer across the water. Sailing costs fuel. Your crew gets hungry and uses supplies. Time in frightening waters builds Terror. You do not need to solve every story on your first trip. A good first goal is smaller: leave London, visit one reachable port, then return alive.

First-trip goal: buy enough to leave a reserve for the return, discover one port, collect a Port Report if that port offers one, and sail back to London. The sea map can vary, so this is a method, not a fixed route with guaranteed coordinates.

These pictures show the PC interface. The named tabs and gauges are the things to look for even if your console or mobile layout puts them in slightly different places. If a key does not work, check the game’s Options because keys can be changed.
Before launch: find the shops and check your hold

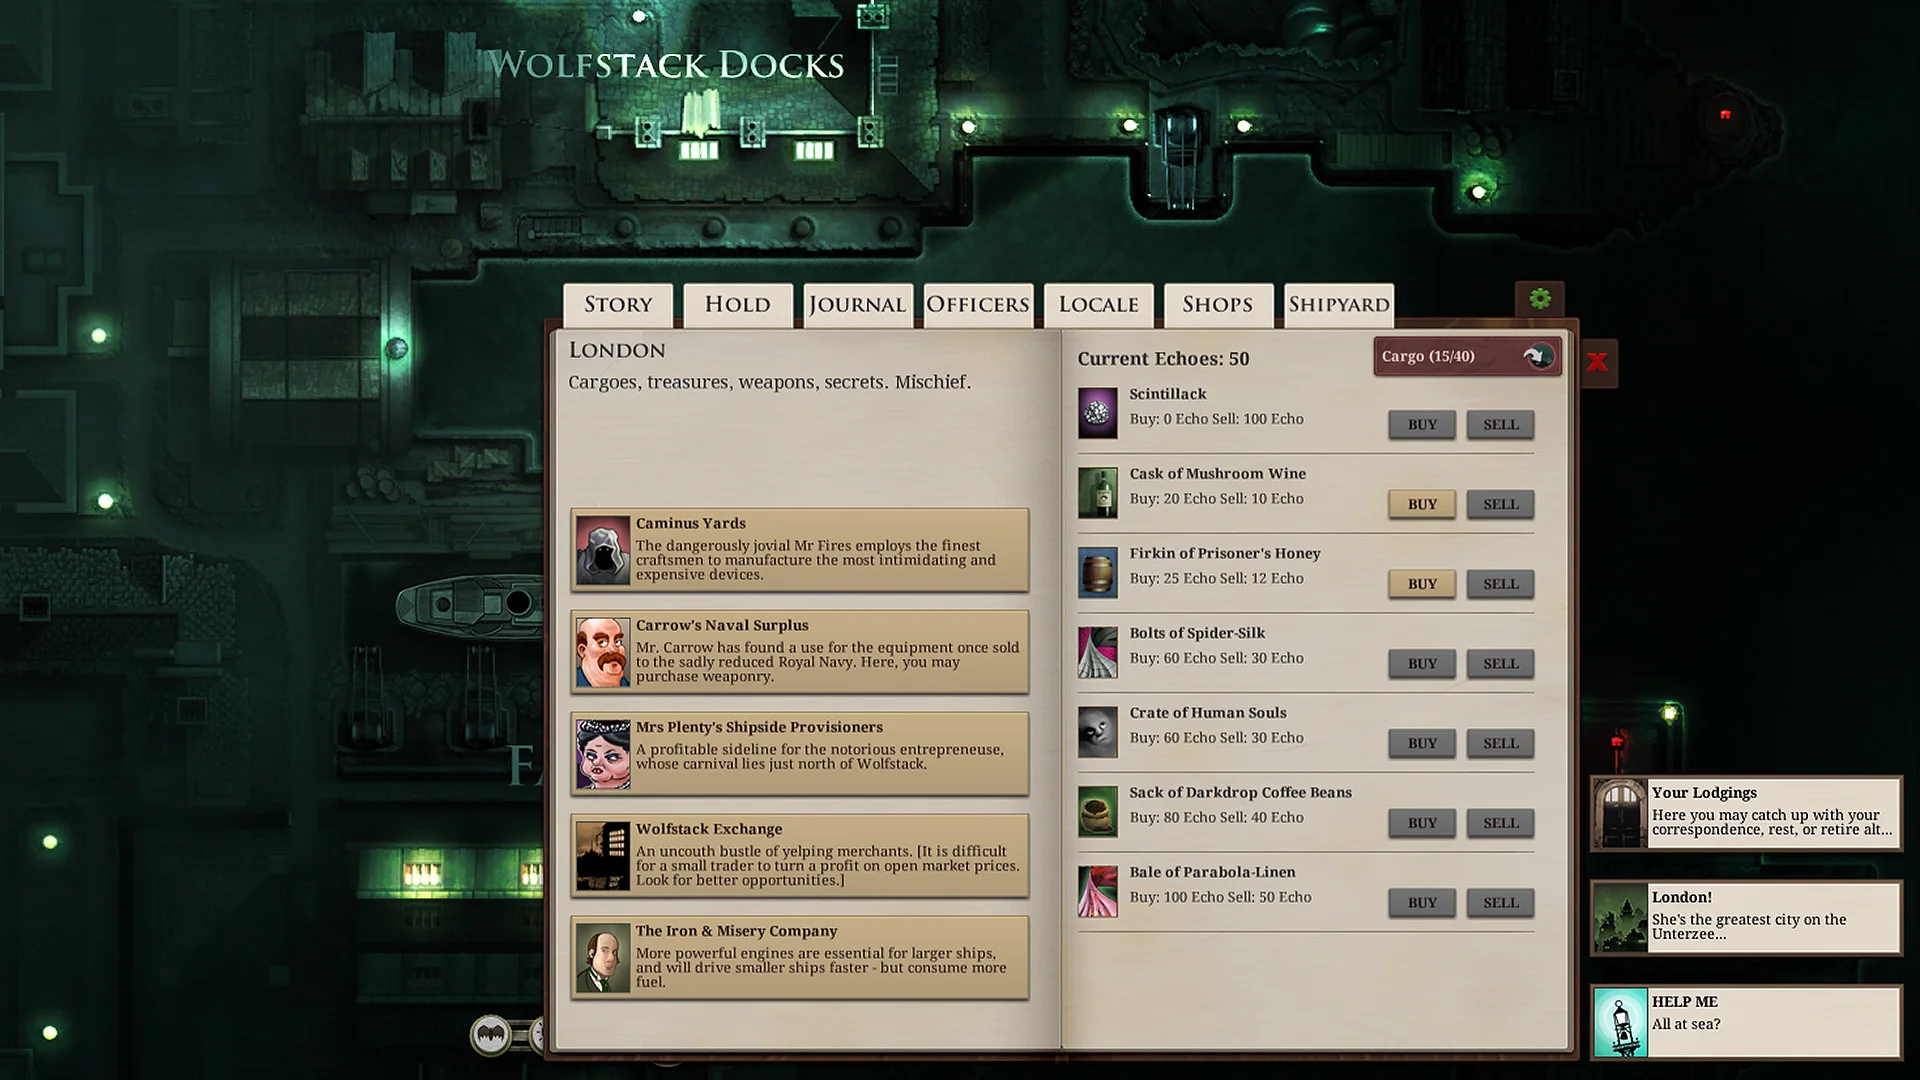
When your captain is in London, you are not steering the ship yet. You are in a story-and-port screen. Look along the top for STORY, HOLD and SHOPS. On the screenshot below, SHOPS is the tab near the right end of that row. The list of London sellers appears in the left column. Mrs Plenty’s Shipside Provisioners is the row with the woman’s portrait; it is below the other shops in this example.

Official Sunless Sea PC screenshot of Wolfstack Docks: the SHOPS tab is on the top row and Mrs Plenty’s Shipside Provisioners appears as the third merchant on the left.
Open SHOPS at the top, then select Mrs Plenty’s Shipside Provisioners in the left list. This screenshot shows the merchant list, not the Fuel and Supplies items inside that shop.
  1. Click SHOPS, then click Mrs Plenty’s Shipside Provisioners in the left-hand shop list. Look in the shop’s item pane for Fuel and Supplies. Buy with Echoes, the game’s money. Do not spend every Echo before you know what is already on your ship.
  2. Click HOLD on the top row. That is your cargo space. Check how much Fuel and how many Supplies you actually have there. The top-left sailing gauges do not show your whole inventory: the flame gauge is fuel in use; the fork-and-knife bar is Hunger, not a count of spare Supplies.
  3. Plan for a trip out and a trip back. Keep a reserve rather than spending your last fuel or food while searching for a second port. If the first reachable port is farther than expected, turn back early.

Easy mistake: the fork-and-knife symbol tells you how hungry the crew is becoming. Open HOLD when you need the exact number of Supplies in cargo.

Launch from Wolfstack Docks and steer away

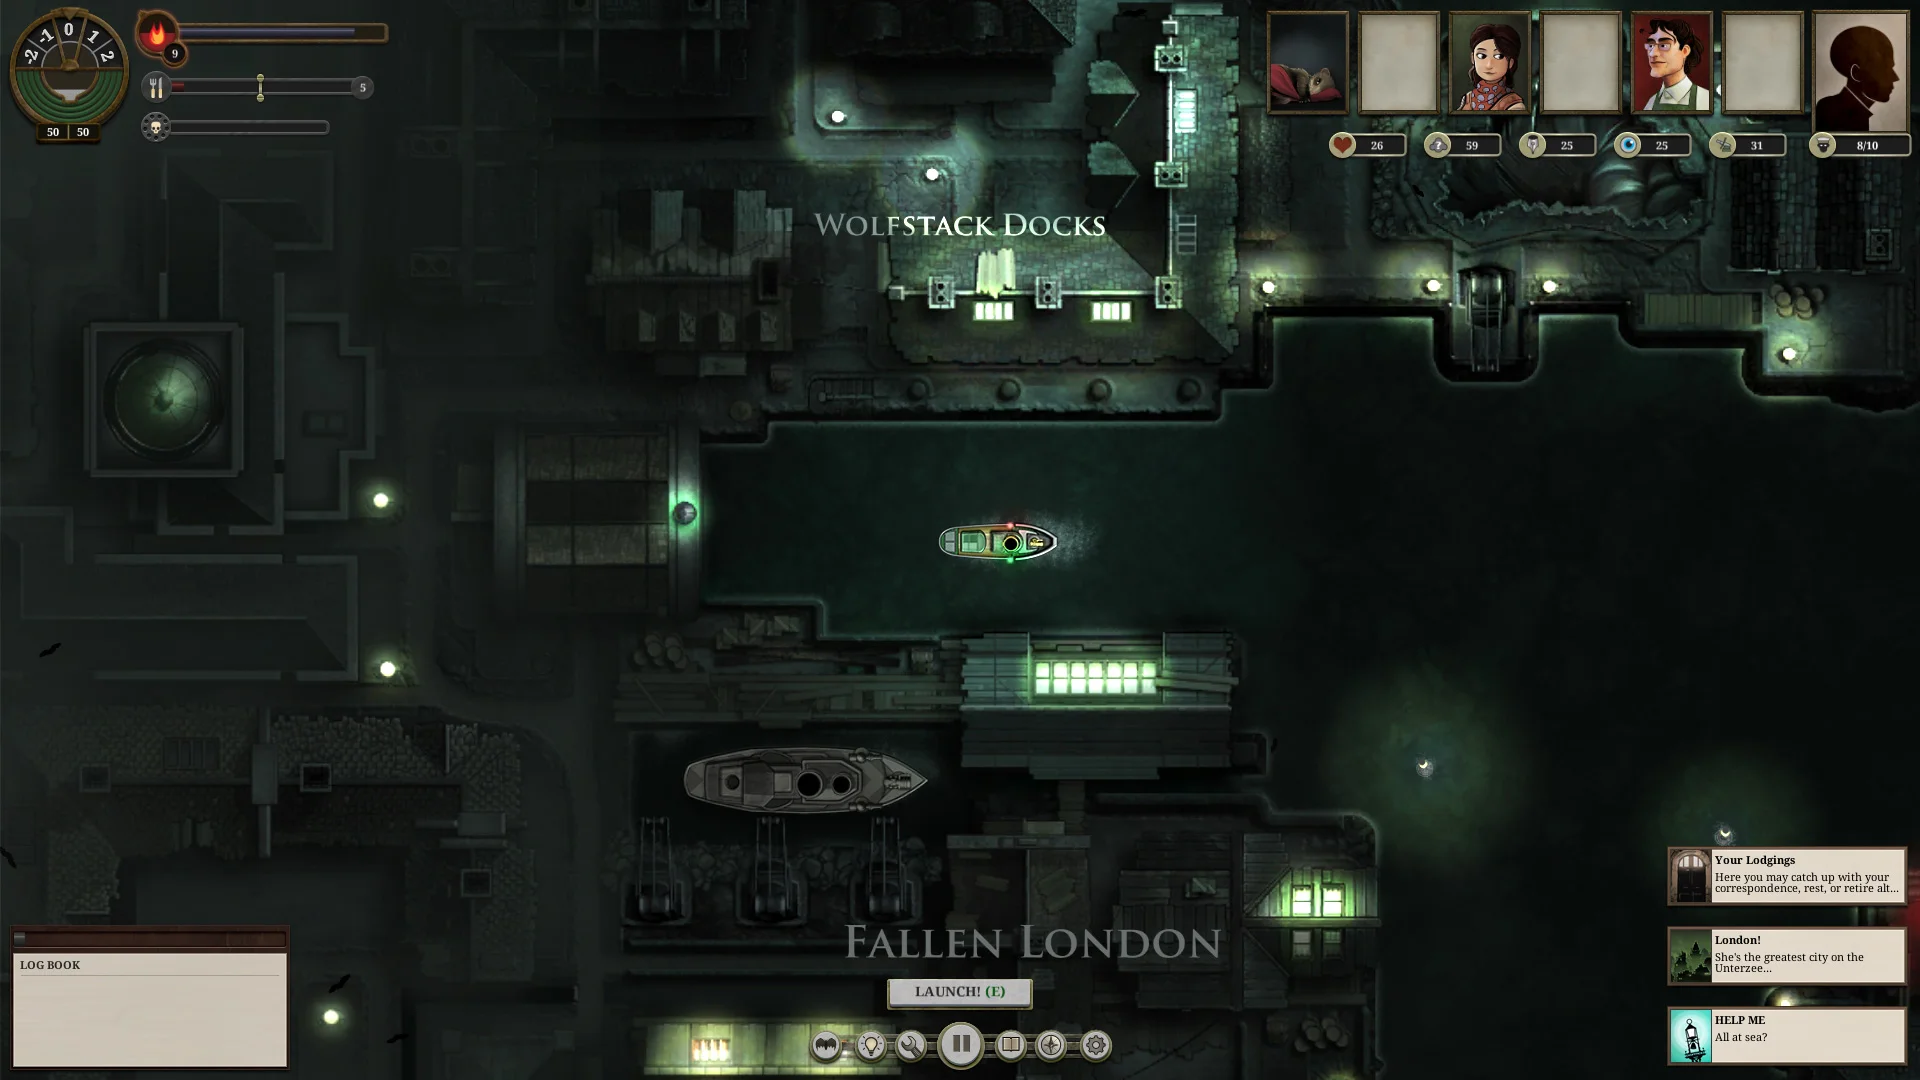
Return to the London story screen and find the departure option at the bottom. The official screenshot below shows a small ship moored at Wolfstack Docks and the prompt “Launch (E)” near the lower middle. On the default PC controls, E launches; you can also click Launch when the button is available.

Official Sunless Sea screenshot of the ship docked at Wolfstack Docks in Fallen London, with Launch (E) visible near the bottom centre.
The ship begins at Wolfstack Docks. Find Launch (E) at the lower middle of the screen; press E or click Launch on this PC layout.
  1. Press E while Launch is offered, or click the Launch control. After the port screen closes, your ship appears on the sea. If E does nothing, make sure you are on the London dock screen and look for the labelled button.
  2. Use W or the up arrow to start the engine on the default PC controls. A and D turn the bow left and right. Increase speed gently, then watch which way the narrow end of the ship points. The water is dark, so steer around shorelines instead of trying to cross them.
  3. Do not race toward a distant name just because it appears in a screenshot. Pick the first reachable dock you can approach while keeping enough fuel and supplies for the journey back. Open the chart/map from the bottom toolbar if you lose your bearings; the small chart button is among the circular controls.
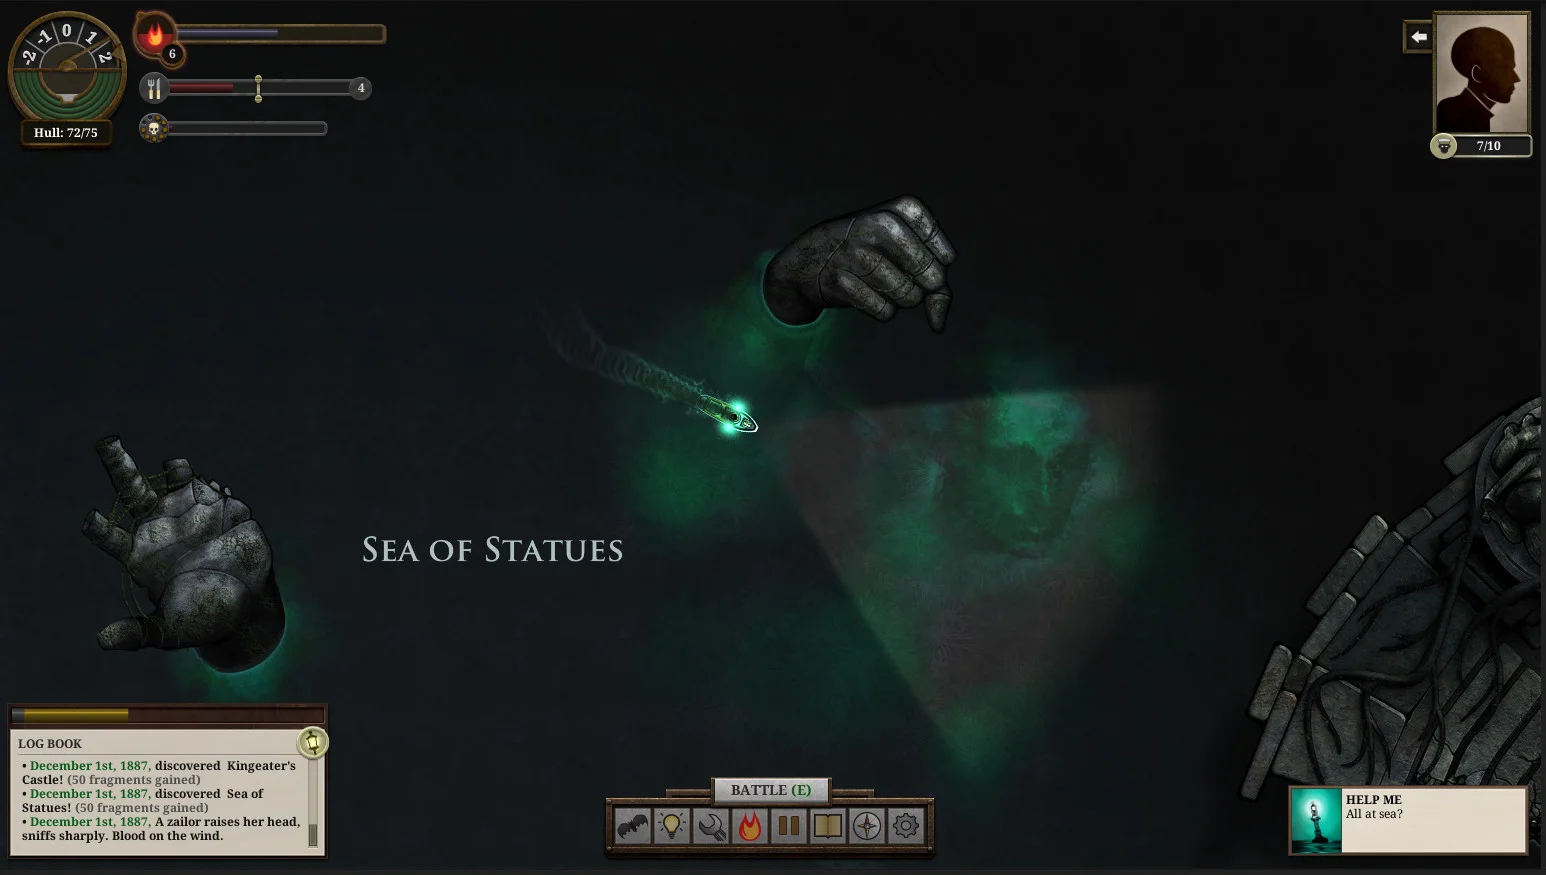
Official Sunless Sea screenshot at the Sea of Statues: the ship is above a row of bottom-centre controls, including a compass-like chart button just left of the gear.
The compass-like button just left of the gear opens the chart on this PC layout. Sea of Statues is an interface example, not a first-trip destination.

The first minutes may feel slow. That is intentional: the trip is about reading the coastline, your gauges and the logbook, not simply moving toward a quest arrow.

Read the four gauges before every decision

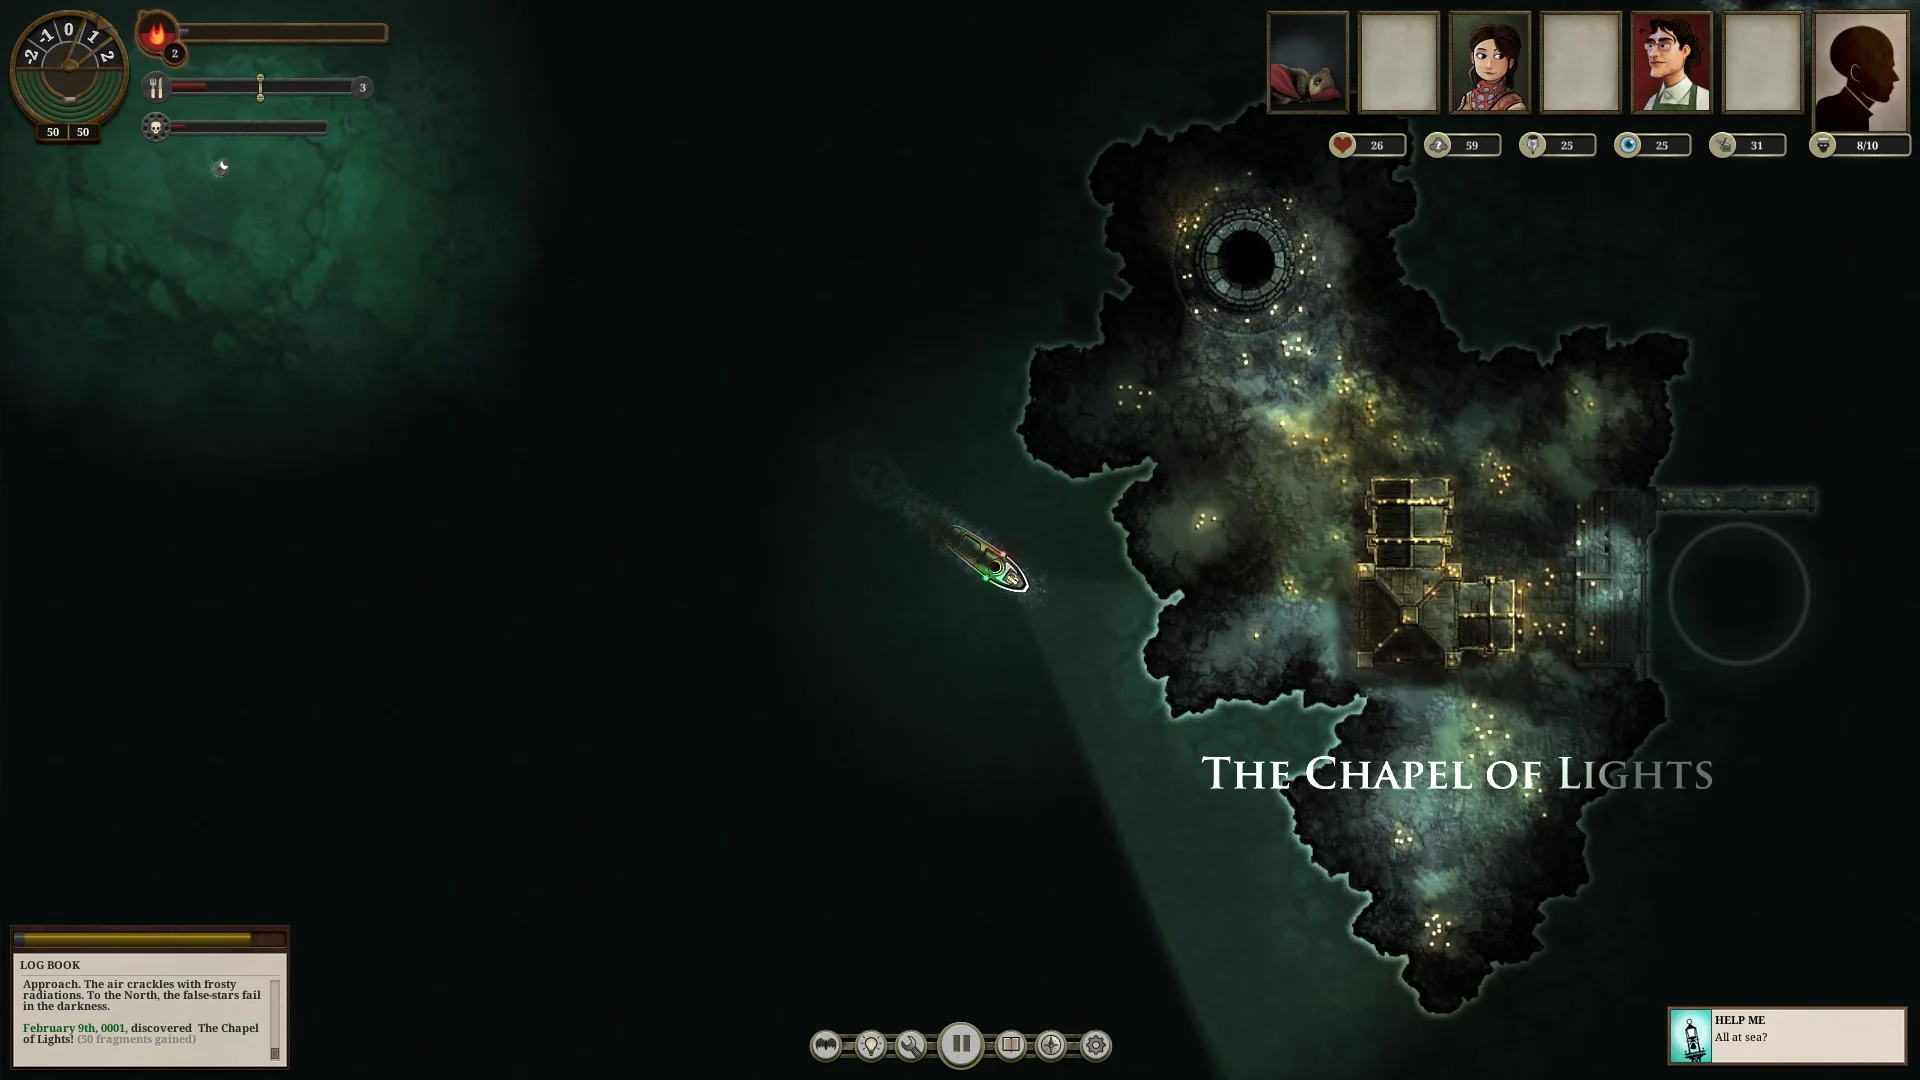
At sea, the important gauges are tucked into the top-left corner. In the official screenshot, the large round dial is ship condition (Hull); the flame beside it is Fuel; the fork-and-knife line is Hunger; and the skull line underneath is Terror. The small inventory number beside a gauge is not a substitute for opening HOLD to check all cargo.

Official Sunless Sea screenshot of a ship near the Chapel of Lights; the top-left corner shows the round Hull dial, flame Fuel bar, fork-and-knife Hunger bar and skull Terror bar.
Look in the top-left corner of the real game screen. This Chapel of Lights screenshot is for reading the interface, not a recommended first-voyage destination.
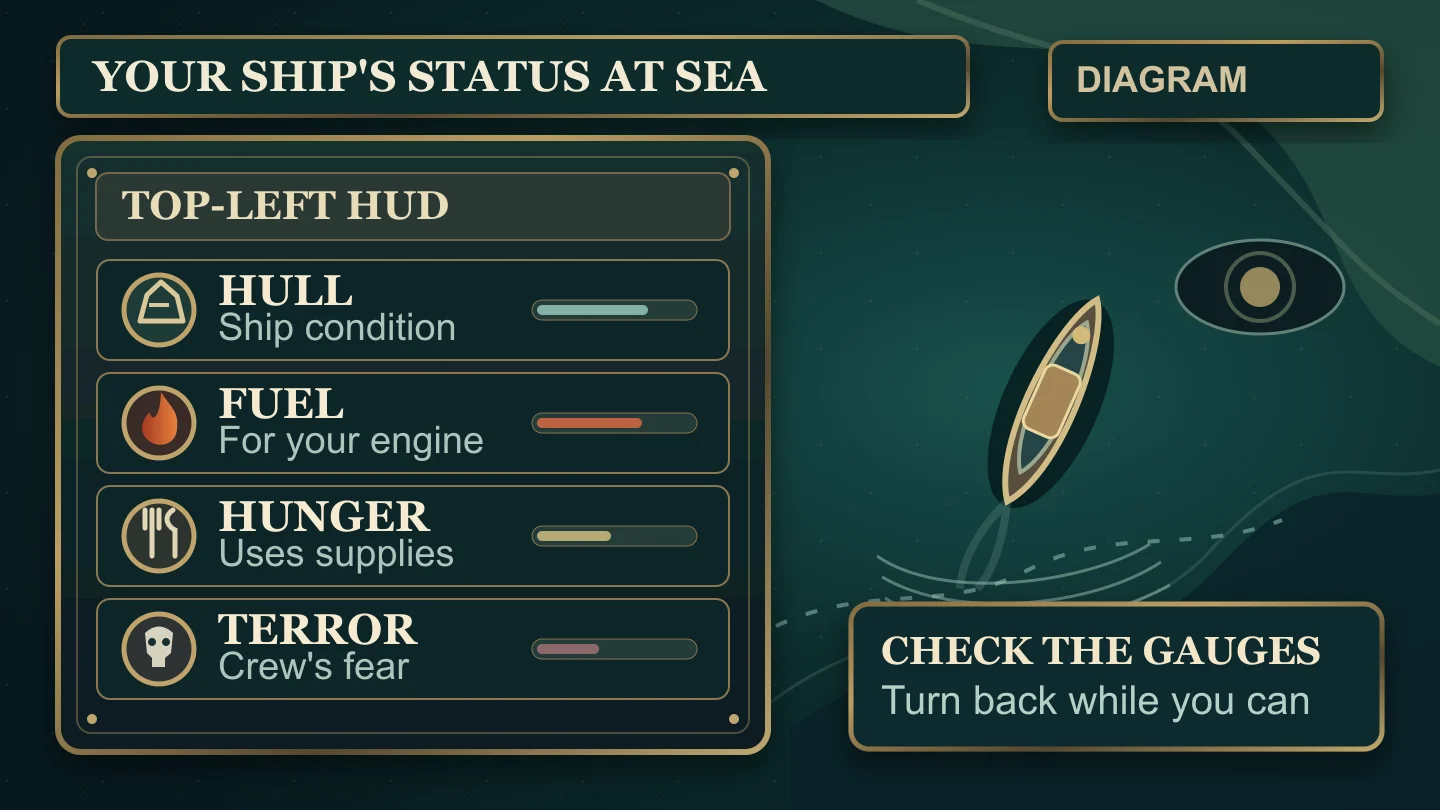
Pixel Twelve original diagram, not a screenshot: the top-left Sunless Sea-style HUD labels the Hull, Fuel, Hunger and Terror indicators, with every label inside a padded panel.
Original diagram: Hull is ship condition, Fuel runs the engine, Hunger rises as the crew sails, and Terror measures fear. Check them before committing to a longer leg.
  • Hull is the ship’s condition. If it falls after a collision or fight, another risky trip may end the voyage.
  • Fuel is used while sailing. A low flame gauge is your cue to calculate the return trip, not a reason to push deeper into the dark.
  • Hunger rises with time at sea and eventually uses Supplies from your hold. Look at both the Hunger bar and the Supplies quantity in HOLD.
  • Terror is the skull bar. It can rise in frightening areas and makes a long detour less safe even when you still have fuel.

Turn-back rule: if one of those resources looks unsafe for the trip home, stop adding new destinations. Returning with a partial story is better than losing the ship with a full cargo hold.

How to recognise a port and dock

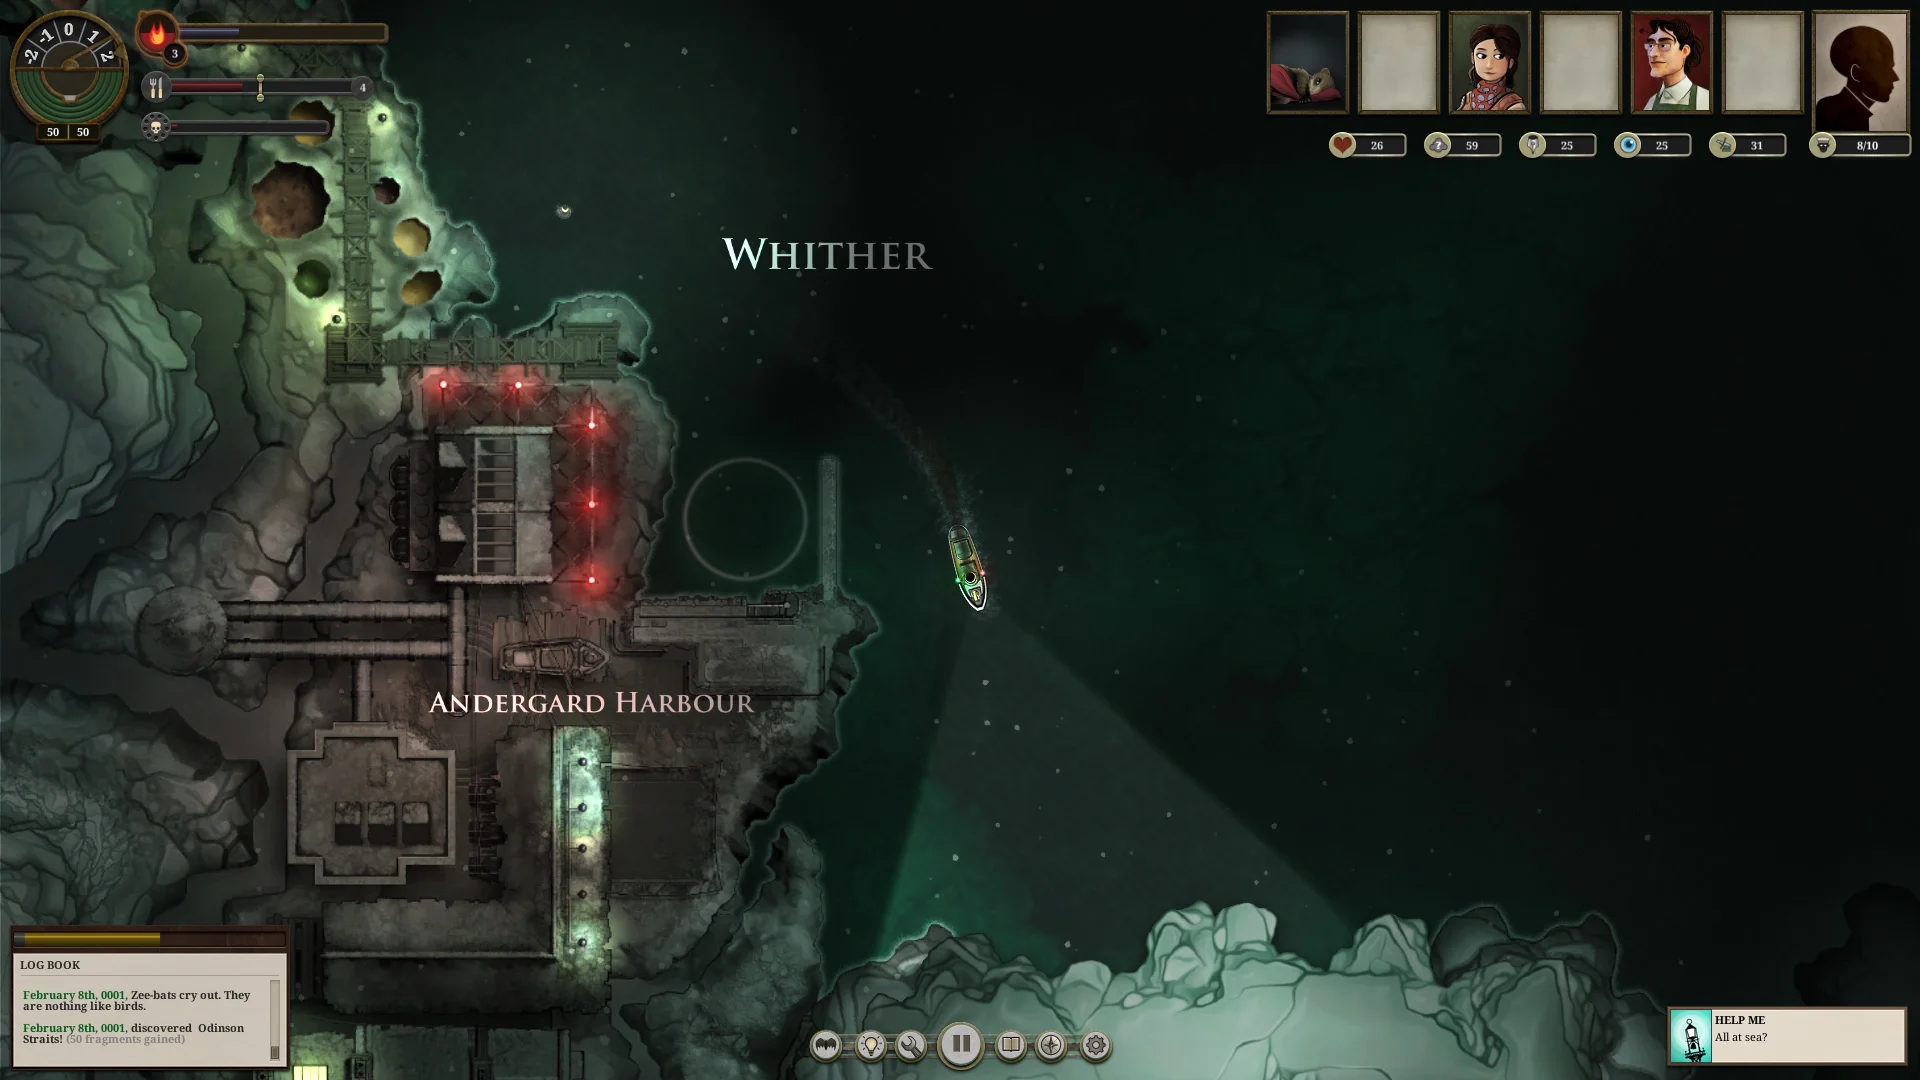
A named coastline is not always a place you can land anywhere you like. Find the port entrance: a pale ring or circle on the water beside the harbour. The next official screenshot shows that circle to the left of the ship at Whither, near Andergard Harbour. It is an example of what a dock entrance looks like, not an instruction to sail to Whither on your first voyage.

Official Sunless Sea gameplay screenshot at Whither: the player ship is to the right of a pale circular port entrance at Andergard Harbour.
To dock, aim for the pale circle beside the harbour and move the ship into it. Whither is only the visual example here; choose a nearer reachable port in your own game.
  1. Slow down as you reach a coastline. Look for the pale circular marker in front of a built-up shore or harbour. Line up the ship with that marker instead of scraping along the land.
  2. Move into the marker. On default PC controls, press E when the Dock prompt is available. If nothing happens, reposition the ship into the circle and watch for the prompt.
  3. Once the port’s story screen opens, read the available choices. If “Compile a Port Report” or a similar report option appears, take it. Not every port offers one in the same way, and some choices depend on what you have already done.

A Port Report is a record you bring back to London. You do not have to win a fight to collect one. If you cannot find a report at this stop, do not waste your return reserve circling the island; read the port story and decide whether it is time to head home.

Avoid a first-voyage fight and know when to return

The game also has sea combat. In the screenshot below, curved targeting lines and hostile shapes occupy the water near the ship. Those arcs are a warning that this is no longer just navigation. If you are learning the controls and did not set out to fight, steer clear of enemies and keep a safe course toward a port or home.

Official Sunless Sea gameplay screenshot with the player ship in a hostile sea encounter and curved targeting arcs visible in the water.
Curved combat arcs mean a fight is in progress or close. On a first supply run, avoid turning a short voyage into an unnecessary battle.
  • Return after one successful stop, even if you can see a second mystery in the distance. You can sail out again with more supplies and a clearer plan.
  • If Fuel or Supplies are running low, stop exploring and use the chart and coastline to retrace your route to London.
  • If Hull is damaged or Terror is climbing, treat that as another reason to end the trip early. A first voyage is practice, not a speedrun.

Port locations and nearby events may change, so copying a screenshot’s exact sailing line is less useful than recognising the harbour marker and keeping a return reserve.

Back in London: hand in a Port Report

Sail back to Fallen London and enter the Wolfstack Docks marker the same way you entered the other port. When the London story screen opens, look for The Admiralty Survey Office among the London choices. That is where eligible Port Reports are handed in. The exact story card may be lower in the list, so scroll the London screen if it is not immediately visible.

  1. Dock in London. Confirm the story screen says Fallen London or Wolfstack Docks rather than simply stopping the ship in nearby water.
  2. Open The Admiralty Survey Office. If you have an eligible Port Report, choose the option to submit it. Reports commonly pay Echoes and a Fuel item; the result depends on the report and the port, so read the reward on your own screen.
  3. Reopen HOLD and SHOPS before the next voyage. Count remaining Fuel and Supplies, replace what you used, and choose one new reachable stop rather than leaving with the same depleted hold.

You succeeded if you launched, navigated to a dock, read its story, and returned. A report and its reward are a useful bonus, but a safe return is the skill that makes the next voyage possible.

Quick fixes if you feel stuck

  • Cannot find Supplies: go to London, open SHOPS at the top, select Mrs Plenty’s Shipside Provisioners, then check her item list. Use HOLD for the number you own.
  • The fork-and-knife bar is rising: that is Hunger. It is not a shop item counter. The crew will use Supplies as Hunger builds.
  • Launch or Dock does nothing: look for the on-screen prompt; E is the default PC key. You must be in the London launch screen or inside a port’s pale docking circle.
  • A screenshot’s place name is not on your chart: use the pictures to recognise the interface. They are not a promise that the same port will sit beside London in your map.
  • You reached a port but see no report option: read its story choices and move on only if you have a safe return reserve. Not all reports are guaranteed at every visit.
  • You have enough fuel but the voyage still feels dangerous: check Hunger, Supplies in HOLD, Terror and Hull. Fuel is only one part of staying alive.

Get Pixel Twelve's biggest stories first.

Add as a preferred source on Google