Pixel Twelve
Shovel Knight: Shovel of Hope Beginner Guide — Map, Controls, Relics and Checkpoints

How To

Shovel Knight: Shovel of Hope Beginner Guide — Map, Controls, Relics and Checkpoints

A step-by-step beginner guide to Shovel of Hope with eleven official images showing save slots, the map, controls in action, gold, life, magic, Shovel Drop, Relics, village and a real checkpoint.

By Clarence BumpGame: Shovel Knight: Shovel of HopeVerified Sep 27, 2026
Guide Type
How To
Last Verified
Sep 27, 2026

Guide details

Overview

A step-by-step beginner guide to Shovel of Hope with eleven official images showing save slots, the map, controls in action, gold, life, magic, Shovel Drop, Relics, village and a real checkpoint.

Start here: which Shovel Knight game is this?

Shovel of Hope is the original side-scrolling Shovel Knight adventure. You control the small blue knight with two horns on his helmet and a shovel-shaped weapon. Your goal is to travel across a map, clear stages and search for Shield Knight. Treasure Trove is the collection that includes this campaign and other stories. Shovel Knight Dig and Pocket Dungeon are separate games, so their screens and controls are not the ones shown here.

These pictures come from the developer, but not from one continuous playthrough. Some show later stages or upgrades you will not have at the start. Follow the named shape, label and action, not the example gold total. The A, B, SELECT and START buttons below match the original Nintendo manual; on PC, PlayStation, Xbox or a remapped controller, check the control names in Options and use the equivalent Jump, Attack, Sub Screen and Pause actions.
1. Create a save, then recognise the world map

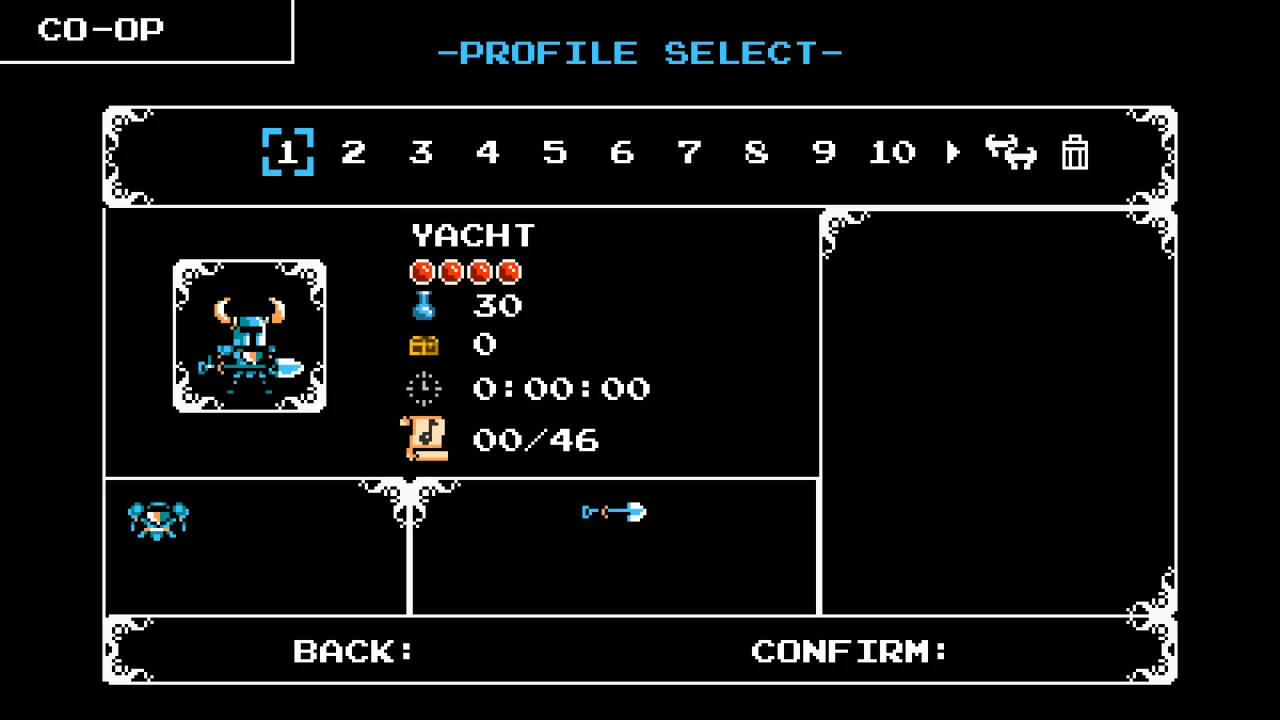
Official Shovel of Hope profile-select screen with numbered slots across the top, slot one highlighted in blue and example character details below.
The blue brackets show the selected save slot in the numbered row. The pictured YACHT profile is a developer example; pick an empty slot for a new game or your own existing profile to continue.
  1. At the title screen choose START GAME. If you are new, pick an empty numbered save slot and enter your name. If you have played before, pick the existing slot showing your progress. The game saves after you return to the map from a completed stage, a village or certain map events; the save slot is not a save-anywhere button inside a stage.
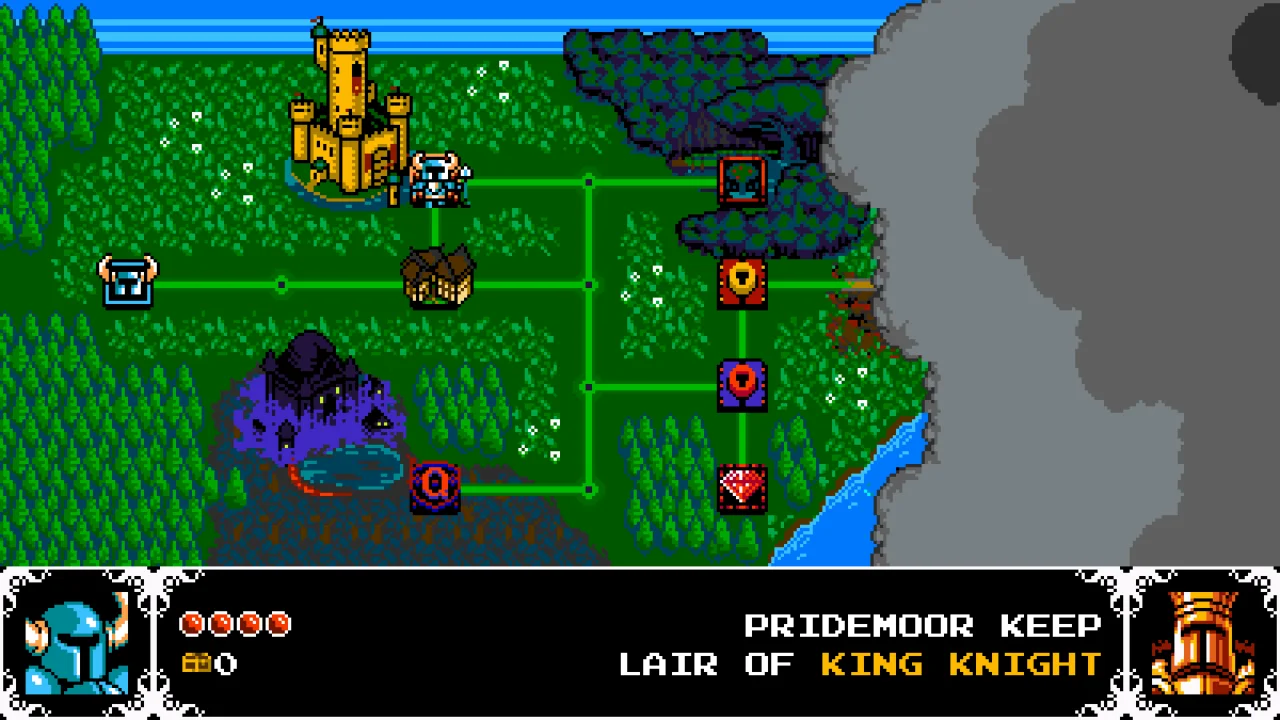
Official Shovel of Hope manual map image: blue knight icon beside a gold castle, connected green paths, square stage symbols and an area-name panel across the bottom.
On the map, find the tiny blue knight on a green path. Move along a connected path to a square and read the area name in the black panel at the bottom before entering.
  1. When the map appears, look for the blue helmet with two horns. That is your position. The bright green lines are paths you can travel. Use your movement control to move the knight along a connected line to a square symbol. In the official picture he is beside the gold castle; your first map may have fewer open paths.
  2. Pause on a square and read the large black panel along the bottom. It tells you the name of the area and shows your life and gold. Press the button labelled Jump/Confirm to enter. If a line is blocked by an enemy or locked route, choose an open square instead; the grey cloud on the right covers places not yet revealed.

The map is not a level you walk through one pixel at a time. It is how you choose a stage or village. After beating a stage, return here to choose the next stop. Entering a stage again lets you explore it, but do not confuse that with a manual save option.

2. Read the four labels across the top of a stage

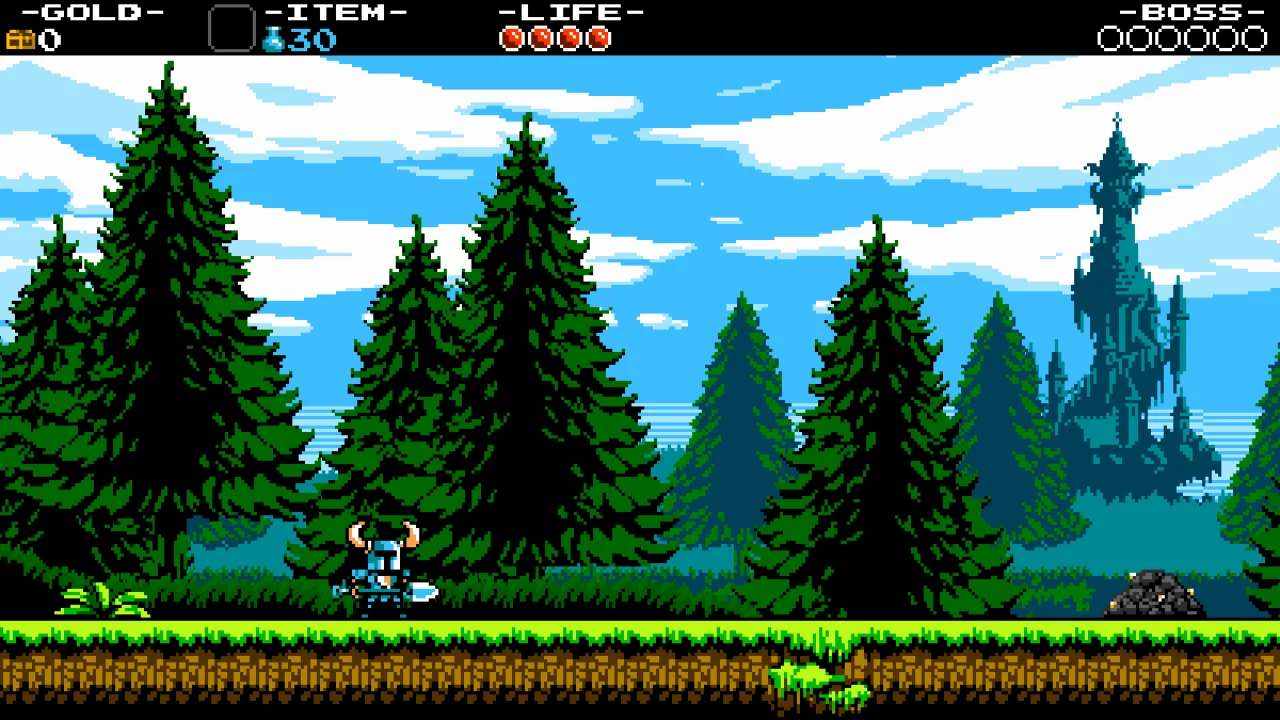
Official manual field screen: Shovel Knight stands in a forest; the upper black bar reads Gold, Item with a blue magic flask, Life with red circles and Boss with empty circles.
Look at the black strip above the trees: GOLD is money at far left; ITEM and the blue flask show relic and magic; red circles under LIFE are your health; BOSS at far right fills during a boss fight.
  1. Find Shovel Knight first: he wears blue armor and holds the white-tipped Shovel Blade near the lower part of the picture. The full-width black strip is not scenery. On its far left, GOLD and a chest icon show how much money you are carrying. Collect gems and treasure to raise this number.
  2. Move your eyes right to ITEM. The square shows the relic you currently have ready; it can be empty at the start. The blue flask and number are your magic. A relic uses some of this number when activated, so an empty-looking flask means you cannot keep firing it forever.
  3. Under LIFE, count the filled red circles. Those are your health. Touching an enemy or hazard removes health. At the far right, the BOSS circles are usually empty while exploring and become useful in a boss encounter. Do not read them as your own health.

If the top edge is cut off on your television, the official manual recommends adjusting Screen Scale in the Options menu. You need to see all four labels to follow the guide safely.

3. Try the basic shovel swing before a difficult jump

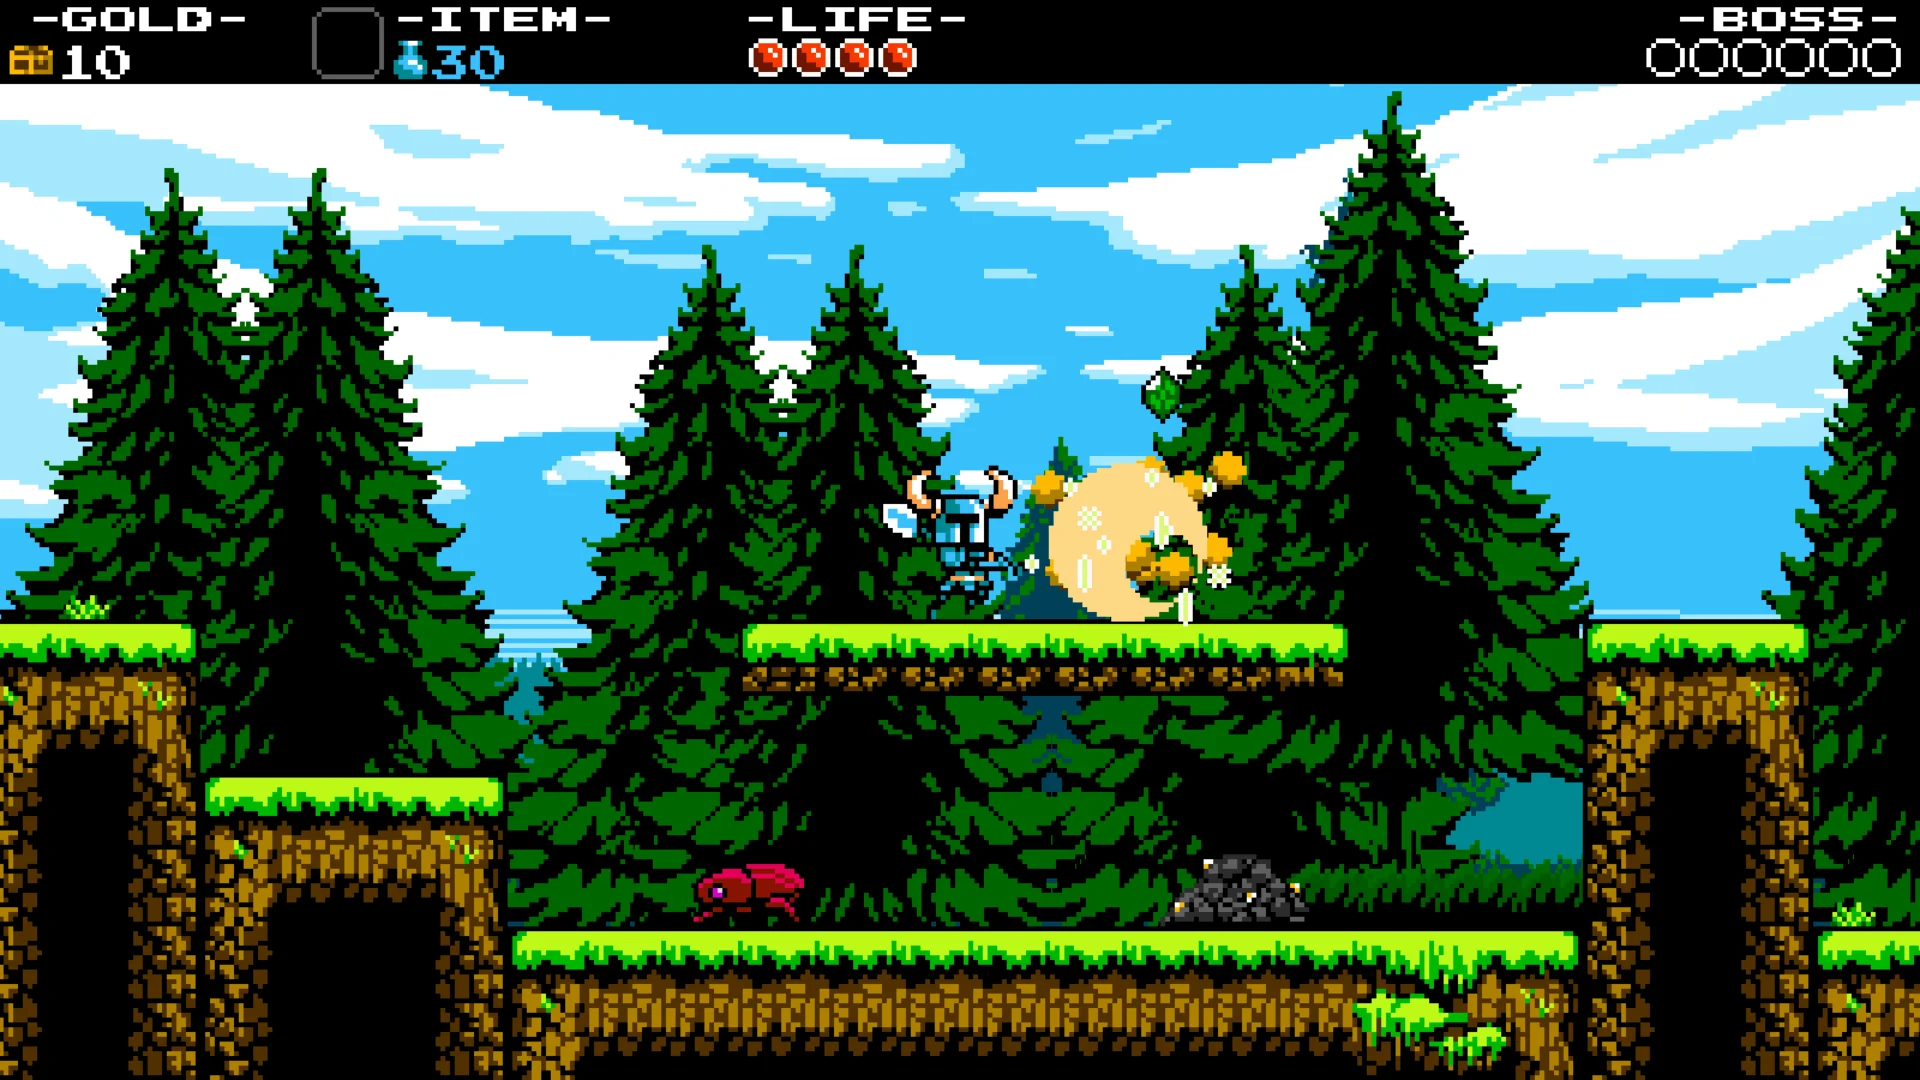
Official forest screenshot showing the blue knight swinging the Shovel Blade horizontally at a yellow enemy, with a small gap and lower platform visible.
Shovel Knight is the blue figure in the middle; the bright arc by the shovel is a sideways Dig Slash. Face the yellow enemy, then use Attack while standing on a safe platform.
  1. On safe ground, press left and right to move. In the forest screenshot, green grass marks the walkable tops of platforms; the dark space between them is a gap. Stop before the edge instead of running forward while learning the controls.
  2. Face a nearby enemy or loose dirt, then press Attack. The original Nintendo button is B. The shovel swings sideways in front of Shovel Knight. In this picture the yellow enemy is immediately to his right, so he faces right. If the target is behind you, turn first.
  3. Press Jump to clear a gap. On the original Nintendo layout it is A. Look for a safe green top on the other side and land on it. A Shovel Drop is a different move: pressing down while airborne points the shovel below the knight. Do not press down just because you want to swing sideways.

Try moving, jumping and swinging in the first stage where the ground is broad. Learning those three actions before chasing every gem makes the later narrow platforms much easier to read.

4. Tell diggable blocks from gaps and treasure

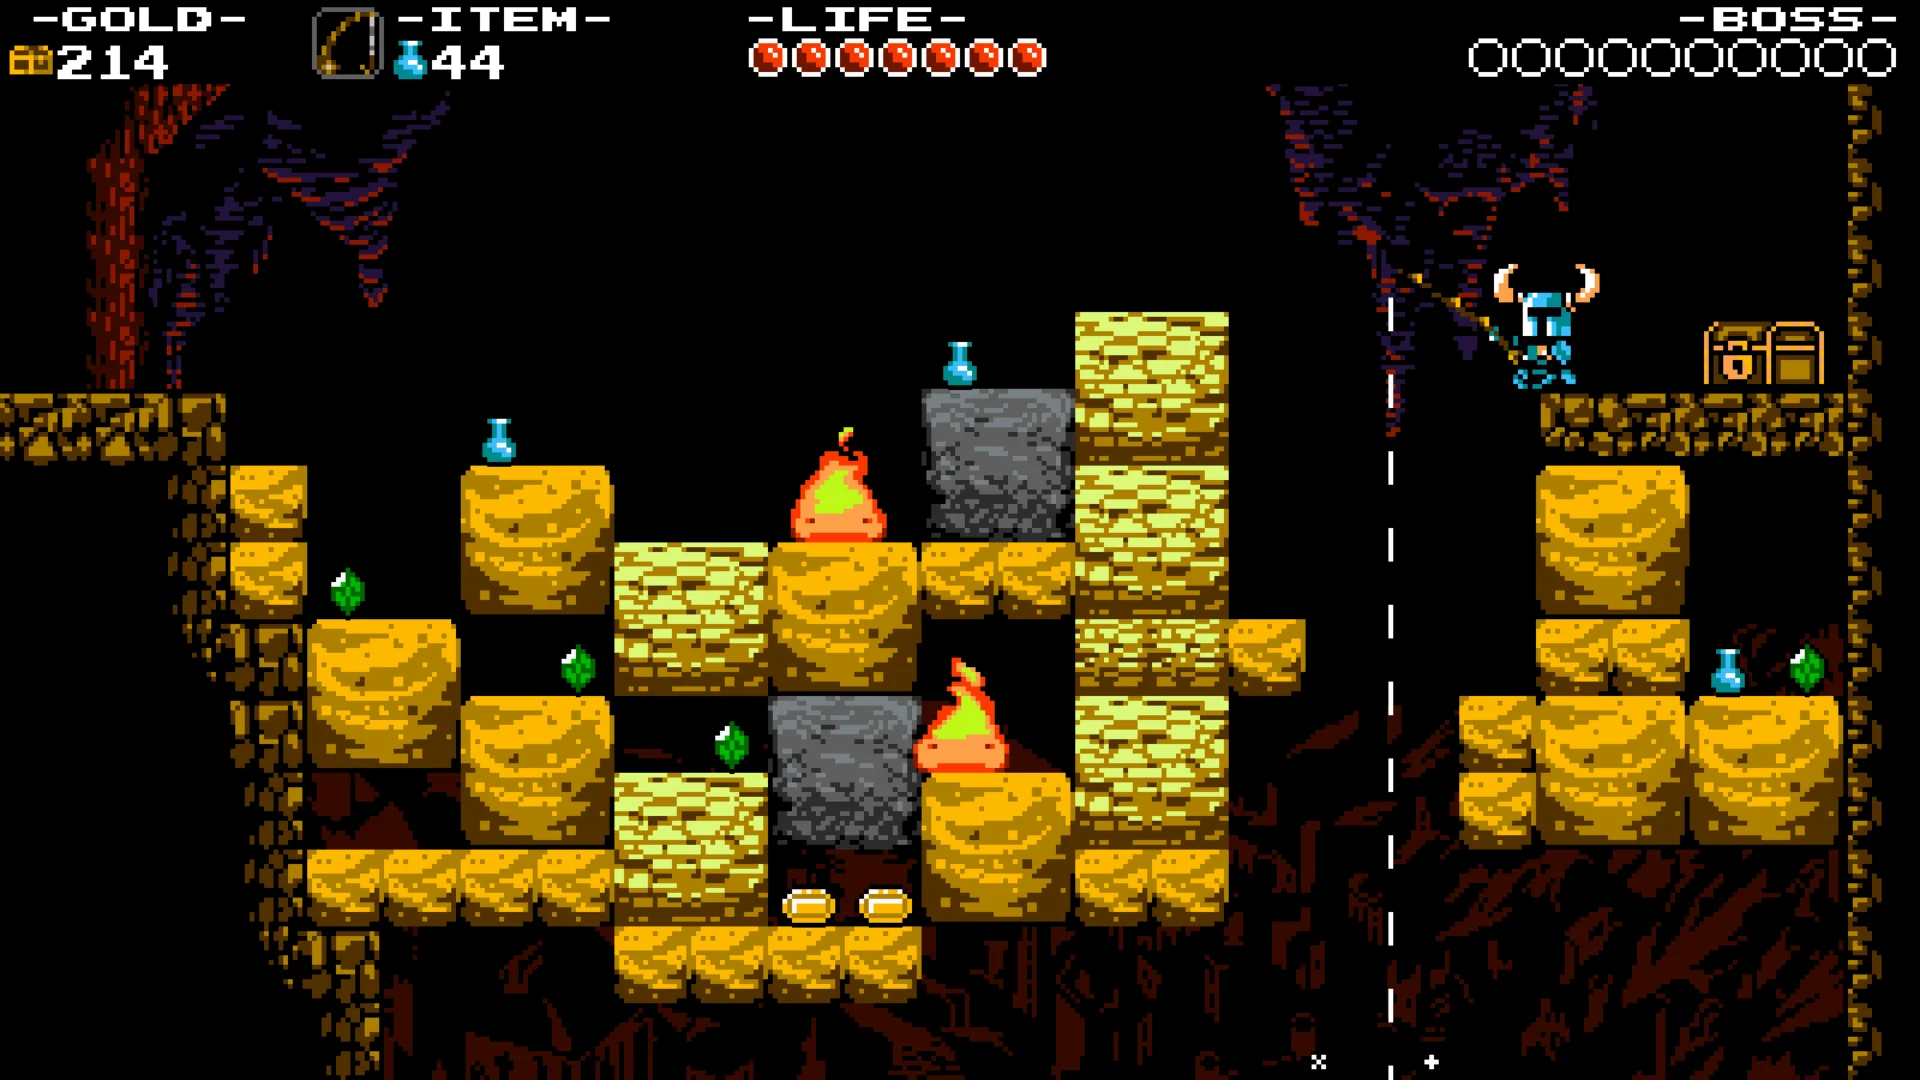
Official underground screenshot with Shovel Knight at right, yellow patterned blocks in the middle, green gems, blue magic flasks, two fire enemies and a chest across a gap.
The pale yellow patterned stack in the middle can be dug through. First notice the gap between Shovel Knight on the right and those blocks; plan a landing before trying to reach the chest.
  1. When a wall or mound is patterned like the yellow blocks in the picture, try facing it and pressing Attack. The Shovel Blade can break certain dirt piles and blocks to uncover a route or treasure. Solid grey blocks in this example are a different surface, so do not assume every wall will break.
  2. Before jumping after a gem, locate the next green or gold platform top. Here Shovel Knight is on a small ledge at the right, and a gap separates him from the block pile. A green gem below and a chest farther right are rewards, not instructions to fall into the dark space.
  3. Watch moving or burning enemies while digging. The two orange flame-shaped enemies in the middle show why stopping to shovel without checking your landing can cost health. If you uncover a suspicious-looking dead end, a quick Dig Slash may reveal a hidden reward; if nothing moves, continue rather than getting stuck.

5. Use Shovel Drop only when something is below you

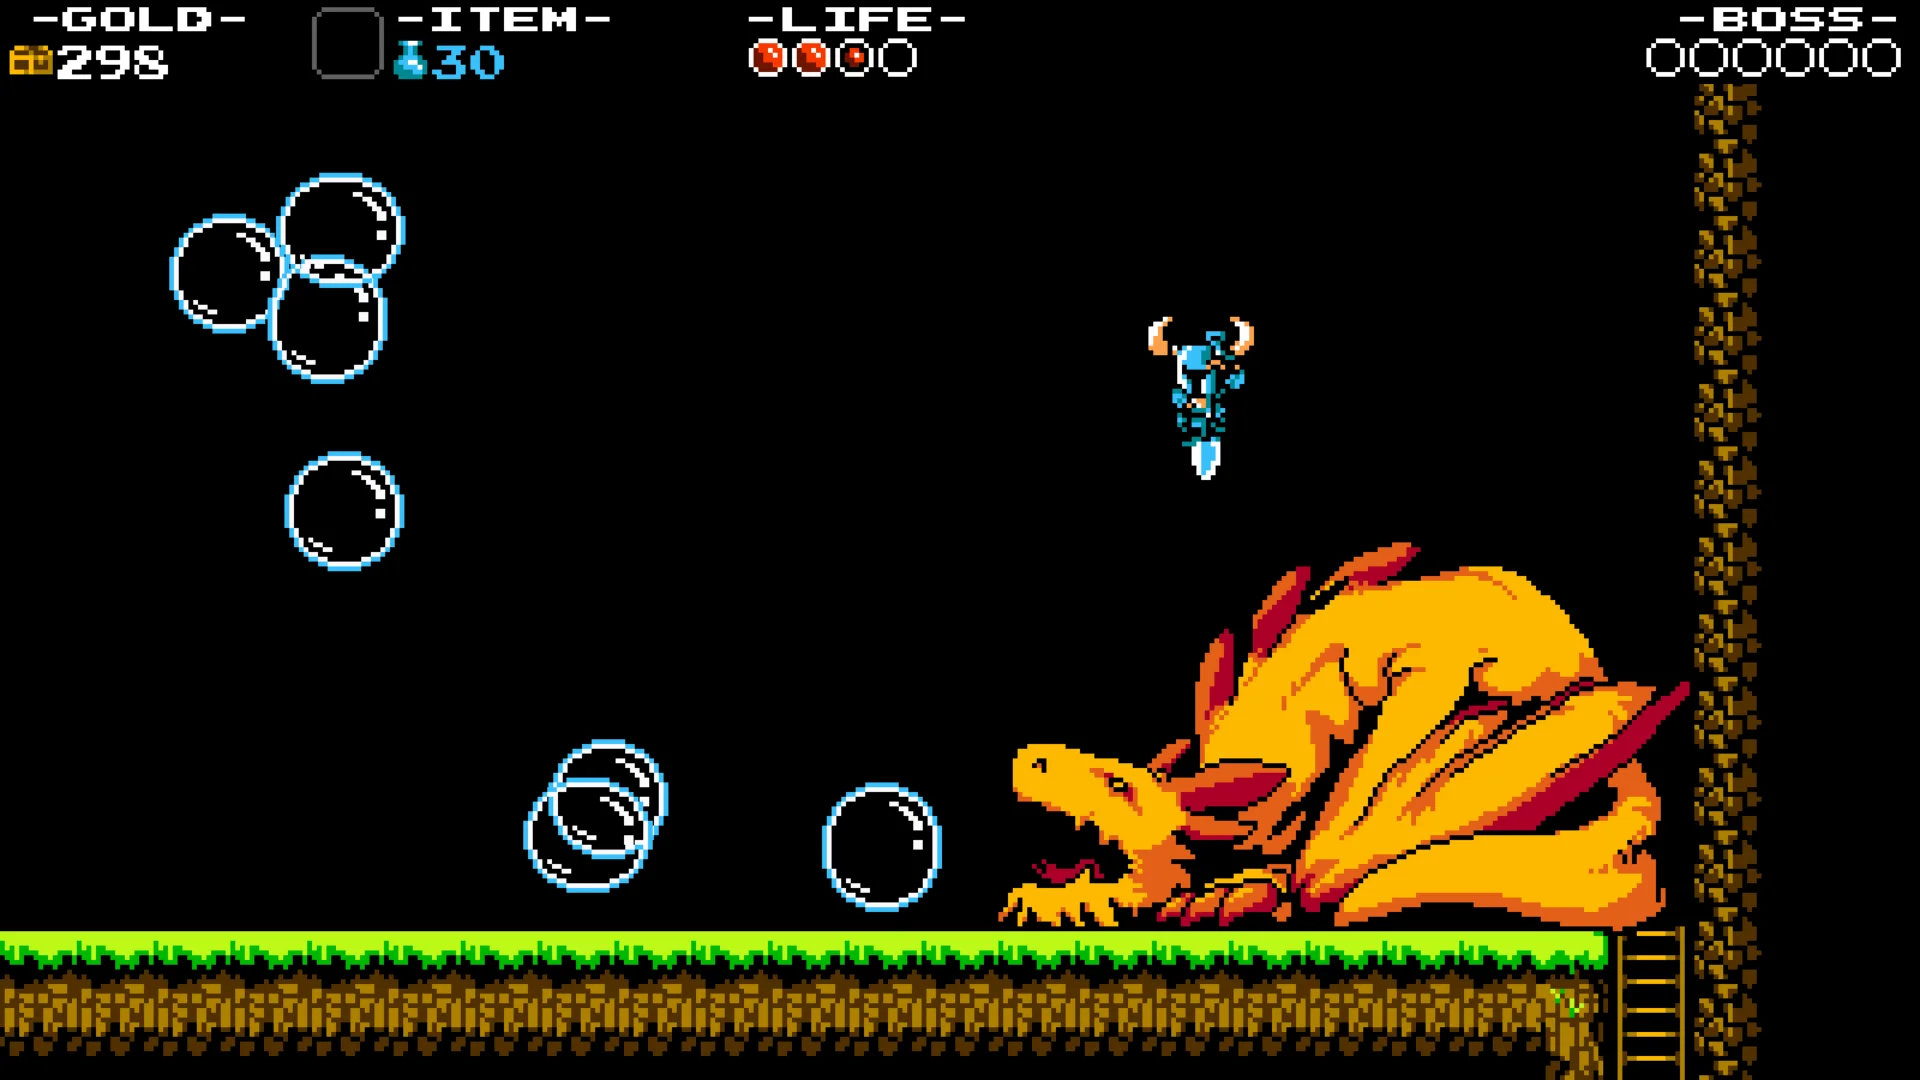
Official later boss screenshot: Shovel Knight is airborne with the shovel pointing straight down above a large orange dragon; blue bubbles float nearby.
The white shovel point directly under the blue knight shows Shovel Drop. This is a later boss example: jump first, then hold Down in the air to bounce on a safe target.
  1. Look at the blue knight above the orange dragon in the picture. The white point below his boots is the shovel turned downward. To make that pose, jump and press Down while airborne; you do not need to select a relic.
  2. Aim for the top of an enemy or an object that the shovel can strike. The hit makes Shovel Knight bounce, which can keep him above a ground enemy or help with a gap. A miss leaves you falling toward whatever is below, so check the landing area before committing.
  3. Practice on a broad, safe target in an early stage before trying a boss or a spike pit. The pictured dragon is not an enemy you must find immediately; it shows the pose, not the next destination on your map.

6. Recognise a checkpoint and leave it intact

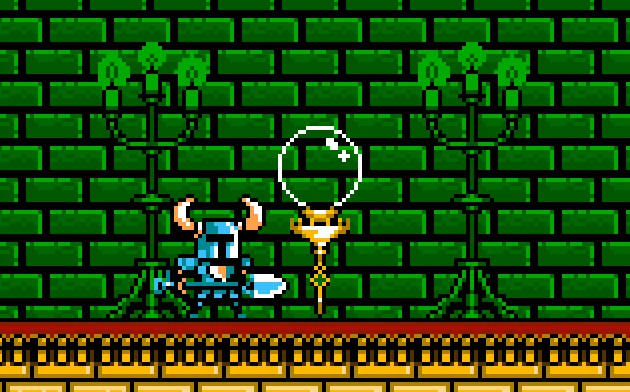
Official final checkpoint screenshot: the blue knight stands beside a clear glass globe mounted on a slim gold post against a green-brick wall.
A checkpoint is the glass globe on the gold stand next to Shovel Knight. Walk past it: a flame lights inside when it activates. Do not hit it three times unless you want to trade the respawn point for treasure.
  1. In a stage, look for a clear round globe on a narrow gold post like the object immediately right of the knight here. It is not a normal gem or treasure chest. Walk past it; the flame inside lights by itself to show the checkpoint is active.
  2. If you lose all your life later in that stage, you restart at the last checkpoint left standing. Yacht Club Games says striking the globe three times breaks it and gives treasure, but it stops working as a respawn point. A crack after the first hit is a warning, not a prompt to finish breaking it.
  3. For your first run, keep every checkpoint intact. The small amount of extra treasure is rarely worth replaying a long hard stretch while you are learning the level. If you die, look for the dropped money bags near the place you fell and try to collect them on the next attempt.

The checkpoint image comes from the developer post explaining the final design, not an early concept sketch. Its shape is the one to recognise in the released campaign.

7. Visit a village and know how to speak

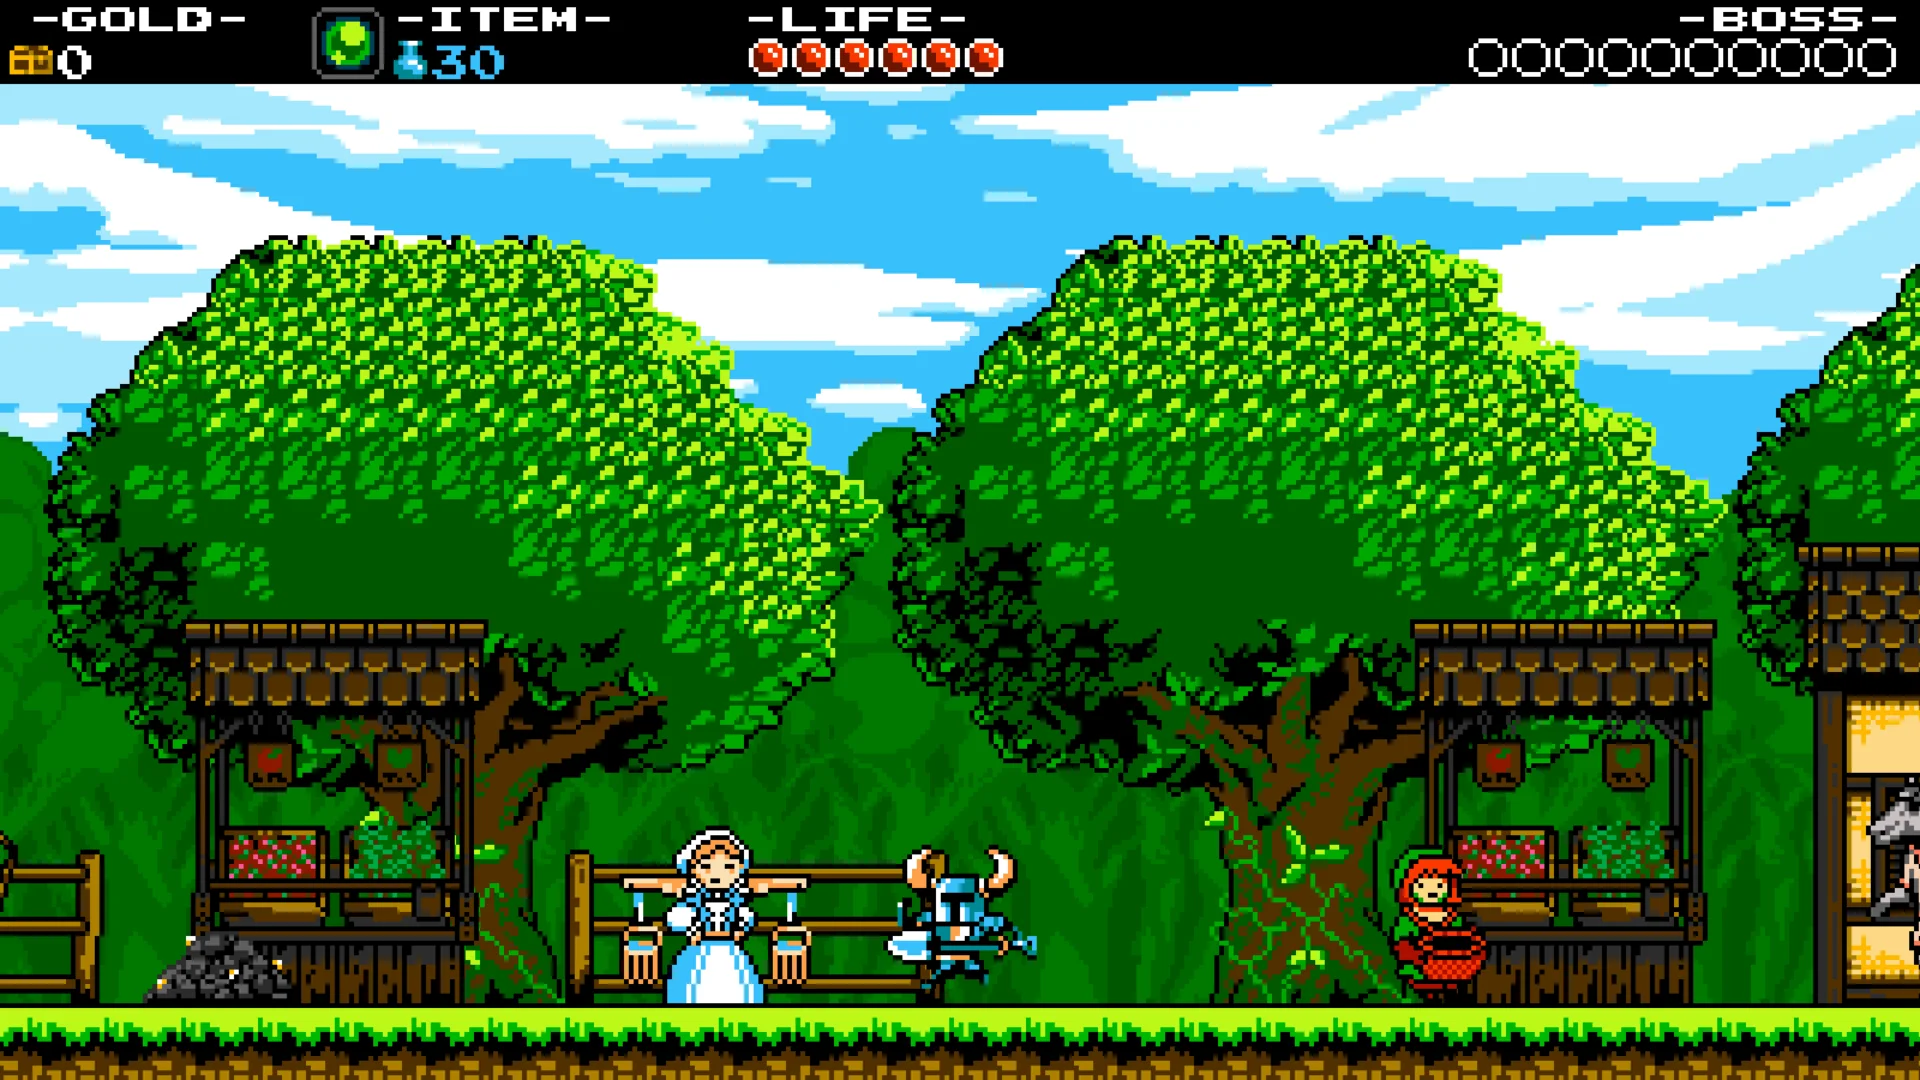
Official village screenshot: Shovel Knight stands between a seated pale-clothed villager and a red-hooded villager, with two market stalls behind them.
The blue knight is in the middle of a safe village scene. Walk next to a person and press Up/Talk; the stalls and villagers are places to check before spending gold on another risky stage.
  1. From the world map, move to a village square and enter it. Unlike a hostile stage, the pictured scene has several standing or seated characters and market stalls. Walk the blue knight close to a person; do not try to attack them to start a conversation.
  2. Press the Talk action while beside that person. In the original Nintendo manual it is Up on the Control Pad. If no dialogue opens, move closer and face the person, then try again. The pale-clothed villager near the bench and the red-hooded villager by the right stall show two places to test the interaction.
  3. Read the speaker name and offer in the dialogue before spending gold. The official manual names the Gastronomer as the person who accepts Meal Tickets for more maximum life and the Magicist as the person who increases magic. Neither seller is identified in this picture, so do not guess from clothing: speak to people and use the name in their dialogue panel to tell who you found.

This press image has more life circles than a new save. The village upgrades are one way to gain them, but you do not need to buy everything on your first visit or assume one of the pictured villagers is an upgrade seller.

8. Read dialogue instead of mistaking it for a control prompt

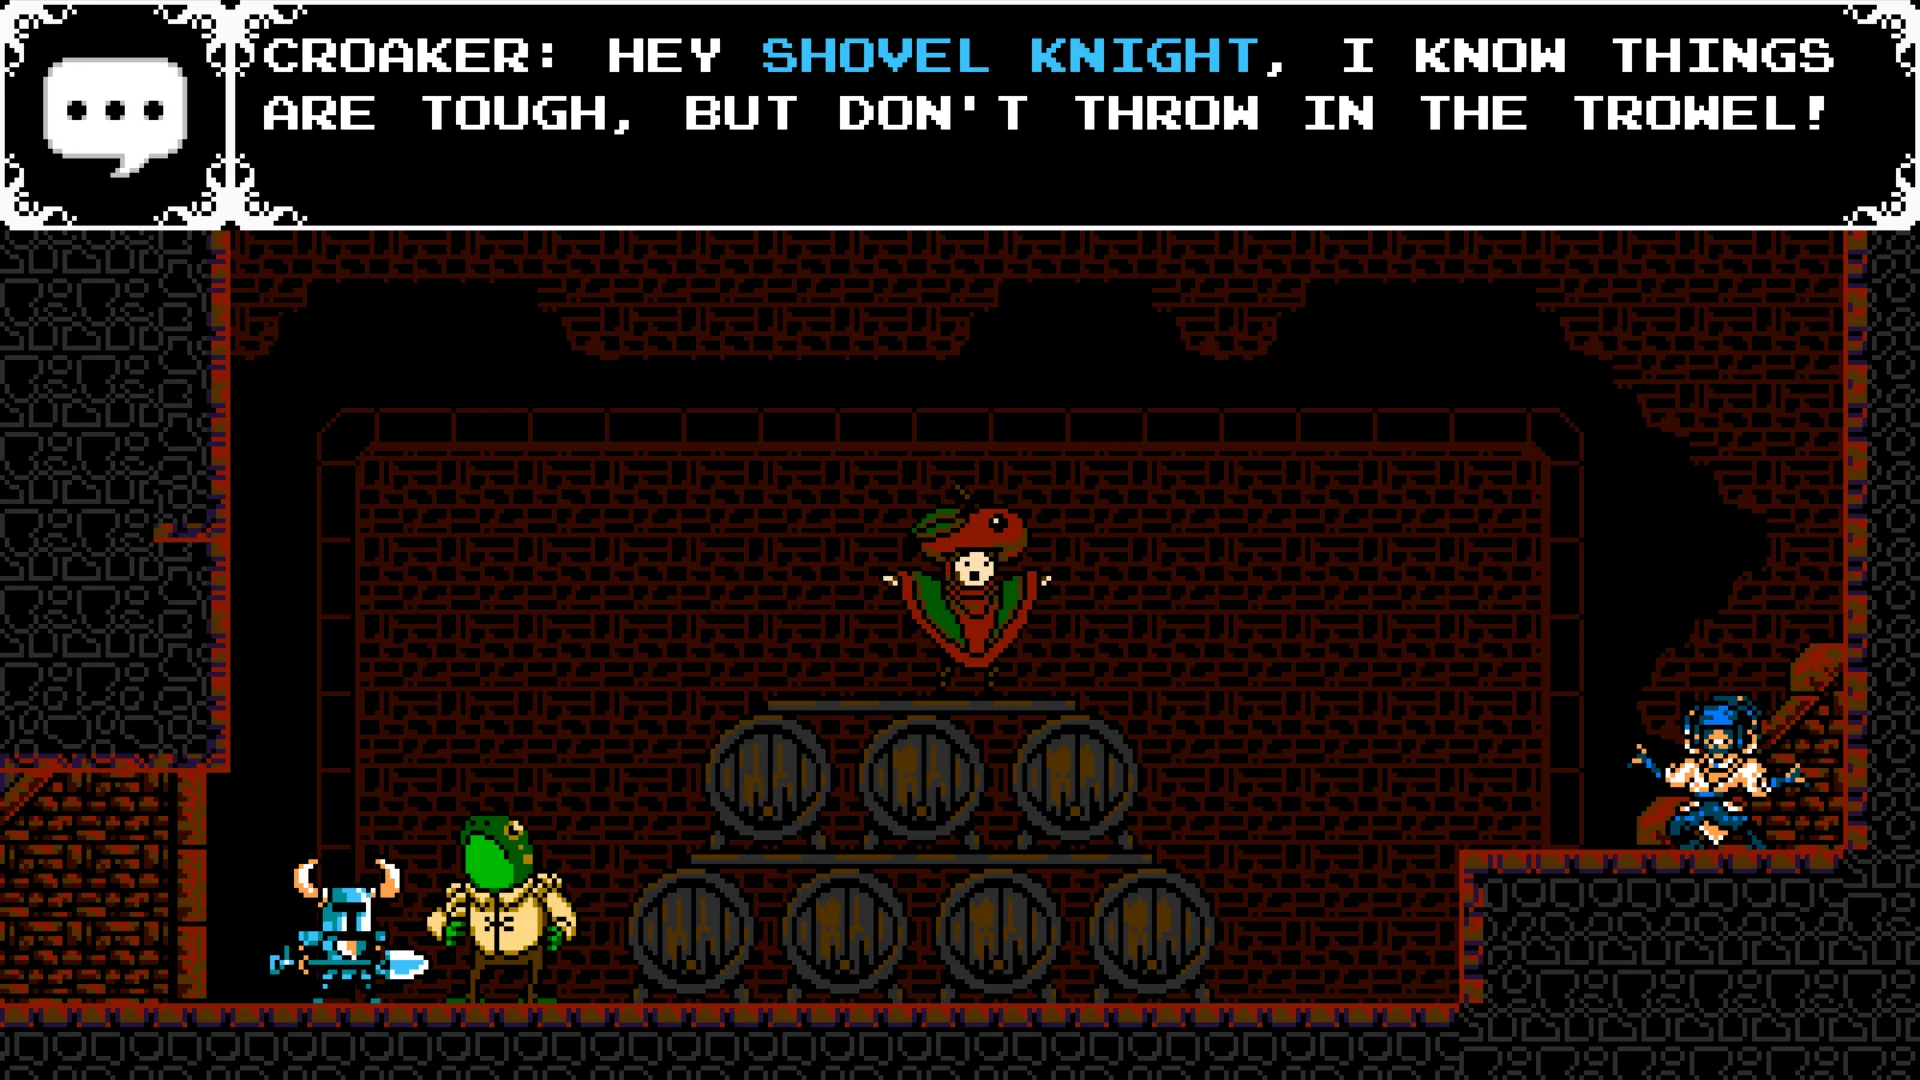
Official screenshot in a dark indoor scene: Shovel Knight faces a green frog, and a large black dialogue panel at top names the speaker CROAKER.
When dialogue opens, the white-bordered black panel at the top names the speaker and shows the words. Here CROAKER is talking; the panel is not a pause menu or a button list.
  1. After pressing Talk near a character, look at the top of the screen. A large black rectangle with a white border appears, followed by a speaker name. In this example the speaker is CROAKER, the green frog next to Shovel Knight at lower left.
  2. Read the line and use your Confirm/Advance button to continue if there is more dialogue. When the panel disappears, the knight is free to move again. A speech bubble next to the panel signals conversation rather than an enemy health display.

Characters in the village give jokes, story clues and sometimes useful directions. You do not have to memorise everyone, but knowing what a dialogue panel looks like helps you spot when the game is talking to you rather than showing a control tip.

9. Open the Relics tab and check magic before using one

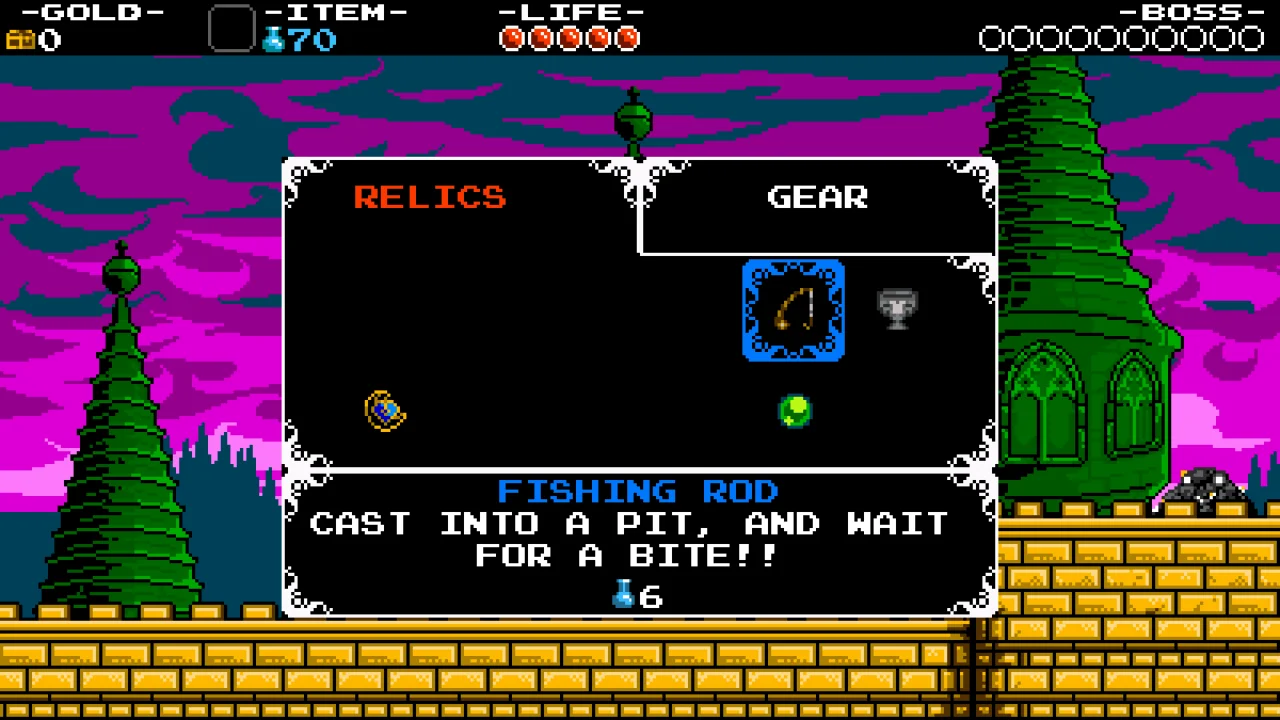
Official Shovel of Hope manual Sub Screen: RELICS and GEAR tabs sit atop a black panel, Fishing Rod is selected in blue, and its description and magic cost appear below.
This is the Sub Screen. The orange RELICS tab is active, Fishing Rod has a blue selection frame, and its magic cost is shown beside the small flask below the description.
  1. While inside a stage, use the Sub Screen action to open the black panel. The original Nintendo control is SELECT. Confirm you see RELICS and GEAR across the top. The pictured character already owns several items; a brand-new save will not have this many icons.
  2. Move the selection frame over a Relic to read its name, what it does and the blue-flask magic cost. In this official image Fishing Rod is highlighted; its description is under the icons. Select the relic you want, then close the Sub Screen. The small ITEM square on the top bar now shows the equipped tool.
  3. To activate the equipped relic in the original controls, press Up and Attack together. Check the blue magic number beside ITEM before using it. If the number is too low, find magic in the level or save the relic for later. Relics are tools, not permanent replacements for a normal shovel swing.

The GEAR tab shows armor, Shovel Blade upgrades and other collected items. In the original manual, Attack switches between RELICS and GEAR while the Sub Screen is open. If your platform has a different binding, follow the on-screen control names rather than the original button letters.

10. Treat spikes and fire as a route problem

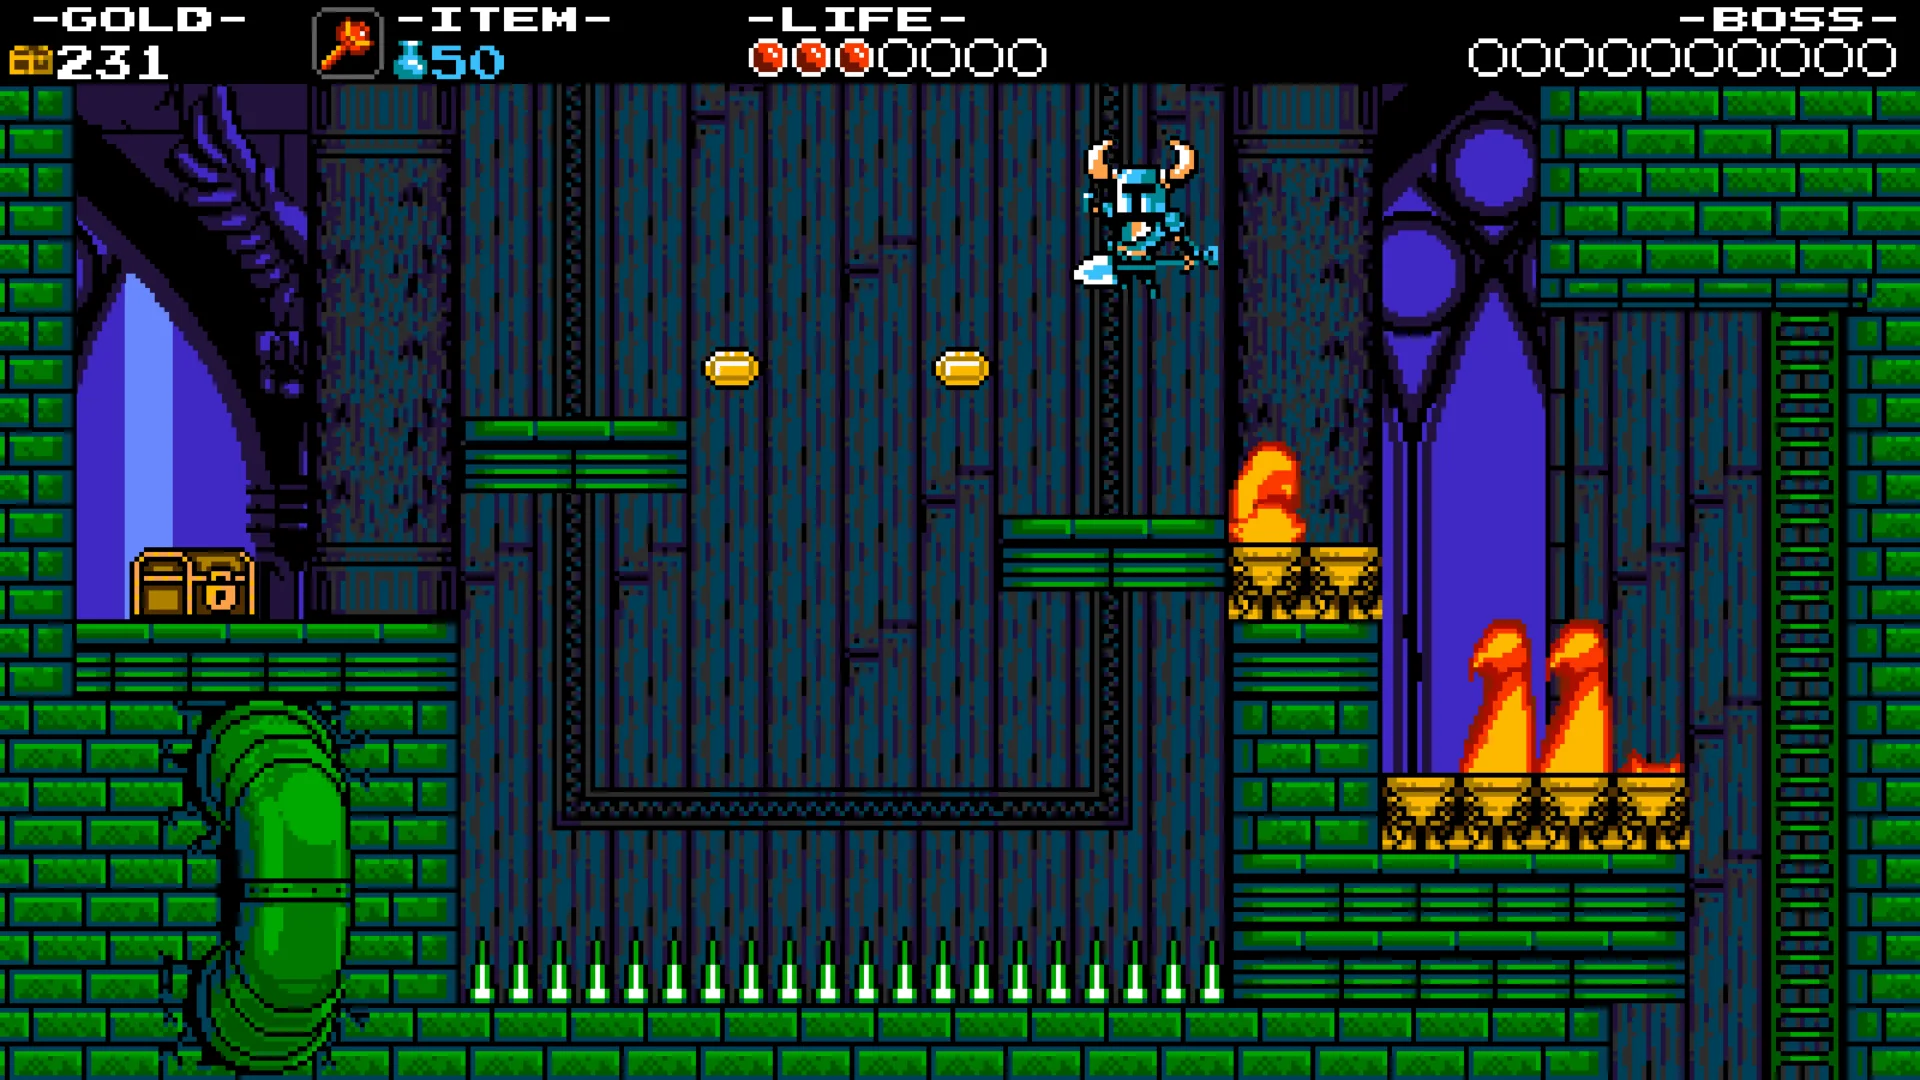
Official later-stage screenshot: Shovel Knight jumps above two narrow green platforms, a small flame, tall flames, a floor of white spikes and a ladder at right.
White spikes fill the bottom of this room. Identify the short green platforms and the ladder on the right before jumping; the orange flame on a platform is another hazard.
  1. Before moving right, scan from the bottom upward. In this image, white spikes cover the floor. The small green platforms above them are the safe route, but the orange flame on the right platform can still hit you.
  2. Jump to a platform with room to land rather than following a coin straight down. At the far right, a vertical ladder is attached to the wall; move next to it and press Up to climb. Do not use Shovel Drop while your landing spot is a spike floor.
  3. If you get hit, Shovel Knight flashes briefly and is invincible for a moment, according to the official manual. Use that short window to reach safe ground; do not count on it to protect you through a long row of hazards.

What happens when you die or leave a stage?

  • When life reaches zero, the knight drops one quarter of the gold he was carrying at the place he fell. On the next attempt, look for the dropped treasure bags and collect them if the route is safe. You do not lose the entire save file.
  • An intact lit checkpoint is where you restart in that stage. If you deliberately broke the last one for treasure, you restart at the earlier surviving checkpoint instead. That is why beginners should leave the glass globe alone.
  • If you choose RETURN TO MAP from the Pause Menu during a level, the original manual says everything earned in that level is undone. Do not use it as a quick save. Finish the stage or return to the map through normal completion when you want progress saved.
  • After clearing a stage or returning from a village, the game saves when you are back on the map. Check your current save slot before starting a new adventure; creating a different empty slot starts a different run.

If something still does not make sense

  • Cannot find yourself on the map: look for the tiny blue horned helmet on a green path, then read the black area-name panel at the bottom after moving to a square.
  • Cannot use a relic: open Sub Screen, highlight the relic you own, check its cost, close the panel and look at the ITEM square and blue magic number. An empty item square or too little magic explains many failed attempts.
  • Keep falling after a Shovel Drop: jump first, aim the white downward shovel at a solid target and check where you will land if it misses. Do not practice over spikes.
  • Checkpoint does not seem to work: it activates when you walk past and its flame lights. If you hit it until it breaks, it will not be your respawn point.
  • Buttons differ from A/B/SELECT/START: the examples come from the 2014 Nintendo manual. Open the game Options control page for your platform and match the actions Jump, Attack, Sub Screen, Use Relic and Pause.

Get Pixel Twelve's biggest stories first.

Add as a preferred source on Google