Pixel Twelve
Mario Kart 8 Wii U Drift Guide: Blue Sparks, Orange Sparks and Mini-Turbos

How To

Mario Kart 8 Wii U Drift Guide: Blue Sparks, Orange Sparks and Mini-Turbos

A visual beginner guide to drifting in the original Mario Kart 8 on Wii U, with Nintendo manual crops, a controller close-up and a Pixel Twelve stage diagram.

By Gertrude PhelpsGame: Mario Kart 8Verified Sep 28, 2026
Guide Type
How To
Last Verified
Sep 28, 2026

Guide details

Overview

A visual beginner guide to drifting in the original Mario Kart 8 on Wii U, with Nintendo manual crops, a controller close-up and a Pixel Twelve stage diagram.

Start here: this is the 2014 Wii U game

Mario Kart 8 is a racing game: you choose a Nintendo character and a vehicle, then drive around a course against other racers or the clock. A drift lets you slide around a bend while keeping speed. If you hold that slide long enough, colored sparks appear by the rear tires. Let go of the drift button when you see them and the kart shoots forward for a moment. This guide is for the original Wii U version released in 2014, not Mario Kart 8 Deluxe on Switch. You need the game, a Wii U and a Wii U GamePad or Pro Controller; no paid downloadable course is required.

The shortest answer is: hold A to accelerate, hold ZR as you steer into a corner, and keep ZR held until blue sparks appear. Release ZR for a short Mini-Turbo. If the corner is long enough, keep holding until the sparks turn orange, then release for a longer Super Mini-Turbo. Do not stare only at the buttons; the pictures and steps below show where to look on the course and on the kart.

Open a quiet course where you can practice

Crop from Nintendo’s Mario Kart 8 Wii U manual showing the yellow Single Player entry on the main-menu explanation chart.
On the game’s main menu, look for Single Player. This is a cropped official manual chart that identifies the menu wording, not a screenshot of today’s live menu.
  1. Launch Mario Kart 8 from the Wii U Menu. At the game’s main menu, choose Single Player, the mode for one person. The manual chart above shows its exact name. Do not choose the Online option printed in older manuals: Nintendo ended the original Wii U online service in 2024.
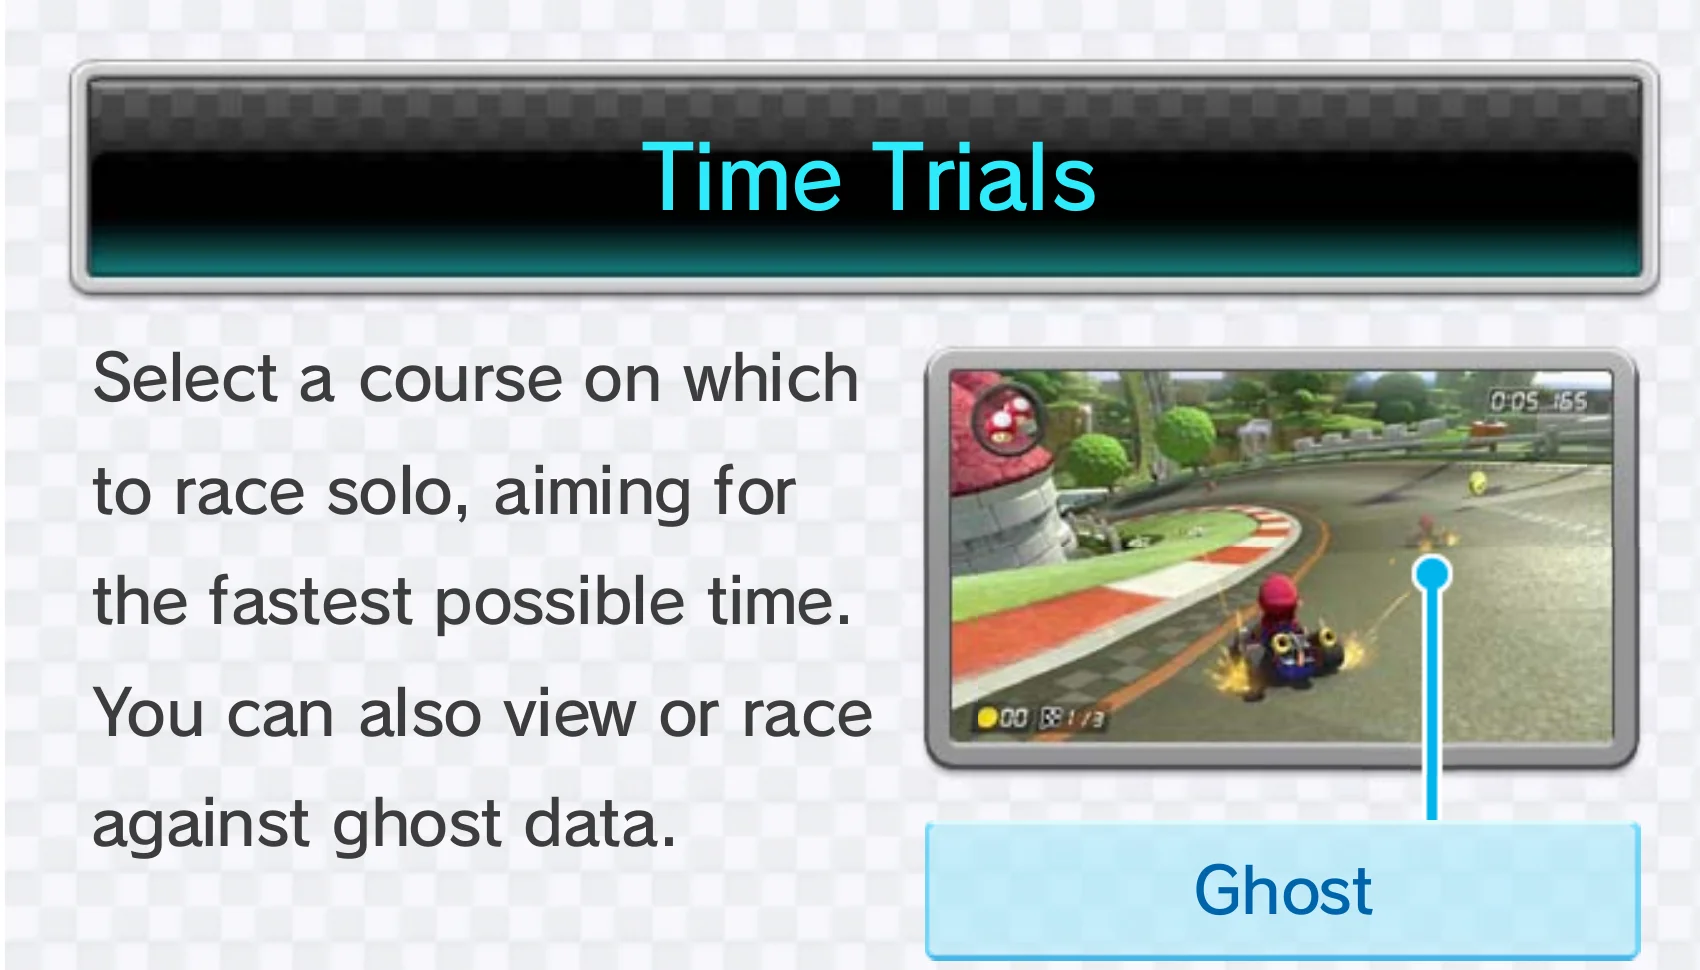
Official Mario Kart 8 Wii U manual section labeled Time Trials, with Mario driving a bend and a Ghost label pointing to another racer.
Choose Time Trials inside Single Player. Nintendo’s manual shows it as a solo run on a selected course, so you can repeat the same bend without a crowded race.
  1. Inside Single Player, look for Time Trials. Choose it, then select an available course. The first simple bends in Mario Kart Stadium work for practice, but any unlocked course with a broad corner is fine. A ghost is a recorded run that may appear for comparison; you do not need to beat it. Your goal for the first few laps is to see the rear-tire sparks clearly.
  2. At the start line, check that you can see your racer and the road ahead. The race camera follows behind the kart. On a bend, the red-and-white striped edge tells you where the inside of the road curves. Leave yourself room before the curb; you can drift without scraping the barrier.

If you have never used Time Trials, think of it as a practice lap with a clock. The timer is not a pass-or-fail test. You can drive the same section again and compare what happened when you released ZR early or late. Pick one corner with a clear straight after it, because that straight gives you space to feel the boost before the next turn. Avoid judging the result from a sharp bend followed immediately by a wall: even a correctly timed boost can be lost if the kart has nowhere to go.

Find A, ZR and the left stick on the Wii U GamePad

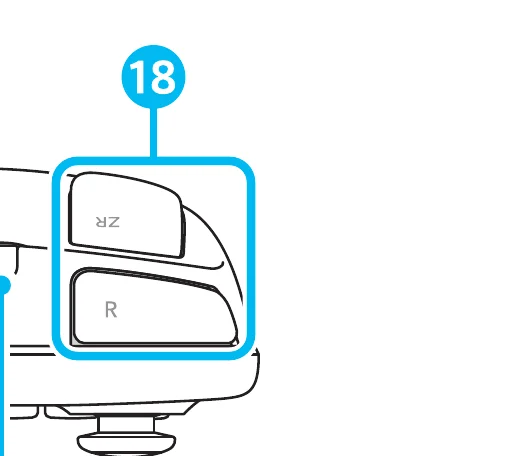
Close crop from Nintendo’s Wii U hardware manual showing the right shoulder of the GamePad: the upper button is labeled ZR and the lower button R; callout 18 marks the pair.
Hold the GamePad with its screen facing you. ZR is on the upper-right rear edge, above the R shoulder button. Nintendo labels this right-side pair with the number 18 in its hardware manual.
  1. Find the group of four face buttons to the right of the GamePad screen. A is one of those buttons; the game’s chart also lets you use Y for acceleration. Hold A while you drive so the kart keeps moving. The left stick is the small round stick to the left of the screen; move it toward the turn to steer.
  2. Find ZR before you start the corner. With the screen facing you, feel along the upper-right back edge where your right index finger rests. The close picture shows the printed ZR label above R. On the GamePad, Nintendo’s chart also lists R as a hop button, but this guide uses ZR so every step has one consistent button name.
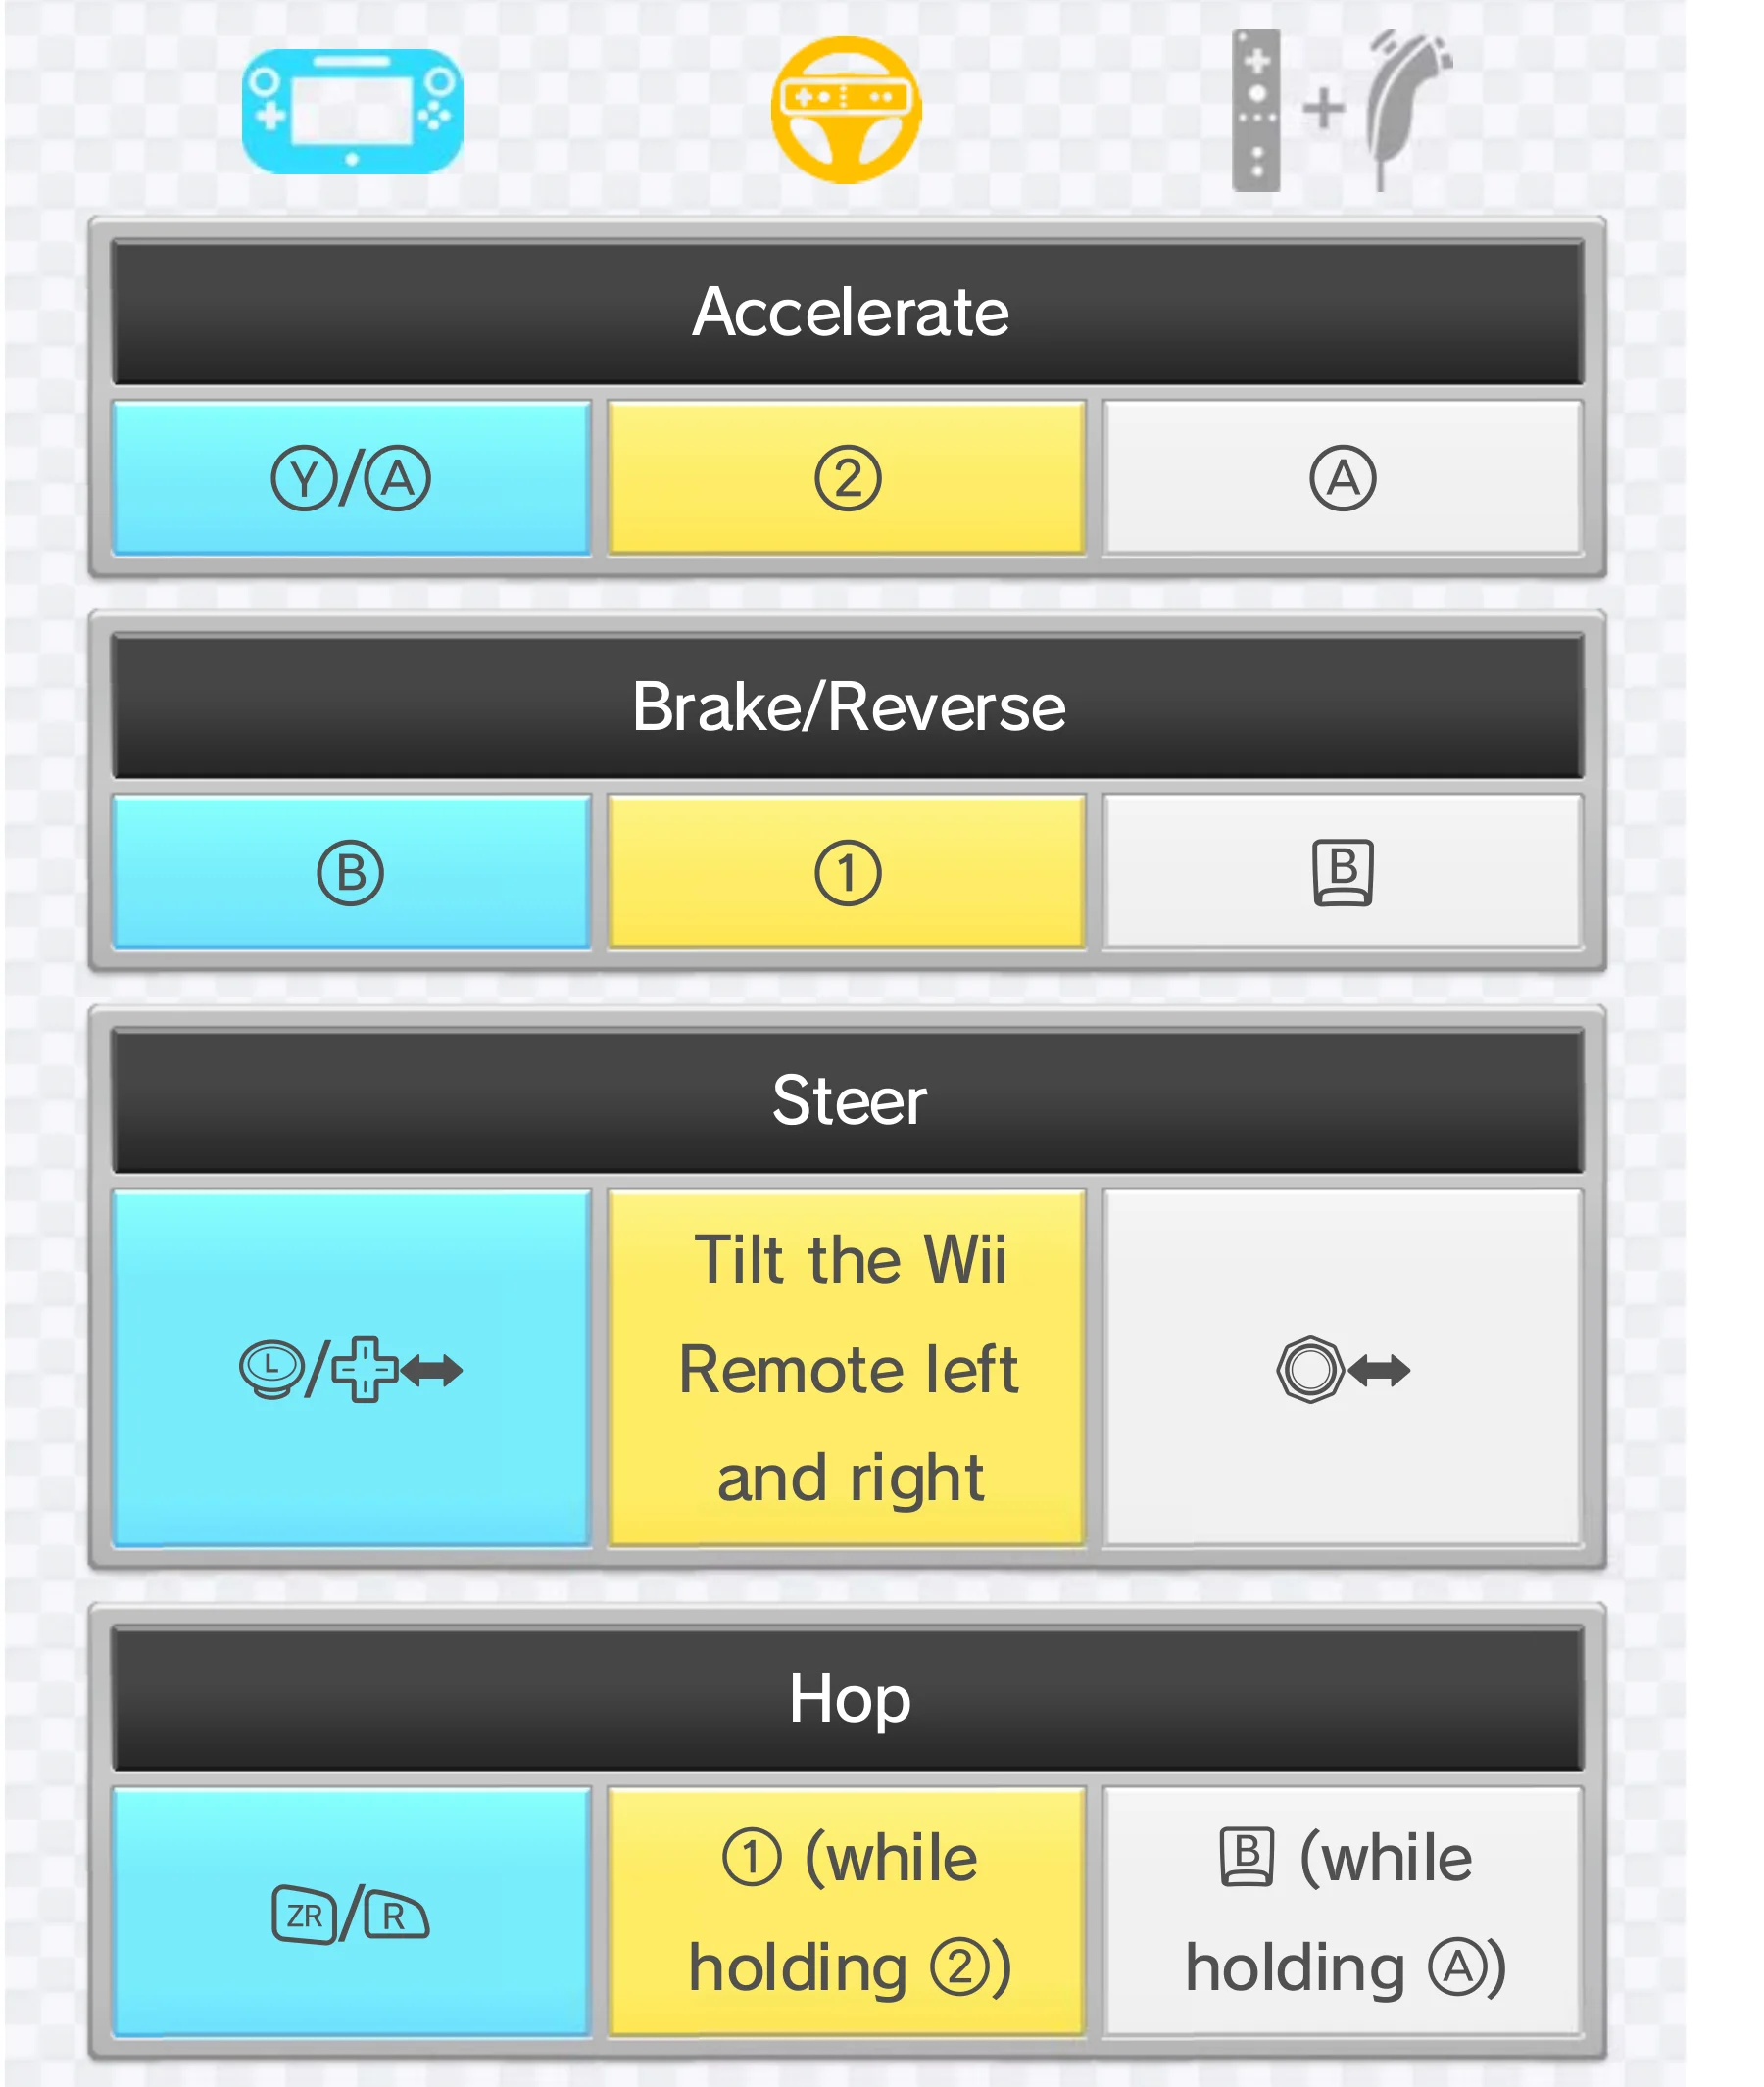
Crop from Nintendo’s Mario Kart 8 Wii U control chart with the turquoise GamePad column: A or Y accelerates, left stick steers and ZR or R makes the kart hop.
Read the turquoise first column beneath the GamePad icon. The yellow column is for Wii Wheel, so do not copy its “2” and “1” button prompts while holding a GamePad.

The Wii U Pro Controller uses the same game controls as the GamePad. A Wii Remote, Wii Wheel or a motion-control setting uses a different layout, as the other manual columns show. If your steering or hop does not match the chart, pause the game and check the control method before repeating the corner. The GamePad instructions here assume Stick Controls, not Motion Controls.

Do one drift from the entry to the exit

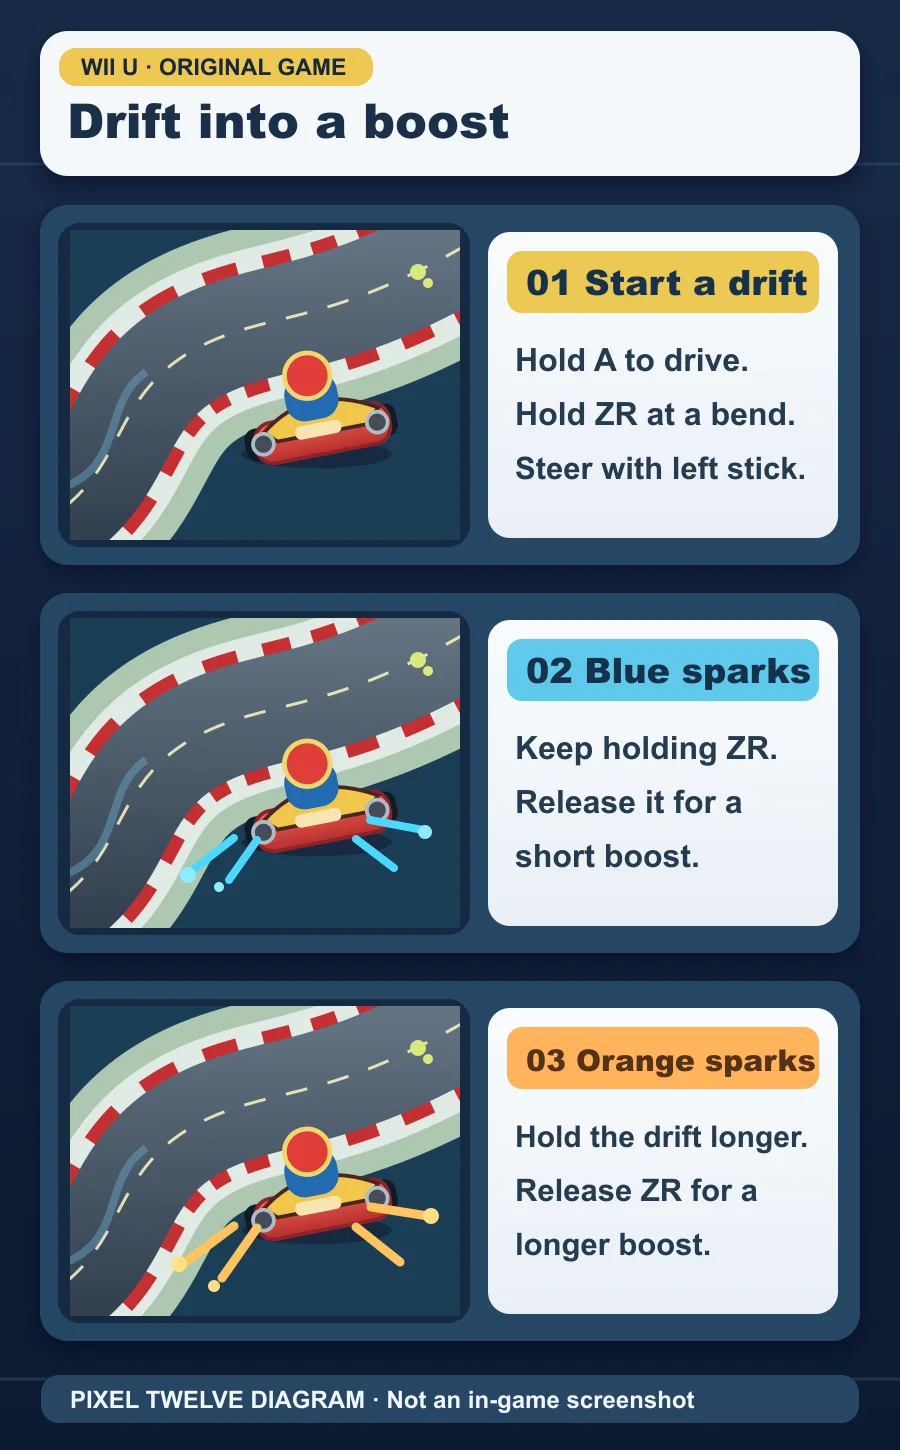
Original Pixel Twelve racing-track diagram with three padded panels showing a kart entering a bend, blue sparks and orange sparks; each panel tells the reader when to hold or release ZR.
Original Pixel Twelve diagram, not a game screenshot. Follow the three panels from top to bottom: start the slide, look for blue sparks, then decide whether there is room to wait for orange.
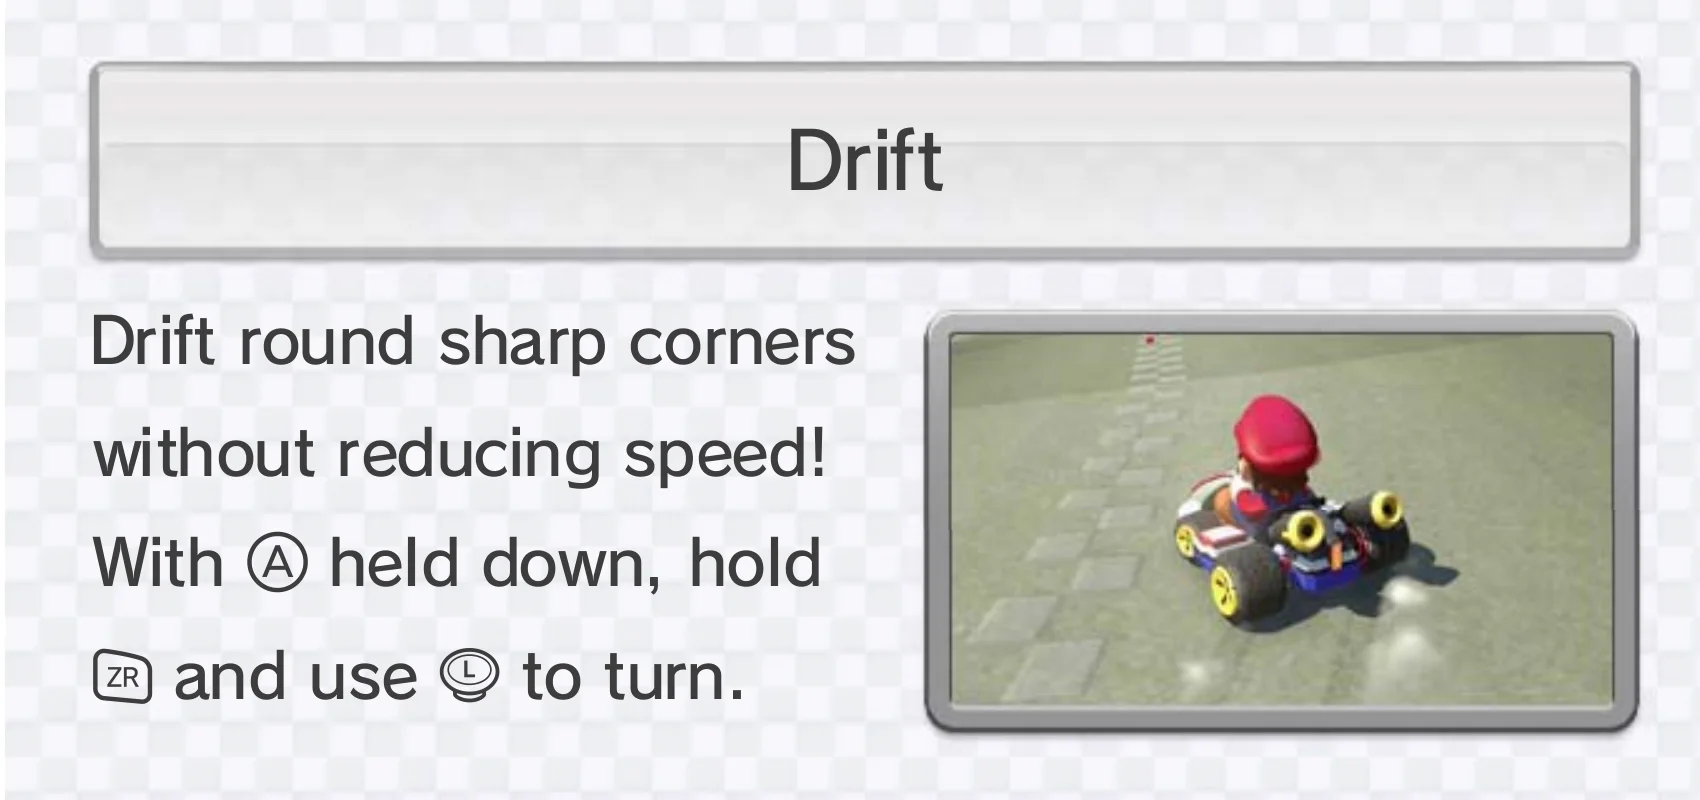
Official Mario Kart 8 Wii U manual crop showing Mario in a kart drifting and the written GamePad instruction to hold A and ZR while steering with the left stick.
Mario’s kart is angled relative to the road in Nintendo’s real game image. The hop at the start is normal; keep holding ZR while you steer through the bend.
  1. Approach a visible bend while holding A. Look a little ahead of the kart for the road edge and the direction the bend turns. Begin before the kart reaches the tightest point. A long, open corner is easier than a tiny kink because you have more time to build sparks.
  2. Push the left stick toward the bend and press and hold ZR. The kart makes a small hop first, then begins sliding with its nose turned into the curve. Do not tap ZR and immediately release it; you must keep it held to charge a Mini-Turbo. Keep holding A too.
  3. While ZR stays down, adjust the left stick so the kart follows the road rather than heading into the barrier. Watch both the road exit and the area beside the rear tires. The manual image shows the rear of Mario’s kart, which is the part you should check for sparks.

A drift is not just ordinary steering. You can steer around a bend by moving the left stick alone, but that will not charge the blue or orange burst described here. The important combination is a moving kart, a turn, and ZR held through the slide. After the small hop, the kart should look slightly sideways compared with the road. If it goes straight instead, check that you are still holding the stick toward the corner. If it spins toward the barrier, ease the stick back toward the center without letting go of ZR yet.

Blue sparks: release for your first Mini-Turbo

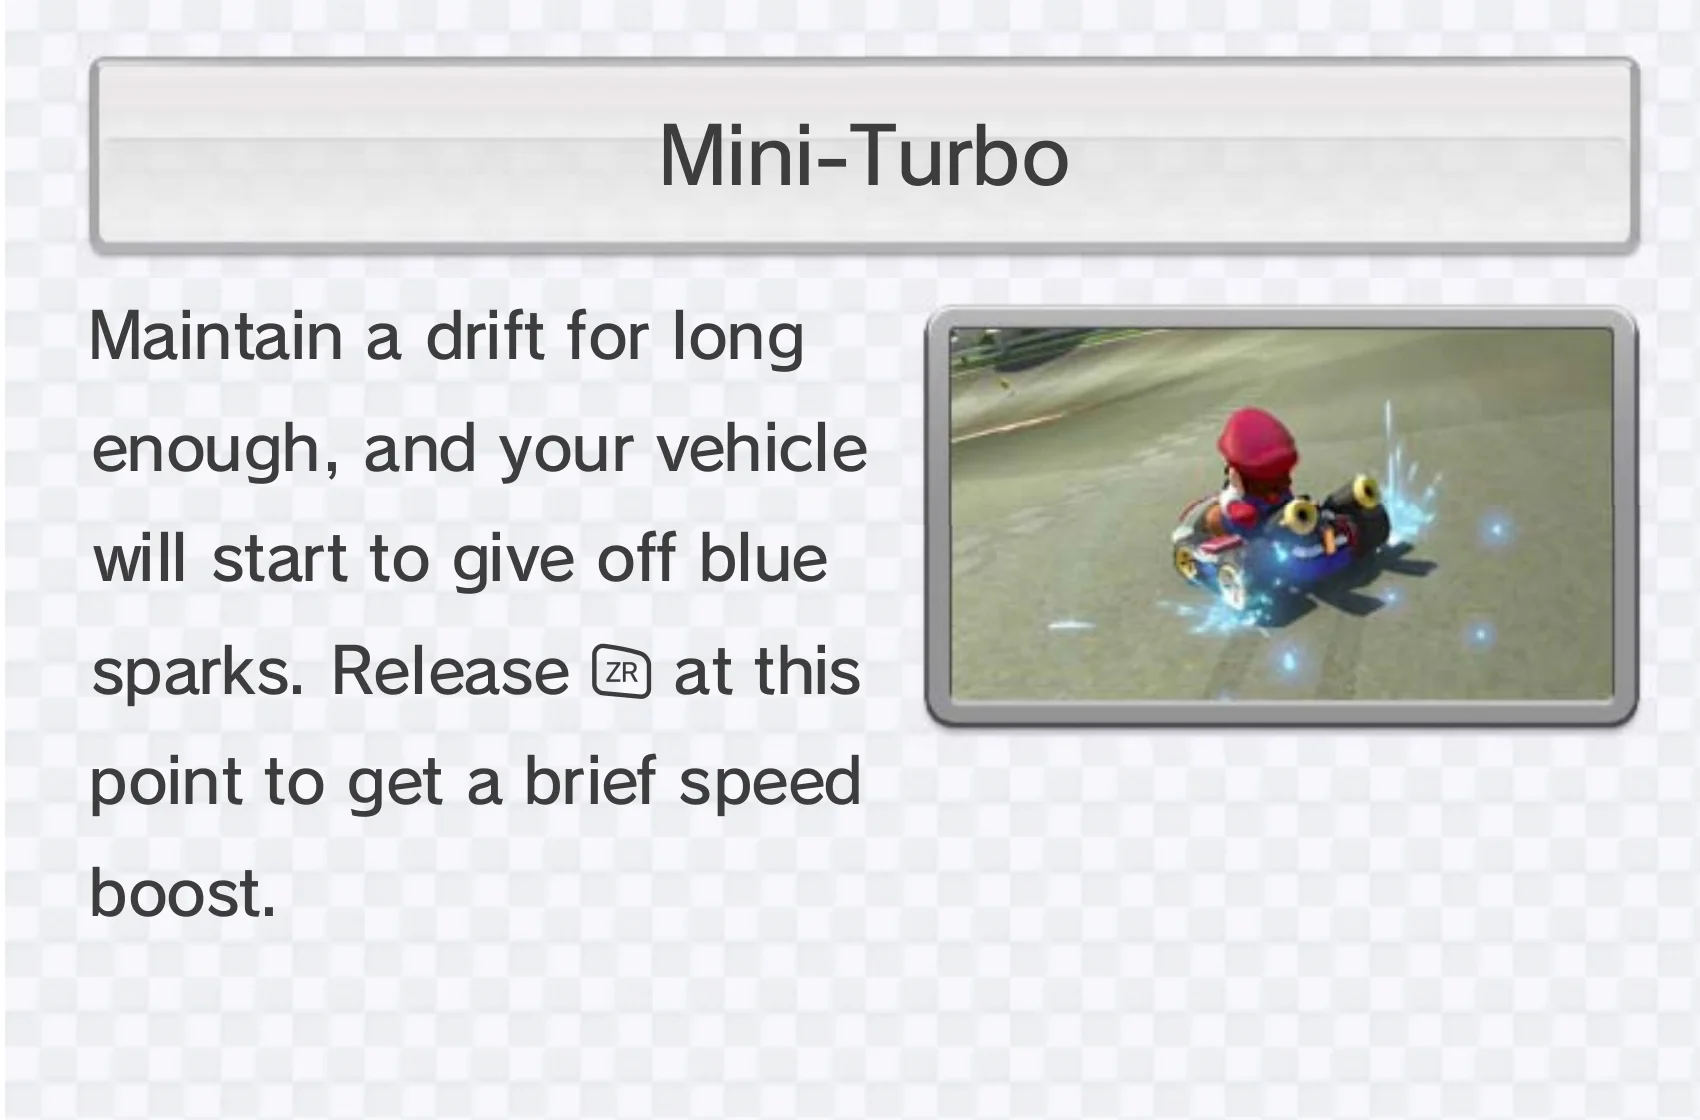
Official Nintendo Mario Kart 8 Wii U manual crop showing blue sparks beside Mario’s rear kart tires and the Mini-Turbo instruction.
The sparks are bright blue bursts around the rear wheels, not a permanent glow on the entire wheel. Release ZR while keeping A held to turn this charge into a short boost.
  1. Keep drifting until you see short blue bursts around the rear wheels. In the real Nintendo screenshot, they stick out from the tires like small blue flashes. If you see no flashes yet, keep ZR down and continue the turn for a little longer.
  2. Once the blue sparks show and the kart points toward a clear road exit, let go of ZR. Keep holding A. The kart straightens and accelerates briefly. That is the Mini-Turbo; you do not press an extra boost button.
  3. Repeat the same corner a few times. If you release ZR before the blue sparks, you end the drift without a charged boost. If you keep the stick turned hard after you release, you can still steer into the edge of the road and waste the speed. Aim toward the next straight as you let go.

You do not need to memorize a number of seconds for blue sparks. The charge depends on staying in the drift, and a crowded course makes counting unreliable anyway. Use the visible flash as your cue. It can be partly hidden by the kart on a tight turn, so glance at the wheel nearest the outside of the bend while keeping the road ahead in view. If you missed the color, finish the corner safely and try again on the next lap; there is no penalty for practicing this way in Time Trials.

Orange sparks: hold longer for the Super Mini-Turbo

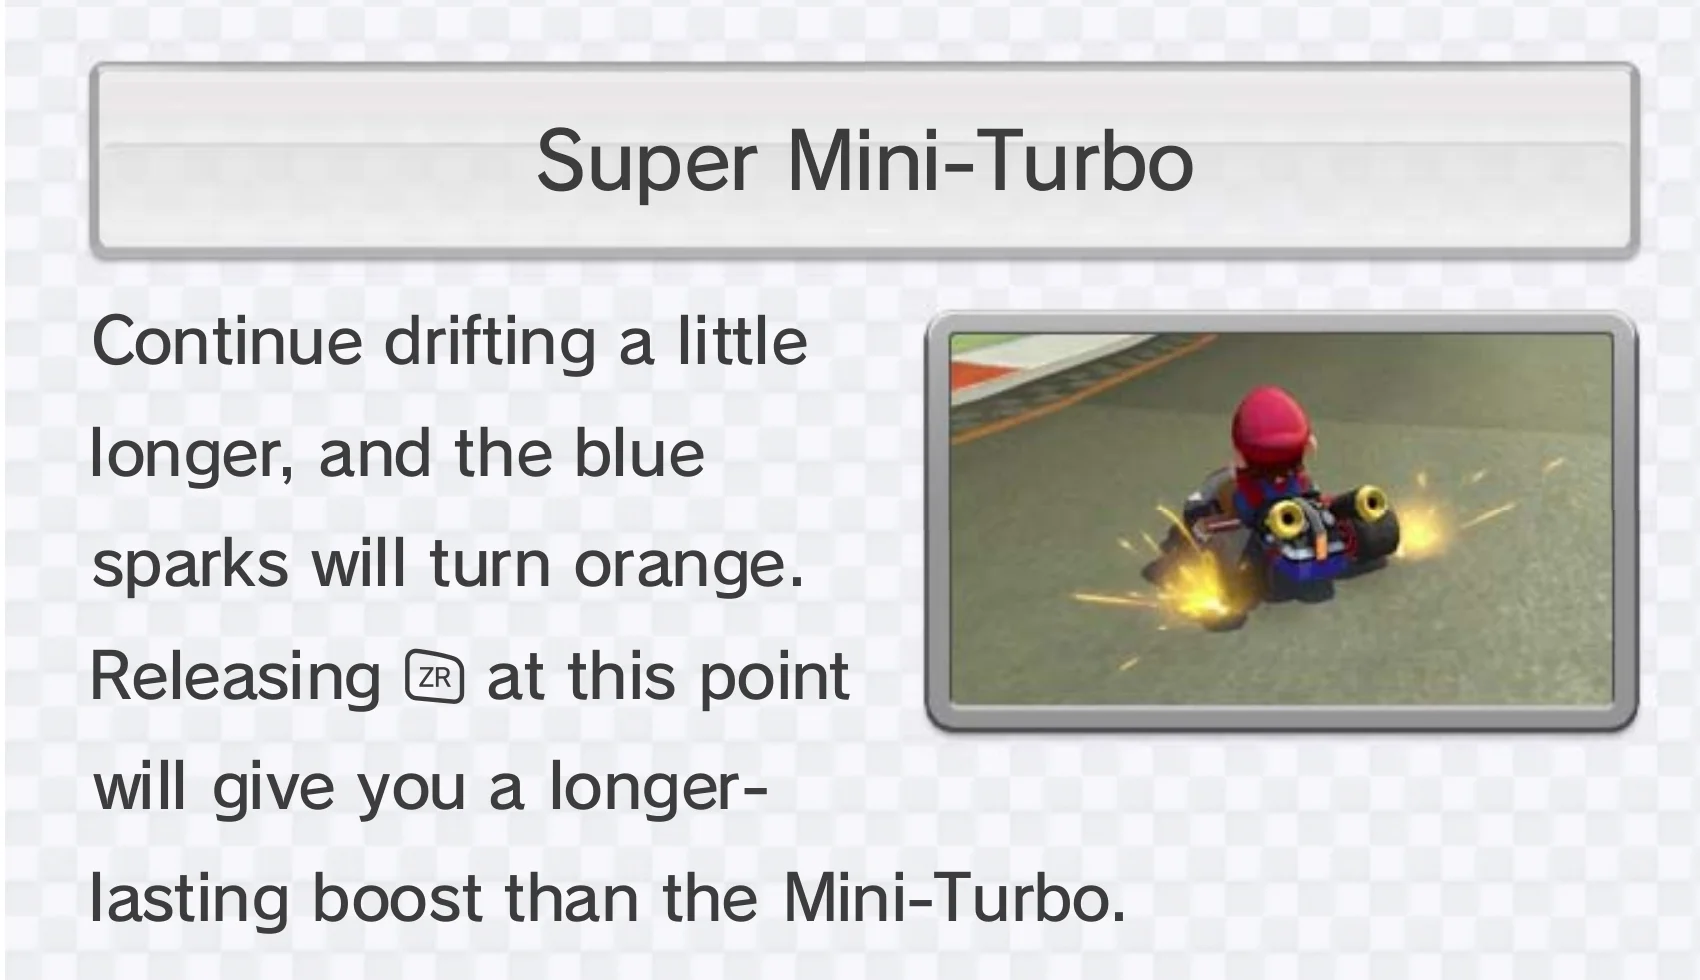
Official Nintendo Mario Kart 8 Wii U manual crop showing orange sparks around Mario’s rear kart tires and the Super Mini-Turbo instruction.
Orange sparks are the second stage in the original Wii U game. On a long enough corner, keep ZR held past blue, wait for orange, then release for a longer boost.
  1. Try a broad bend after you can reliably get blue sparks. Hold A and ZR, steer through the curve and watch the same rear tires. Do not release at blue this time. Keep the drift controlled so you still have road ahead.
  2. When the blue sparks change to orange, release ZR and steer toward the exit. The orange Super Mini-Turbo lasts longer than the blue Mini-Turbo. If the road straightens before orange appears, take the blue boost rather than forcing the kart into a wall just to wait for a color change.

You may see guides talking about a pink or purple Ultra Mini-Turbo. Nintendo introduced that third spark stage in Mario Kart 8 Deluxe on Switch. The original Wii U game taught here has blue and orange stages, so waiting for pink in this version will only make the turn worse.

Do not confuse a blue wheel with blue drift sparks

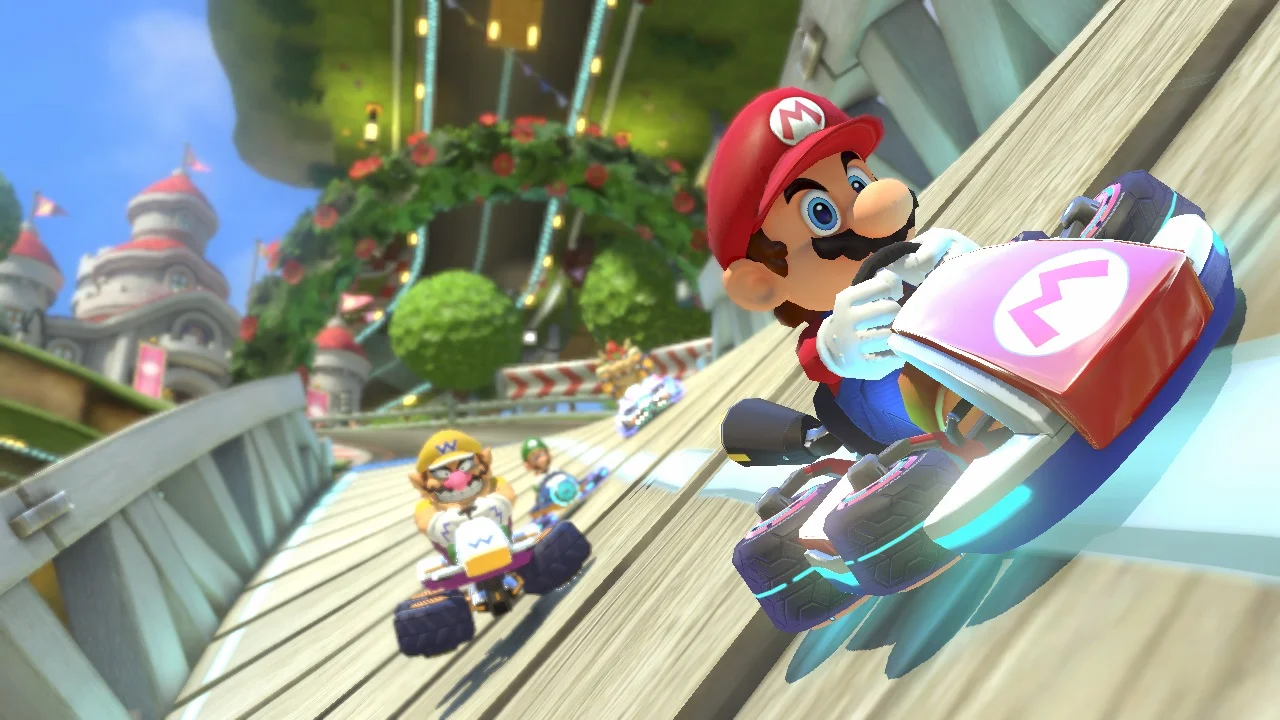
Official Mario Kart 8 Wii U gameplay screenshot showing Mario driving sideways on an anti-gravity wall with blue-glowing wheels.
Here the whole wheel glows blue because the kart is on an anti-gravity section. That glow can remain while the road runs up a wall. Mini-Turbo sparks are smaller bursts by the rear tires during a held drift.
  • Kart hops, but there are no sparks — you may have released ZR too soon. Begin at a longer corner, keep A held, turn the left stick and hold ZR through the slide. The hop is only the beginning of the drift.
  • You see blue but get no boost — check whether you are looking at anti-gravity wheels instead of rear-tire sparks. In the official wall screenshot, both wheels glow blue for the anti-gravity route. The Mini-Turbo image above shows sharp blue flashes beside the rear tires. Release ZR only after those flashes appear.
  • You hit the wall while waiting for orange — start the drift a little earlier and use less steering at the exit. A safe blue boost is better than losing speed in a crash. You can practice the longer orange charge after you can hold a steady line.
  • Your controller buttons do not match — make sure you are using the Wii U GamePad or Pro Controller with Stick Controls. The Wii Wheel and Wii Remote columns in the official chart use different button names. The game’s pause menu can switch each controller’s control method.

A five-minute lap to make it stick

  1. Run the same Time Trials course three times. On the first lap, identify one broad bend and only aim to start a controlled slide with A, ZR and the left stick. Do not worry about your finish time.
  2. On the second lap, watch the rear tires on that same bend and release ZR at blue. You should feel the brief acceleration as you exit. If no blue flashes appear, keep the next drift held a little longer.
  3. On the third lap, test whether the bend is long enough for orange. If it is, hold through blue and release at orange. If it is not, take blue and choose a longer bend elsewhere. The useful skill is making the boost on the road, not chasing a color at any cost.

You can do all of this offline. Nintendo ended the Wii U game’s online features in 2024, but Single Player and local play remain separate from that service. When you have the timing, try it in a Grand Prix race: the same spark colors work, but opponents and items give you less room to stare at the wheels. Keep your eyes on the road first and use the sparks as a quick check.

Get Pixel Twelve's biggest stories first.

Add as a preferred source on Google