Pixel Twelve
Frostpunk Beginner Guide: Find Workers, Read the Heat Map and Understand the Screen

How To

Frostpunk Beginner Guide: Find Workers, Read the Heat Map and Understand the Screen

A visual Frostpunk guide for first-time city leaders: the generator, resource bar, workplace staffing, heat map, Book of Laws, event choices and scouting.

By Sophie MitchellGame: FrostpunkVerified Sep 25, 2026
Guide Type
How To
Last Verified
Sep 25, 2026

Guide details

Overview

A visual Frostpunk guide for first-time city leaders: the generator, resource bar, workplace staffing, heat map, Book of Laws, event choices and scouting.

Start here: what the game asks you to do

Keep the people warm, fed and able to work. Frostpunk is a city-building survival game. The giant tower in the middle is the generator; it is not a decorative landmark. Your decisions about coal, housing, workplaces and laws affect whether people can make it through the cold.

This guide shows where to look on the PC version of the original Frostpunk. The official screenshots come from different saves, including cities much older than yours. Your numbers, buildings and weather will not match them exactly. Use each picture to recognise a button or panel, not as a route to copy. If you are playing on console, look for the equivalent on-screen control; button prompts will differ.

The easiest way to avoid panic is to pause, read the top bar, and solve one visible problem at a time. A new building needs people to staff it. A glowing generator does not mean every home is warm. A decision window deserves a read before you click an option. The sections below show how to check all three.
1. Recognise the generator and pause the clock

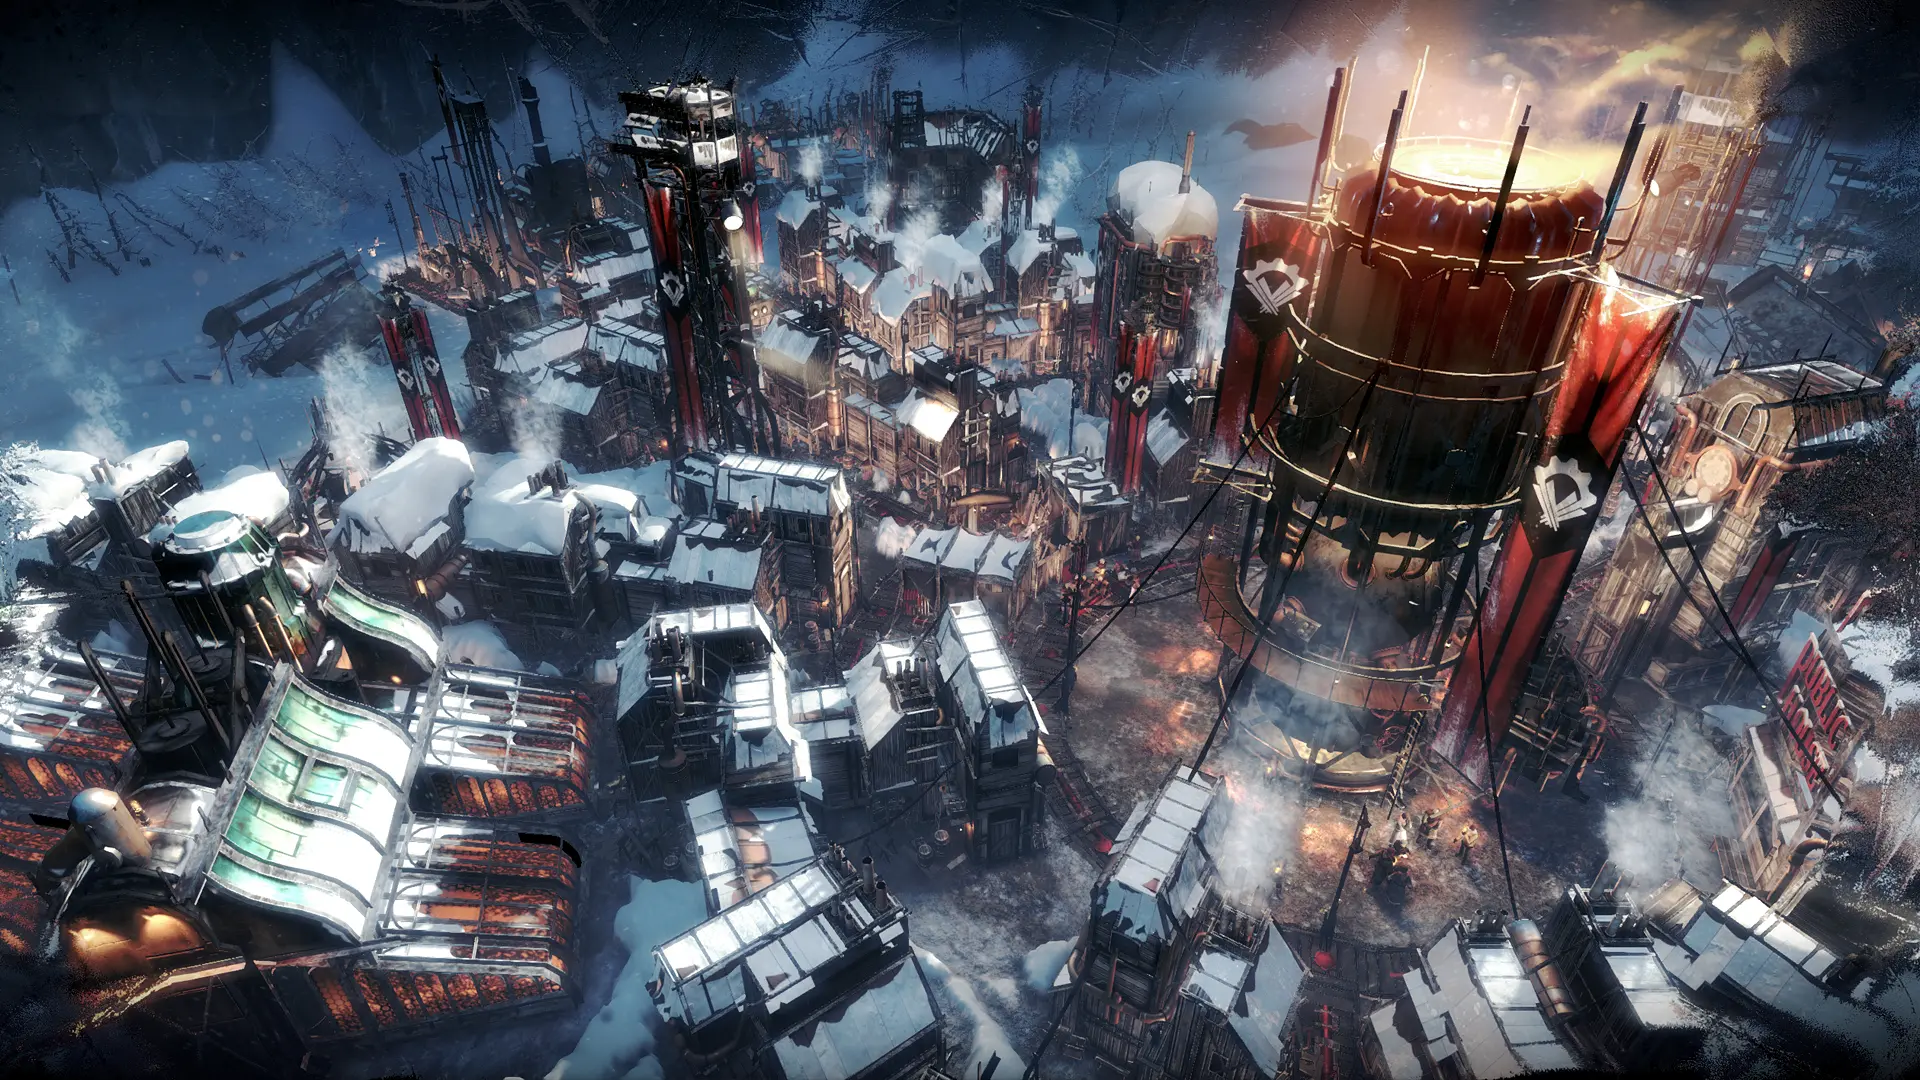
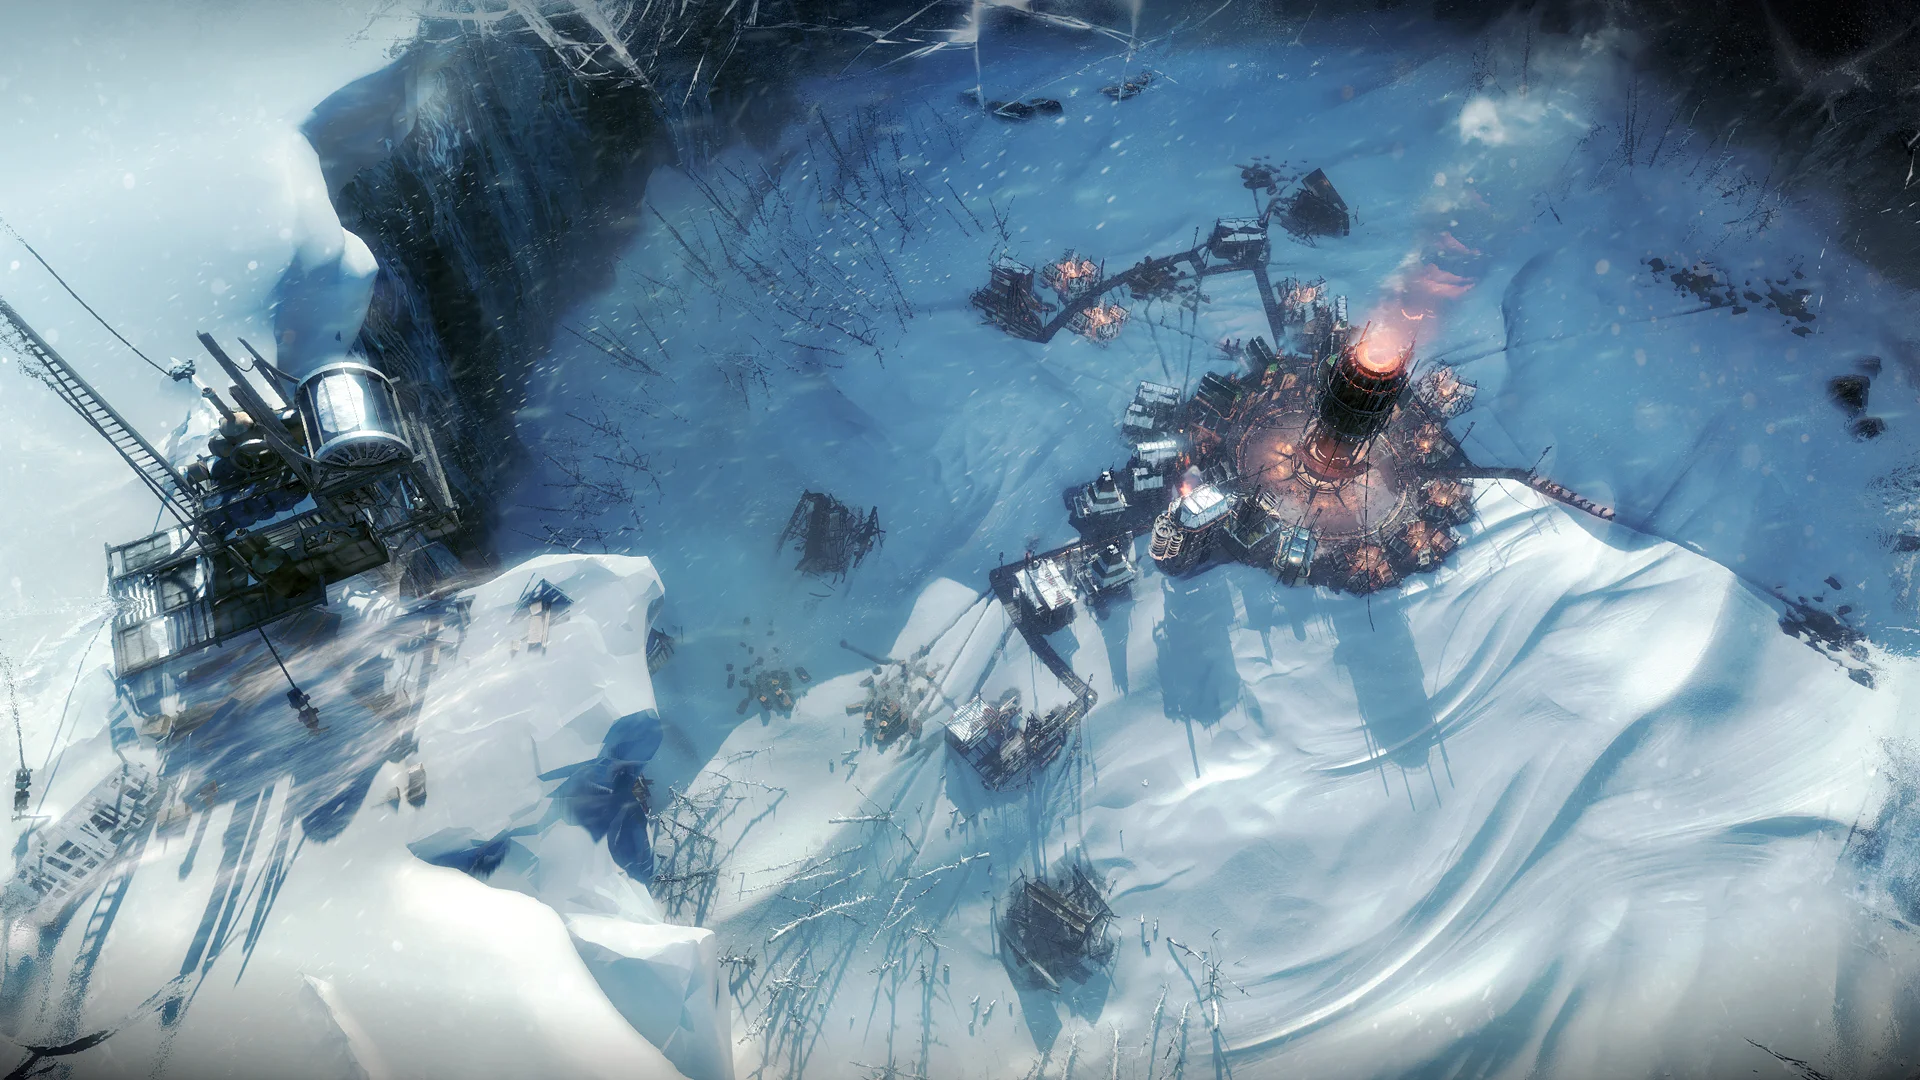
Official Frostpunk screenshot of a small snowy settlement with the tall, glowing generator near the centre-right.
The tall cylinder with the orange-lit top is the generator. This is the city’s heat source, not an ordinary workplace.
  1. When the city opens, find the tallest cylinder near the centre of the crater. Its orange top is easier to spot than the small tents around it. Select it if you need to inspect its status; a building panel will open. Read whether it is on and what it needs before changing anything.
  2. Find the clock controls across the top, just left of the large temperature display. The two upright bars mean Pause. Select Pause while you look around. The neighbouring arrows let time move again or faster. Keeping time paused while you inspect the screen costs you nothing in a normal scenario.

Do not confuse the generator with a workplace. You do not assign a team to that central tower the way you assign people to a resource pile or a building. Its important resource is coal. If the coal number is falling faster than you replace it, your source of heat is at risk.

2. Read the screen before spending supplies

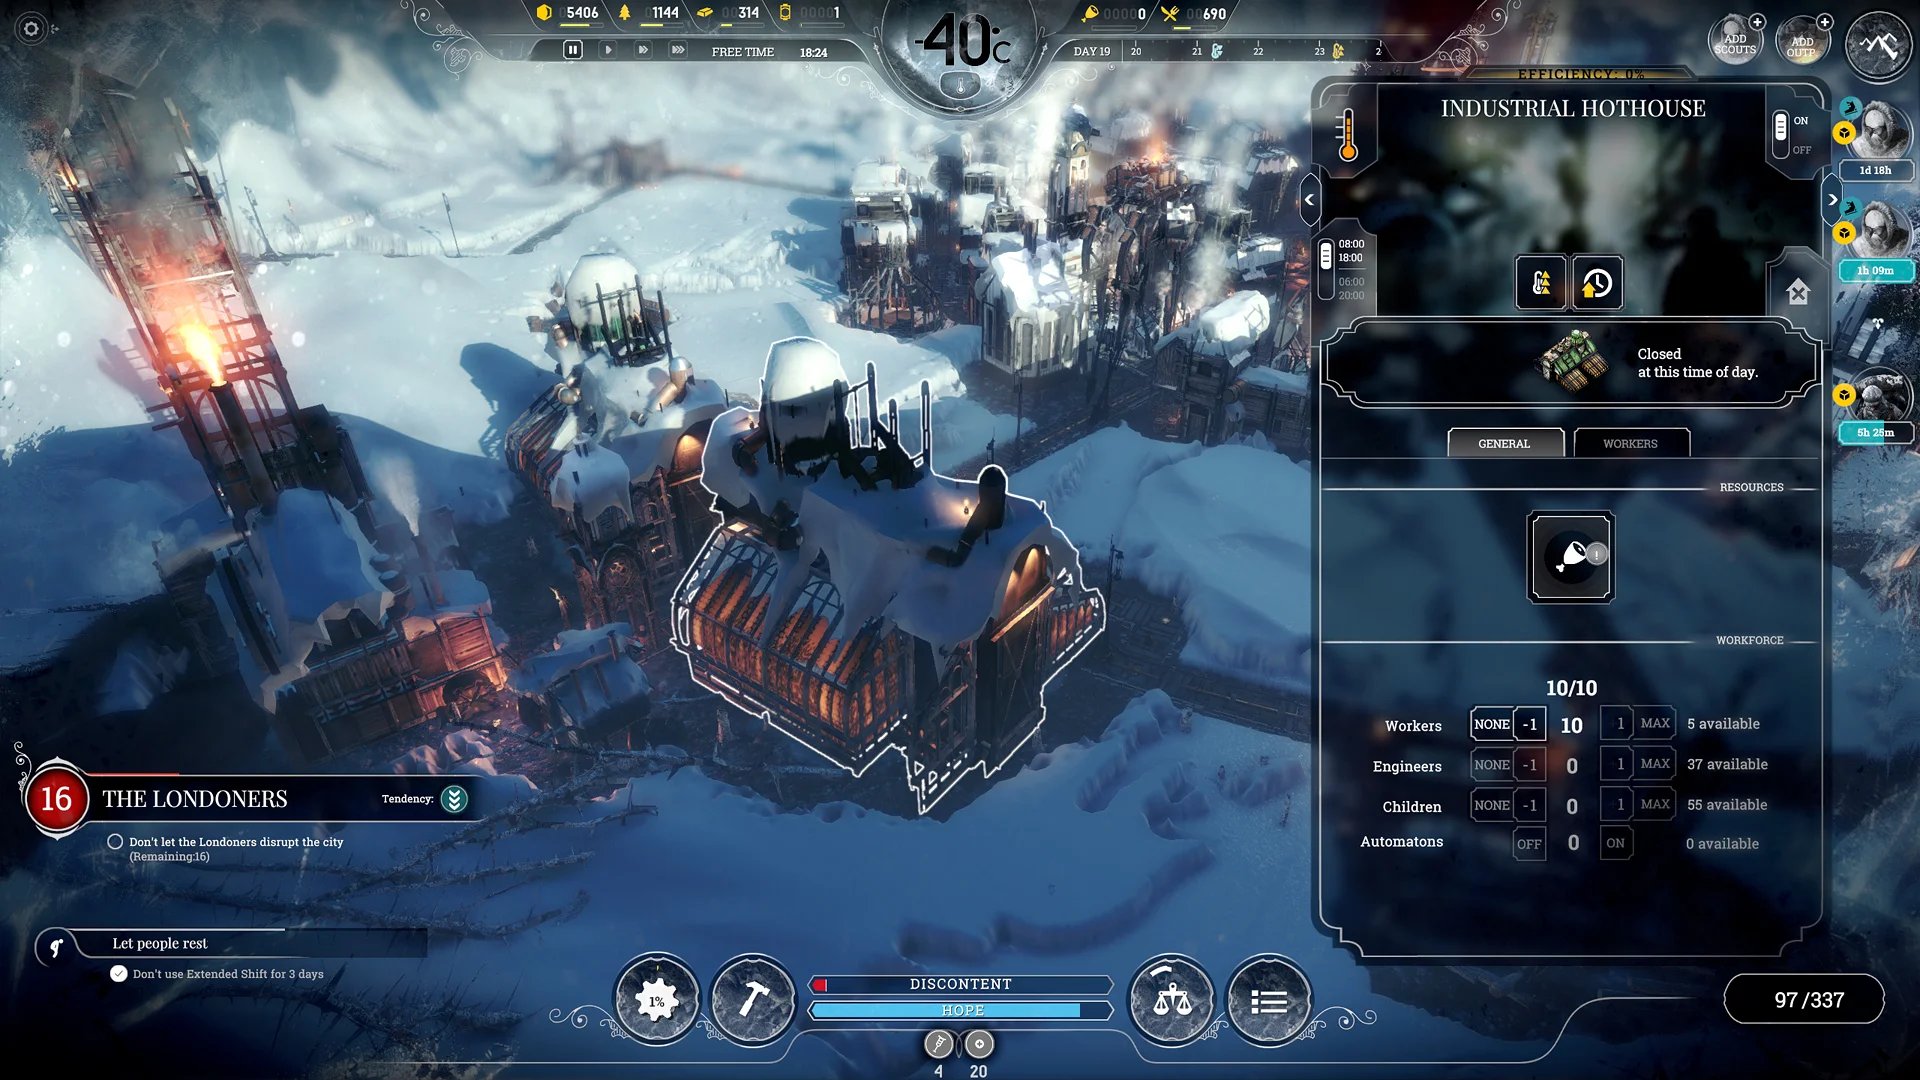
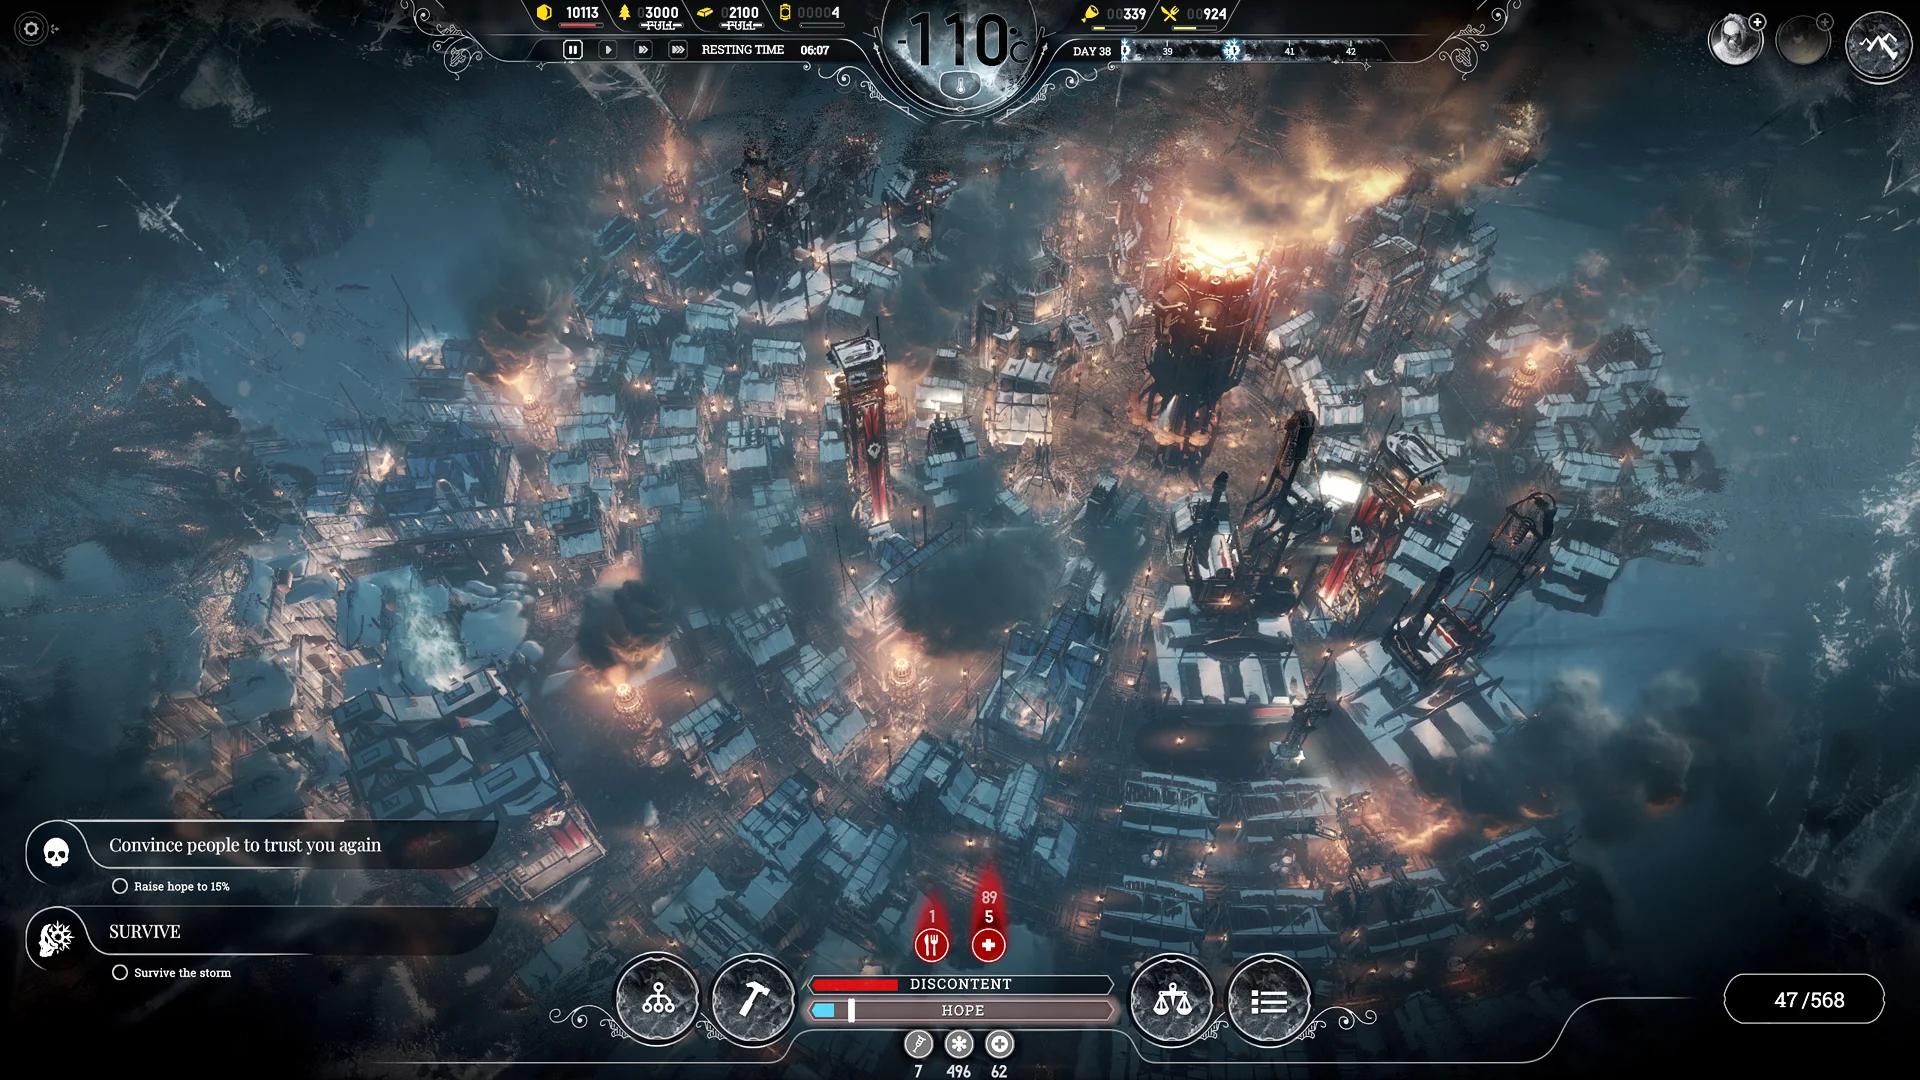
Official Frostpunk city interface: resources across the upper bar, a large temperature and day display above, and hope, discontent and build controls below.
In this later-game screenshot, supplies line the top, the current cold and day are above the city, and the build and law controls are along the bottom.
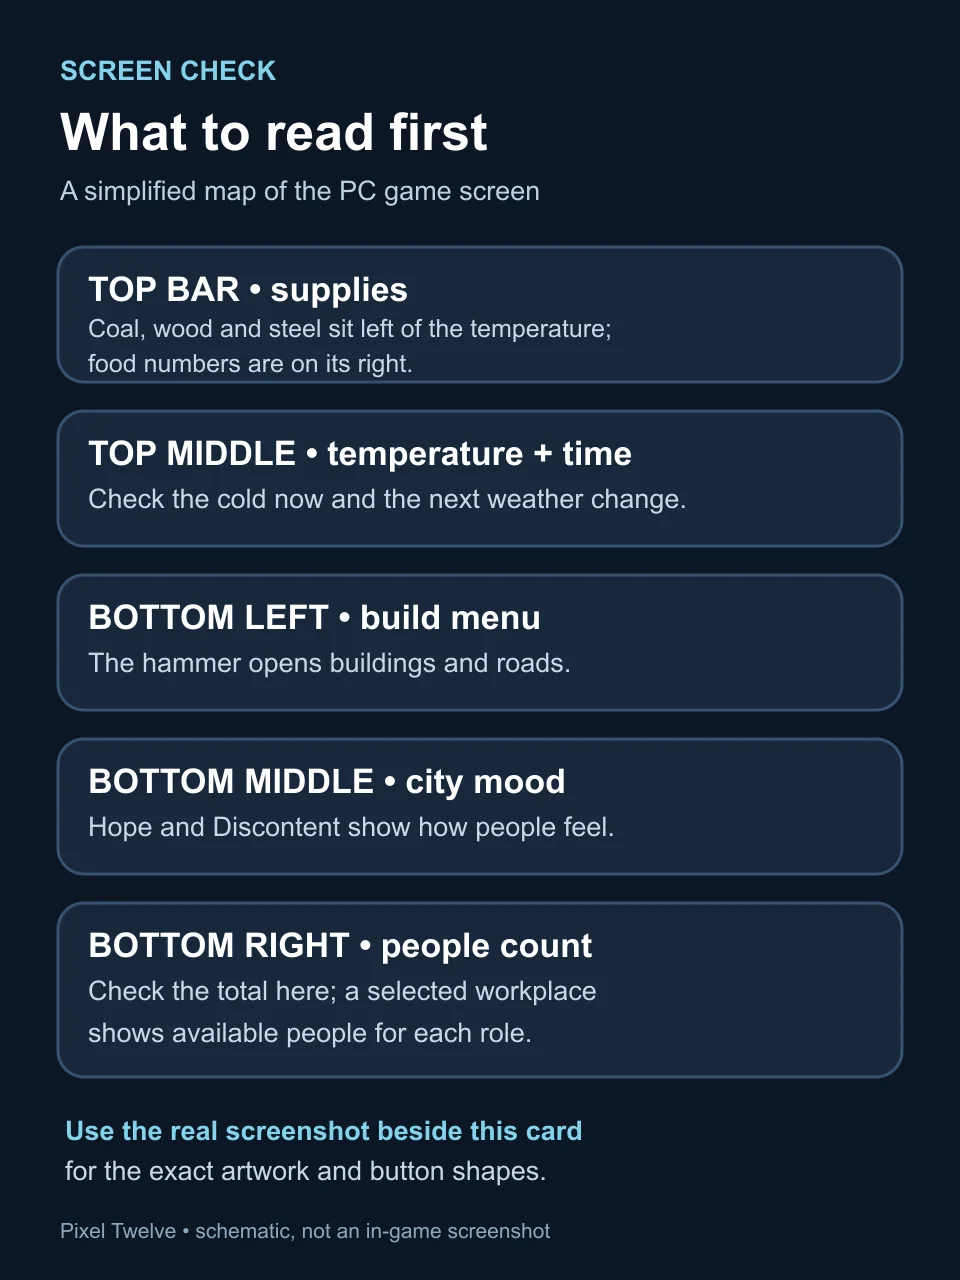
Original Pixel Twelve portrait diagram naming the top-bar supplies, temperature, build menu, mood bars and people count zones of the Frostpunk PC screen.
Schematic reading aid, not a screenshot. Compare its labelled zones with the official game image above.
  1. At the top of the screen, look left of the large temperature circle for coal, wood and steel. Coal keeps the heat going; wood and steel are used to build and research. To the right of the temperature are food numbers. Steam cores, where available, are a separate scarce resource; do not mistake them for a pile of wood or coal.
  2. In the top middle, read the current temperature, the day number and the small forecast markers for coming days. A lower number means colder weather is approaching. Check the forecast before you spend everything on a building that does not help with the next cold spell.
  3. Along the bottom, the hammer opens the build menu. The red Discontent and blue Hope bars show how the city feels. The people count at the lower right gives a broad population view; the exact free workers and engineers are shown inside a selected workplace panel.

The numbers in the screenshot are from an established city and are not a target for your first day. What matters now is learning where each number lives, then checking whether your next action uses people, building materials or coal.

3. Give a resource pile or workplace a real team

Official Frostpunk screenshot with an Industrial Hothouse selected and its right-side panel showing Workers, Engineers, plus-one and Max controls.
The selected building is outlined. Its panel opens on the right; the Workers area lists each role and the number still available.
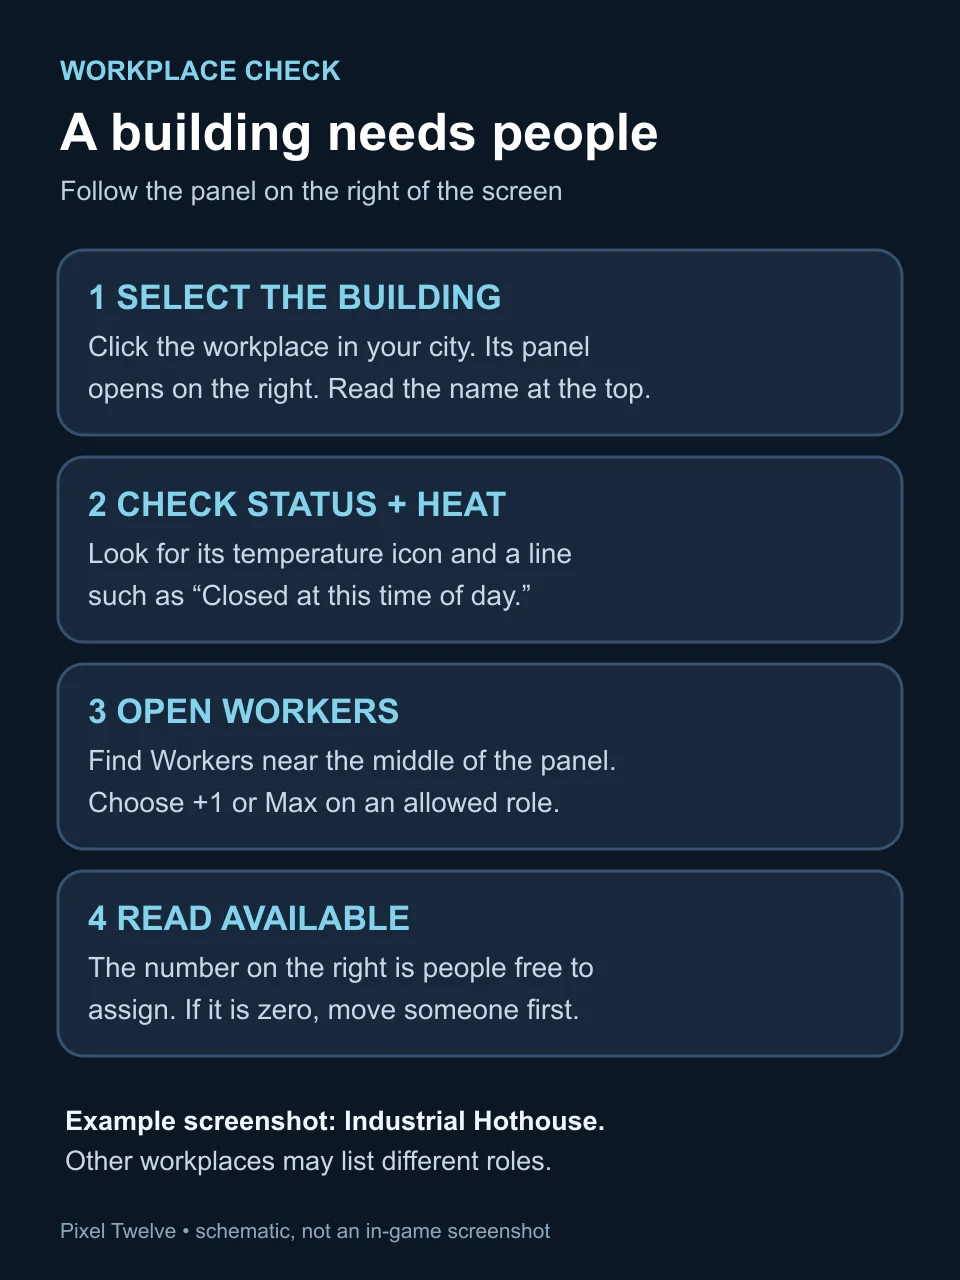
Original Pixel Twelve portrait diagram showing four checks in a workplace panel: select, status and heat, Workers controls, available count.
Schematic checklist beside the real Industrial Hothouse panel. The same idea applies to other workplaces, but available roles can differ.
  1. Find a resource pile or a workplace on the city map and select it. If you have just built something, click the building itself. Its name appears at the top of the panel on the right. The example here is an Industrial Hothouse from a much later city, not a building you need at the start.
  2. Read the status line before adding anyone. This picture says “Closed at this time of day,” so the staff will not be producing food at that hour even though the building exists. The thermometer icon near the panel top shows its temperature. If a workplace is too cold, more workers alone will not solve that problem.
  3. Find the Workers tab or workforce area in the right panel. The rows show roles that building can accept. Choose +1 to add a person or Max to fill the available slots, then read the employed count and the “available” number beside that row. If available is zero, find another staffed building and move people from it, or wait for new people to join the city.

The Hothouse screenshot has 10/10 workers even though it is closed for the night. That is a useful distinction: staffed is not the same as currently producing. On a fresh run, look for a resource pile such as coal or wood and assign people there first. After unpausing, watch whether the matching number at the top begins to rise during work hours.

4. Use the heat map to find the actual cold spots

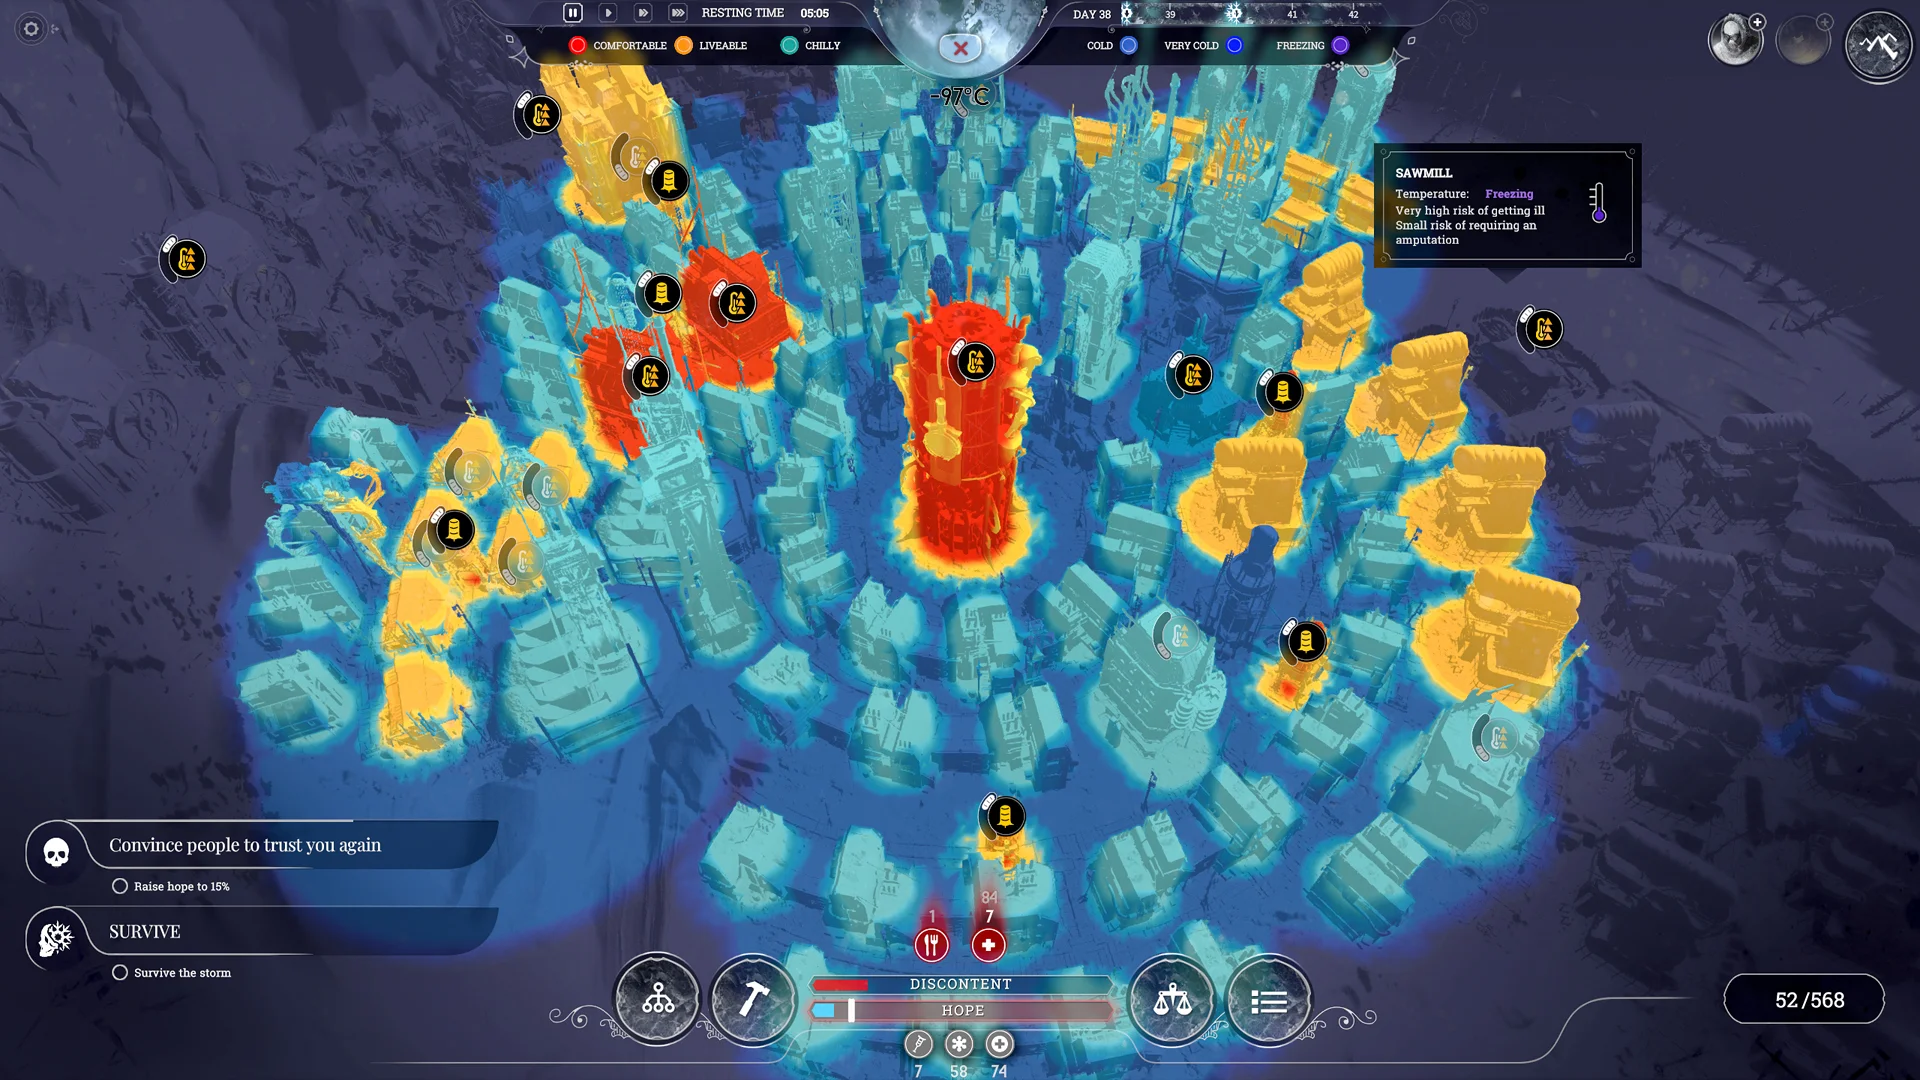
Official Frostpunk heat-map screenshot with orange and yellow warm areas, blue cold areas and a temperature legend across the top.
The colour key is above the city. In this example the selected Sawmill’s tooltip says Freezing and warns of illness and amputation risk.
  1. Look just below the large temperature number at the top centre for the small thermometer control. Select it to switch from the normal city view to the colour-coded heat map. In the screenshot, an X appears there while the heat map is open. Use that X to return to the normal view.
  2. Read the legend across the top rather than guessing from colour alone. It moves from Comfortable and Liveable through Chilly and Cold to Very Cold and Freezing. Hover over a particular home or workplace to read its own label. The selected Sawmill in this picture reports Freezing and explains why working there is dangerous.
  3. Start with occupied homes and workplaces marked cold. See whether they sit inside a heated zone around the generator or a Steam Hub, and whether the generator has enough coal. A later upgrade or a heater may help a workplace, but first identify the building that is actually cold. Do not build or switch on every heat source without checking the coal cost.

The colours in this example are from a late cold spell, so your first-day city may be warmer. The useful habit is the same: open the map after the weather changes, after building farther from the centre, or when sickness rises. The heat map shows the problem more clearly than the city view alone.

5. Open the Book of Laws, but read the whole choice

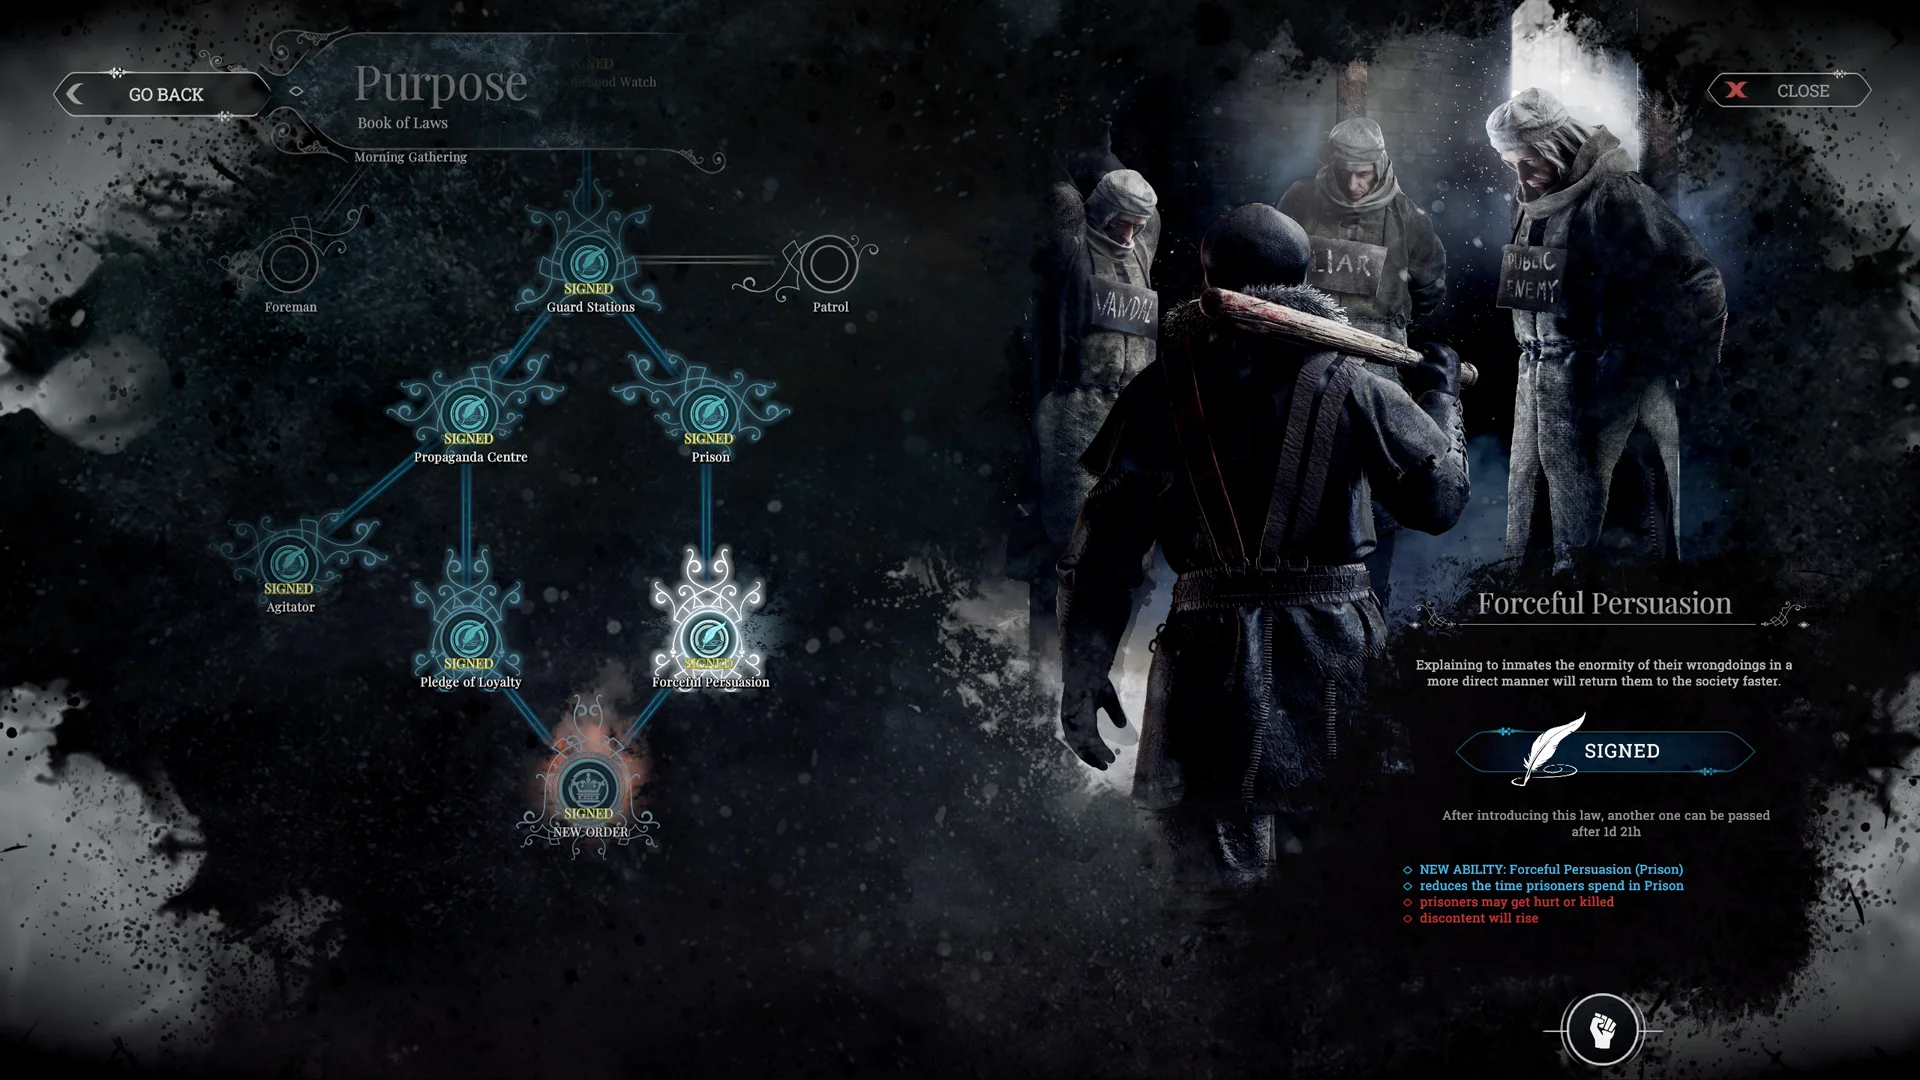
Official Frostpunk Purpose Book of Laws screen showing a connected law tree on the left and the selected law’s effects on the right.
This is a later Purpose branch, not a recommended first law. The right-hand text lists both benefits and harms.
  1. From the city view, find the scales icon in the bottom row near the Hope and Discontent bars. Select it to open the Book of Laws. Find the law name in the tree and read its full description on the right before signing.
  2. Look for both the useful effect and any cost. The illustrated late-game law has blue benefit lines and red warning lines. Your first available laws may be different, but the rule is the same: do not pick from the title alone. Once signed, a law can change the way the city works and how people react.

There is no one perfect first law for every player and scenario. Ask what is hurting your city now: missing shelter, sick people, food, or too few working hours. Choose a law that helps that problem, then watch the mood bars at the bottom after it takes effect. The screenshot is for learning the layout, not a suggestion to pursue the pictured branch.

6. Understand an event before promising a fix

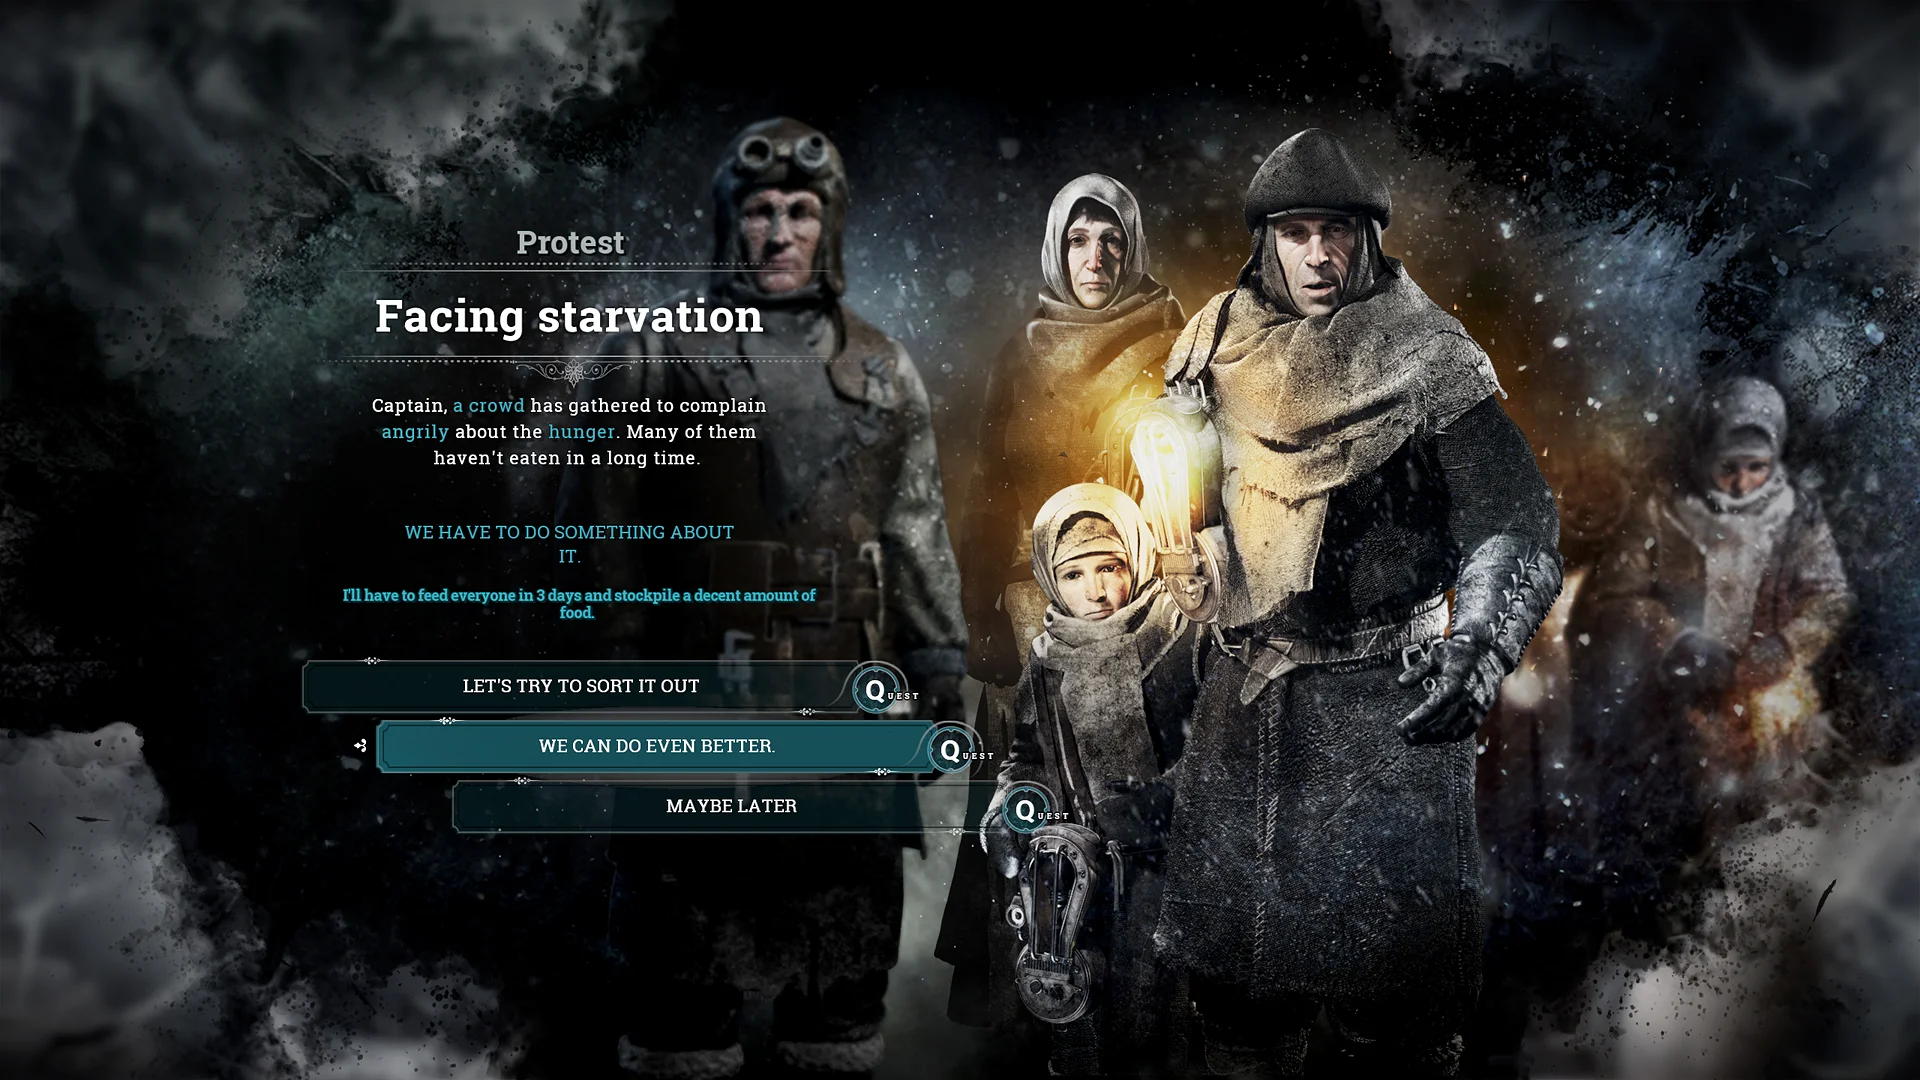
Official Frostpunk event window titled Facing starvation, with a crowd at right and three response buttons below the text.
Read the event title, the complaint and the smaller promise text before choosing a response. This is a later example, not a first-day event.
  1. When an event covers the city, read the large heading and the complaint below it. This one is about hunger. Then read the smaller line above the buttons: it describes what the chosen promise asks you to do and how long you have.
  2. Compare the buttons before choosing. A generous promise may ask for more supplies in less time. “Maybe later” postpones an answer but does not create food. Choose the response you can realistically support with the people and resources shown on your top bar.

After closing the window, look at the task list on the left of the city view. If you promised something, that list is where you can track it. The event is not just story text: it may create a real job for your city.

7. Recognise scouting when it becomes available

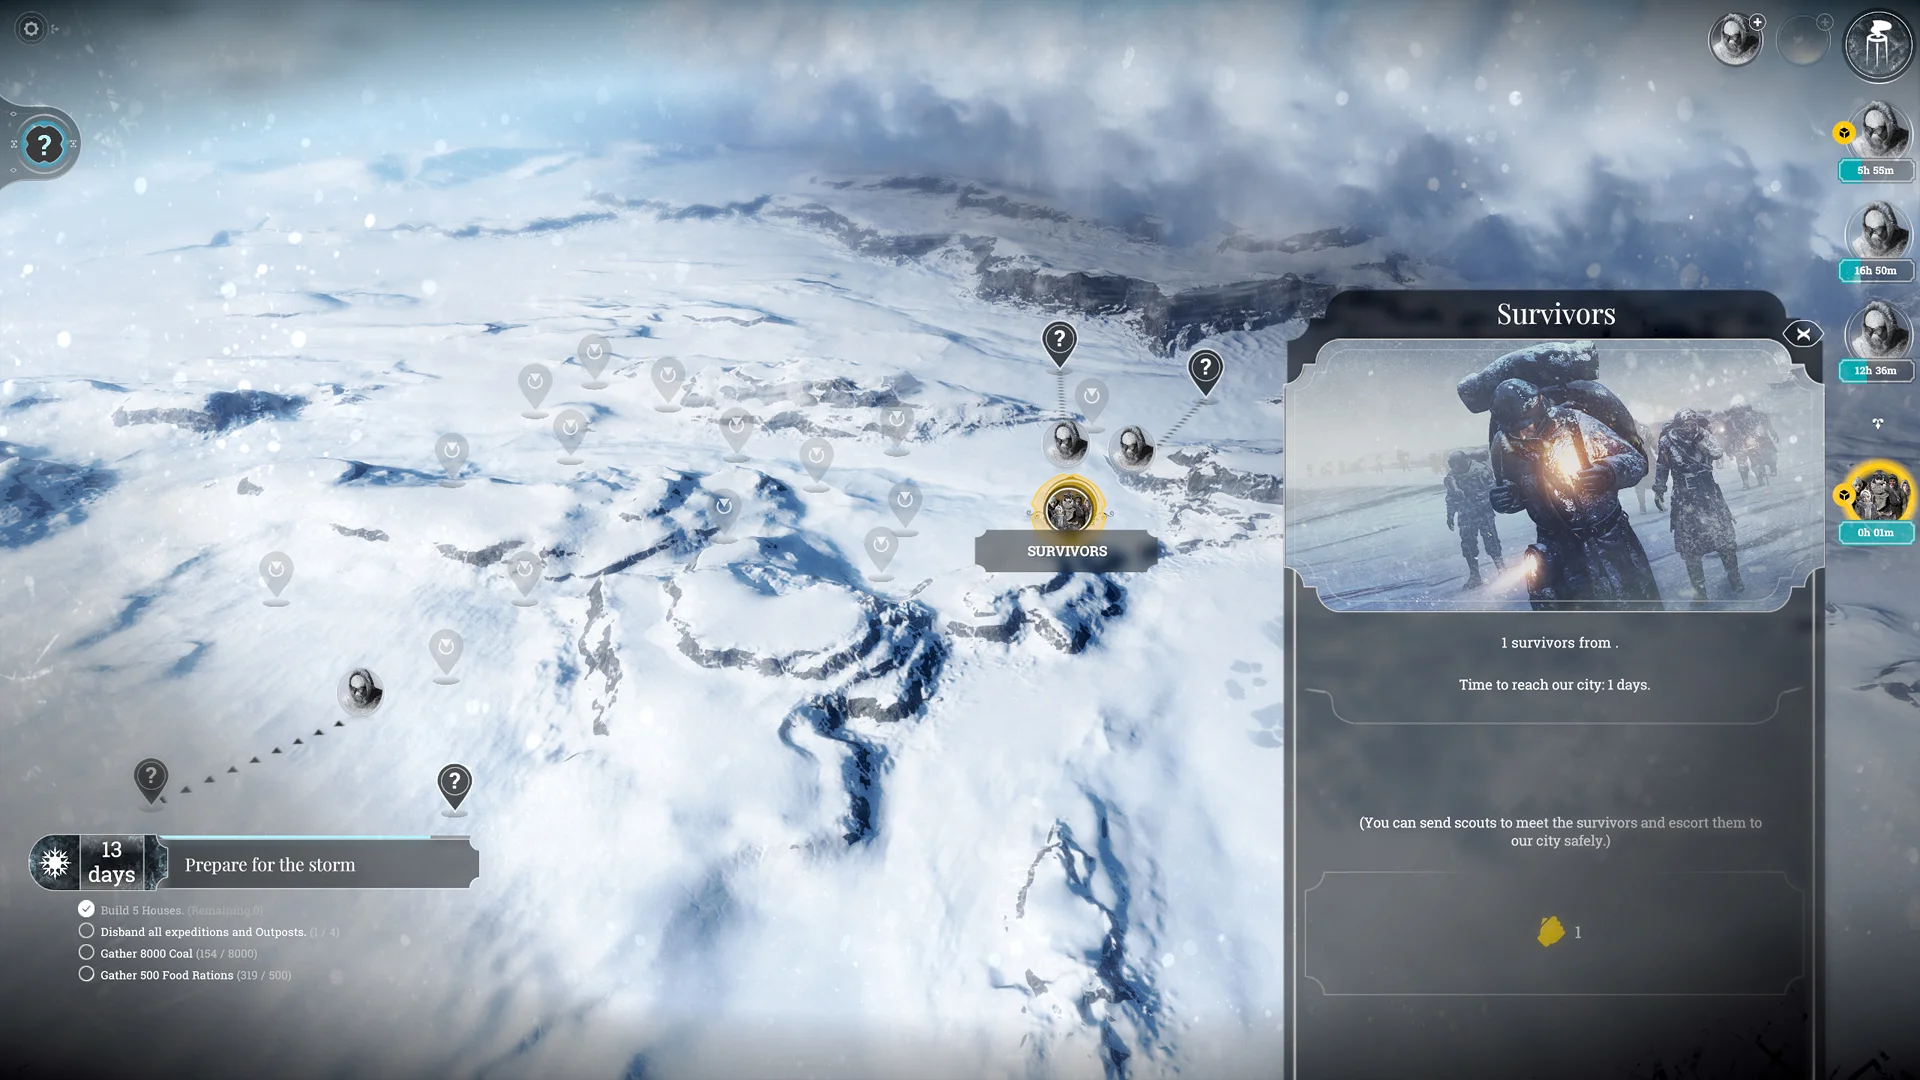
Official Frostpunk frozen-world exploration map with location markers, scout portraits and a Survivors encounter panel on the right.
On the exploration map, the markers are places scouts can investigate. The selected Survivors panel gives the next decision.
  1. Later, once you have a Beacon and scouts, return to the city view and look for the large round mountain/map button at the upper right. It is visible in the full city screenshot in section 2. Select it to open the snowy exploration map below. Look for circular location markers and your scout teams along the right edge. A question mark marks somewhere not yet explored.
  2. Select a marker to read what your scouts found. In this screenshot, the selected marker is Survivors. The panel on the right explains who is there and how long travel back to the city will take. Do not send a team on automatically: check what they are carrying and whether they need to return first.

If you are on day one and cannot find this screen, nothing is wrong. Scouting comes later. The immediate jobs are learning the top bar, staffing gathering work and checking heat. This section is here so the map makes sense when the city asks you to explore.

Quick checks when the city stalls

  • Coal is falling: select a coal pile or coal workplace, check its available workers and status, then watch the coal number during work hours. A lit generator still needs fuel.
  • A new building does nothing: select it. Read the Workers tab, current staff and status. It may be unstaffed, closed for the hour, too cold or short of an input resource.
  • People keep getting sick: open the thermometer heat map and inspect occupied homes and workplaces before placing more medical buildings.
  • Food is not improving: check whether the food-producing building is staffed and open. Raw food and prepared rations are not the same number on the top bar.
  • A law or event feels confusing: pause first. Read every blue benefit, red warning, deadline and task-list entry before committing.

Frostpunk becomes easier to read when you treat each alert as a question about the screen: which resource, which building, which group of people, and which temperature? The picture next to each step shows where to begin looking. You do not need to memorise every system before your first city starts moving.

Get Pixel Twelve's biggest stories first.

Add as a preferred source on Google